Testing Font Scaling For Accessibility With Figma Variables

Building a true culture of digital accessibility in a company is a mission of resilience and perseverance. It’s not difficult for the discourse on accessibility to fall into the usual clichés. Accessibility is very important for people. The accessibility of digital products and services promotes inclusion. Or even, all professionals on the teams should be involved in accessibility work. Of course. No one in their right mind will dispute any of these statements (I hope).

However, the second part of this conversation, which very few companies reach, is “how?” How do we make this happen in the midst of the day-to-day work of digital transformation teams, which, as we all know, are immersed in demanding scripts, often with a very limited number of people available? Most of the time, the choice ends up being between “we do this” and “that.” And it shouldn’t, because, in these cases, I never saw accessibility winning in this equation.

It shouldn’t be this way. You don’t need to be this way. First of all, because choosing between accessibility and anything else isn’t the right choice. Accessibility is no longer just another feature to be added to the others. It’s an added value for the business and, currently, a legal obligation that can have serious consequences for companies. On the other hand, there are intelligent, optimized, and impactful ways to incorporate accessibility principles into the natural dynamics of teams. It’s possible to work on accessibility without turning team operations upside down. In essence, that’s what AccessibilityOps does. Empowering people and providing teams with simple processes so they can integrate accessibility work into their daily routines without disproportionate effort.

Accessibility And Design

Working on digital accessibility in design can involve several actions. It’s clear that we need to pay particular attention to color and how it’s used to convey meaning. Of course, the interaction sizes of elements must be comfortable. But, most importantly, we must think about design from a versatile perspective. An interface isn’t a poster. We can control many aspects of that design, but how users interact with the interface is subject to an endless number of variables. The type of device, context, purpose, network quality, etc. All of this greatly affects each person’s experience and interaction. Along with all this, when digital accessibility concerns are brought into the design process, it adds even more variables.

People often use what are called assistive technologies and strategies. Basically, these are technological tools or, at the very least, “tricks” that people resort to in order to find more comfortable usage models. The famous screen readers, commonly associated with the use of blind people (but which are not only useful to them), for example, are an assistive technology. Changing colors or color contrasts between different elements is also an assistive technology. Increasing the font size (which we discussed in this text) is another example. There are countless assistive technologies and strategies. Almost as many as the different contexts of use for each person.

We Don’t Control Everything

In other words (and this is the “bad news” for us designers), “our design” is subject, from the users’ perspective, to transformations that we don’t control. It will be “transformed” by the user, ensuring that they can interact with the application and everything it offers in the most comfortable way possible. And that’s a good thing. If this happens and everything goes well, we will have surely done our accessibility work very well, and we all deserve congratulations. If the user applies any of these support technologies and strategies and still cannot use the digital application, it’s a sign that something is not working as it should.

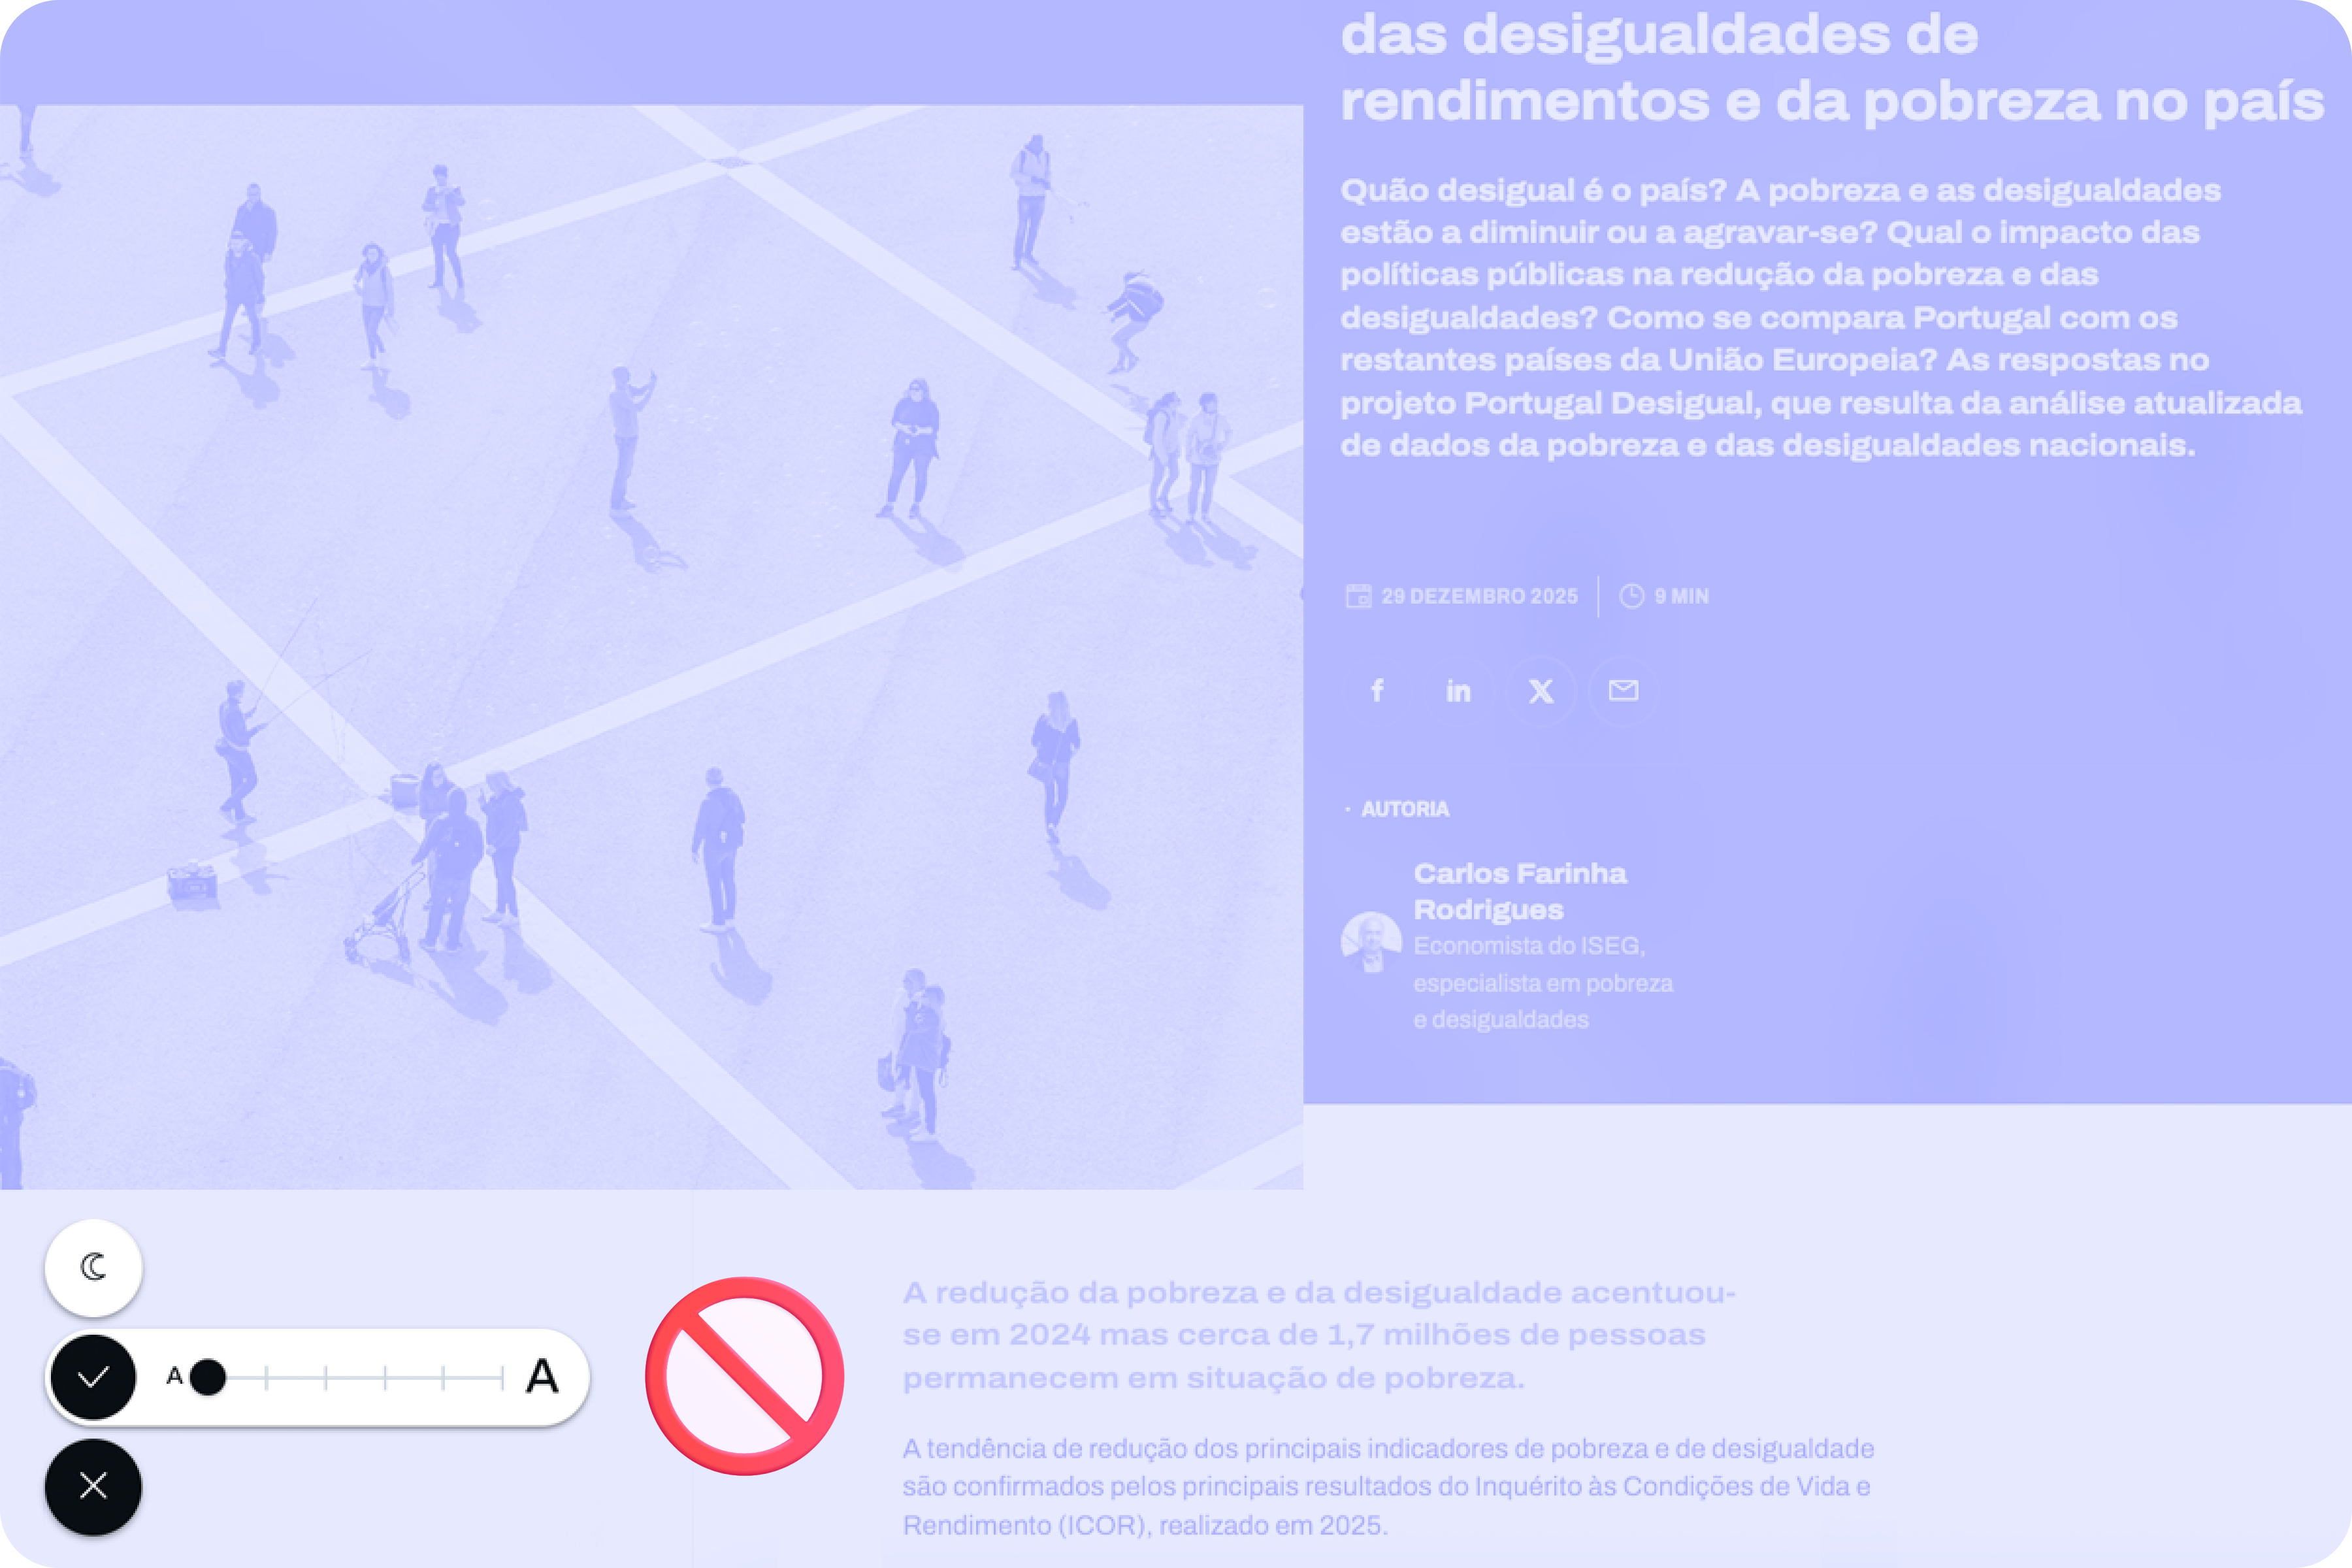
Oh, and speaking of which. Don’t even think about blocking the use of these technologies or support strategies. They may be “destroying” your beautiful design, but they are allowing more and more people to actually use the app. In the end, wasn’t that exactly what we promised we wanted to do? Design for (all) people. Without exception?

Increase Font Size

How many times have we heard someone — friends, family, or even colleagues — complaining that this or that text is too small? Text plays a very important role in the digital experience. Much information is conveyed through text: instructions for use, button captions, or interactive elements. All of this uses text as a communication tool. If reading all these elements is difficult, naturally, the experience is severely impaired.

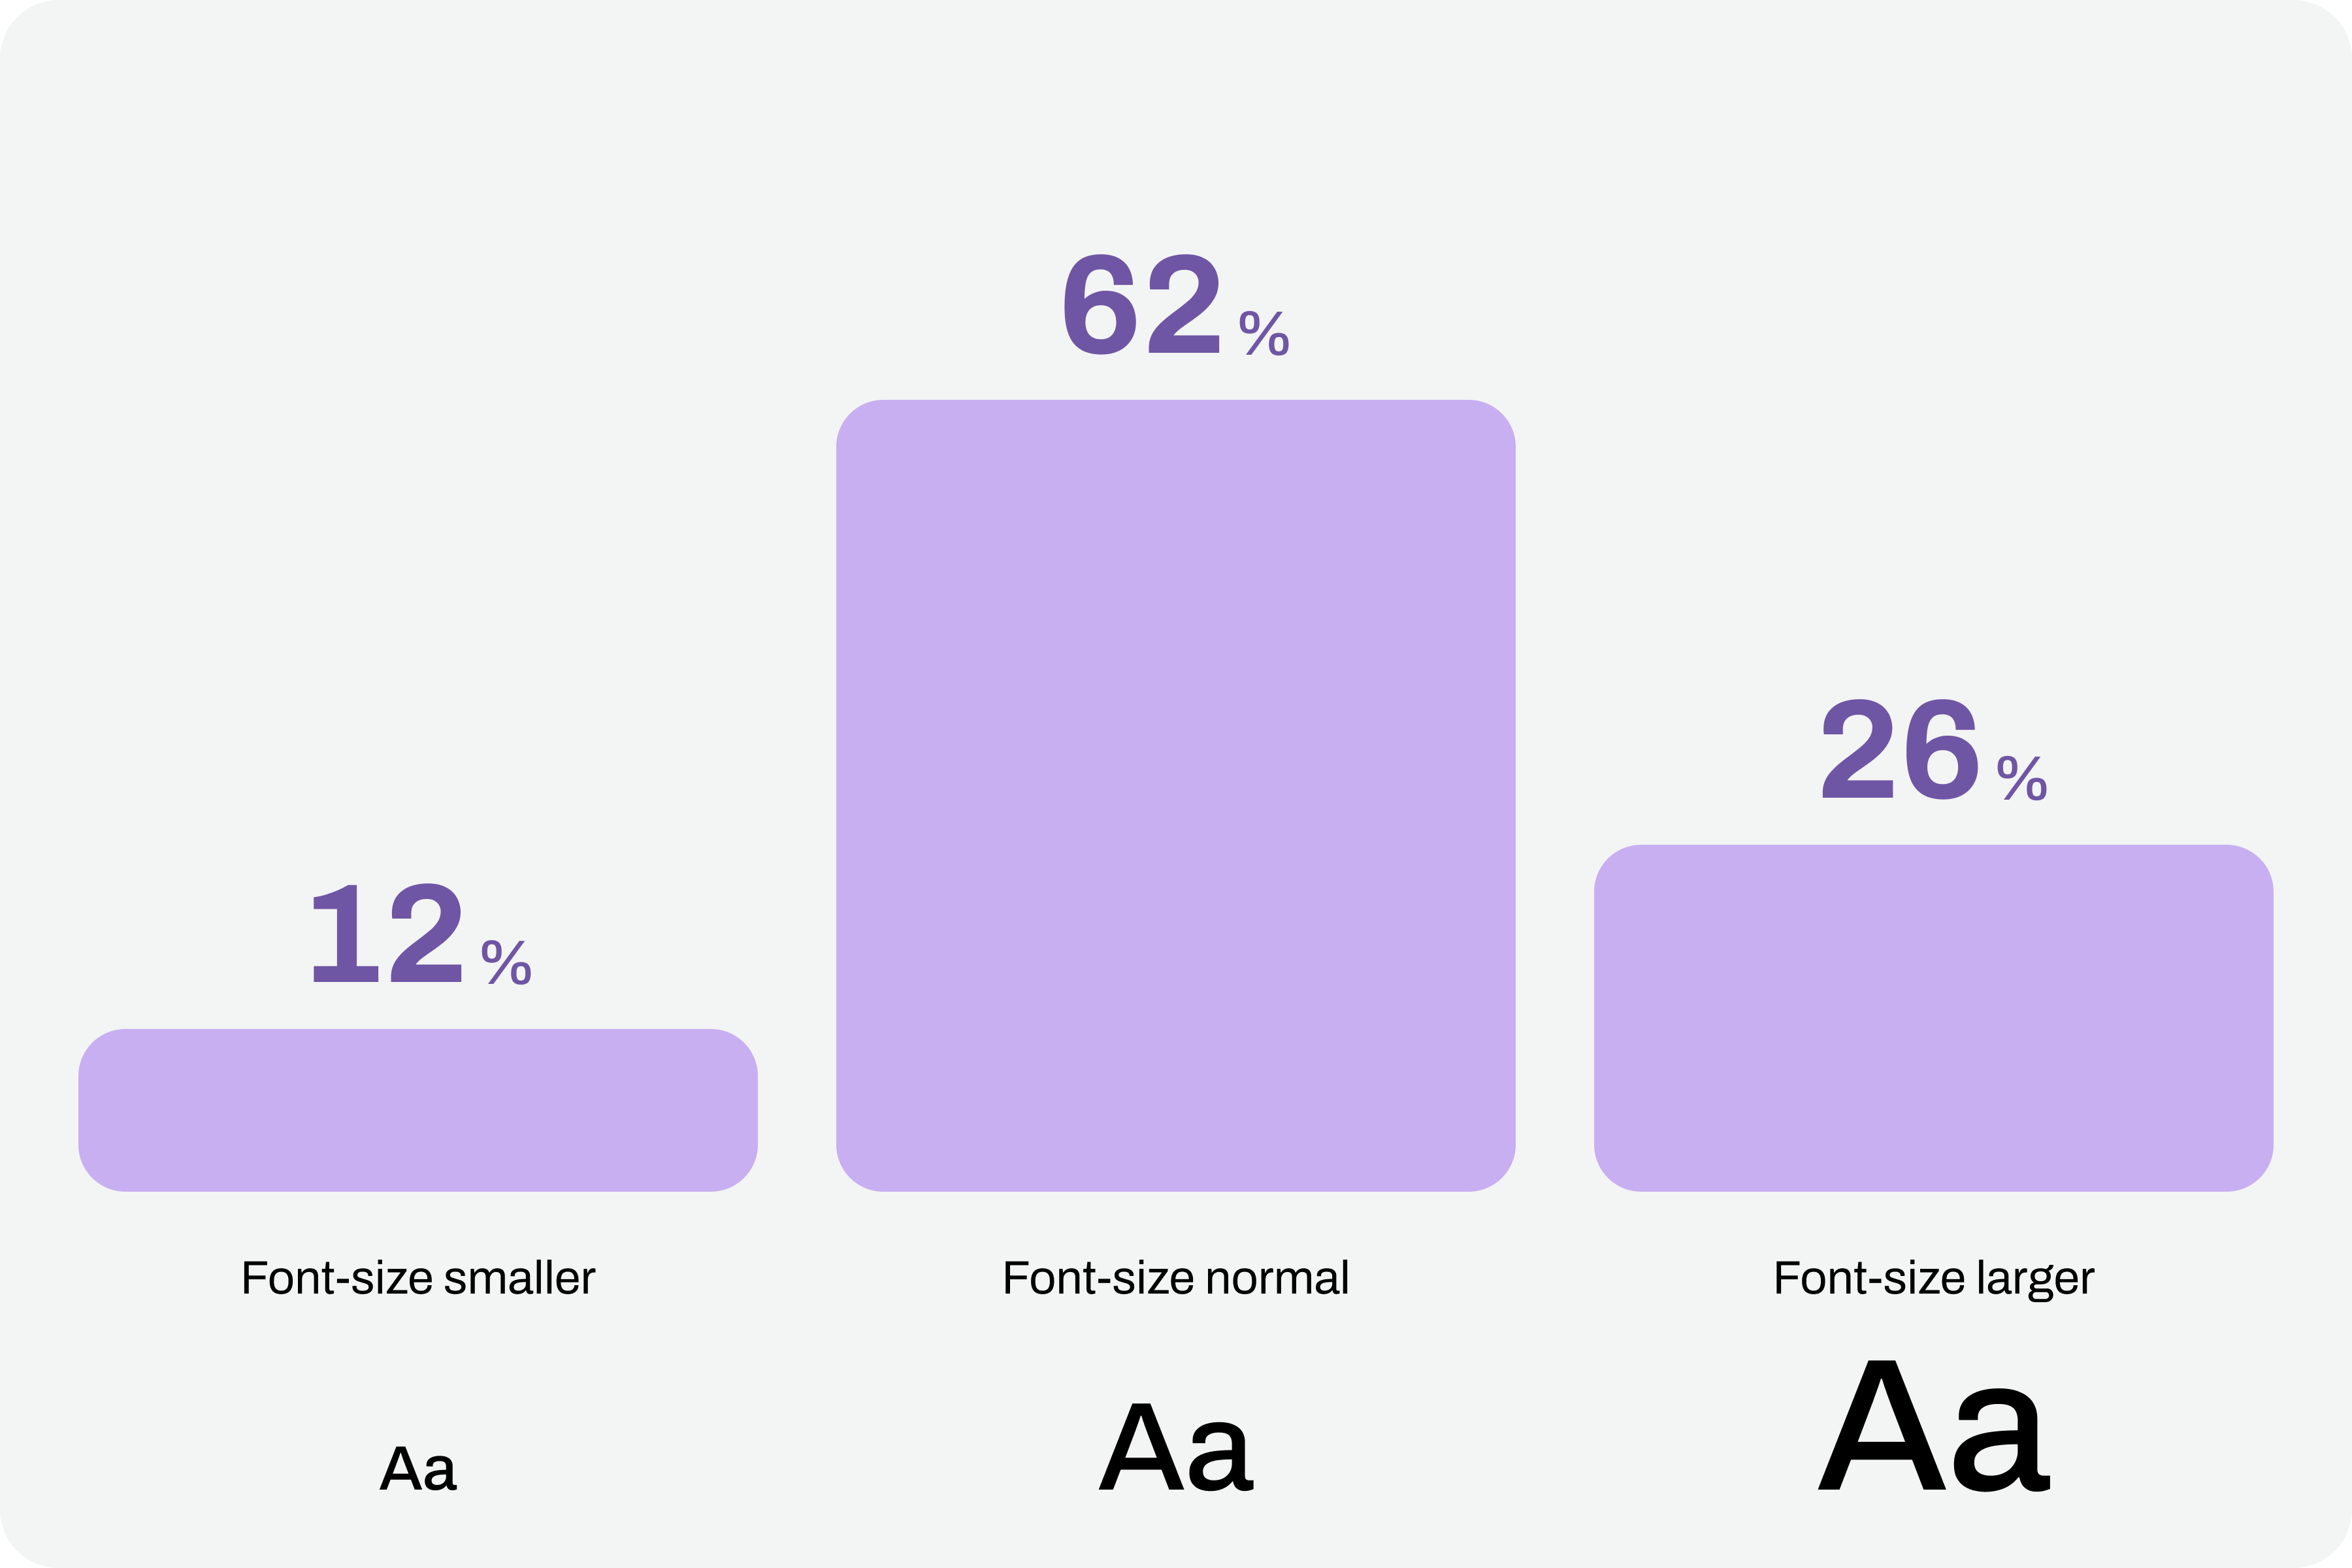
Comfortable text reading, regardless of its function, is a non-negotiable principle. This reading can be facilitated by using comfortable sizes in the design. However, supporting technologies and strategies, through the functionality of increasing font size, can also help improve readability. According to APPT data, 26% of Android and iOS mobile device users increase the default font size (data from February 2026). One in four users increases the font size on their smartphone. This is a very significant sample of people, making this functionality unavoidable in design processes.

Compliance With Guidelines

Increasing font size in interfaces can represent a huge design challenge. It’s important to understand that, suddenly, some text elements, due to user actions, can double in size from their initial size.

“With the exception of captions and text images, text can be resized without assistive technology up to 200% without loss of content or functionality.”

— Success criterion 1.4.4, “Resizing Text” of the Web Content Accessibility Guidelines (WCAG), version 2.2

This success criterion is at the AA compliance level, meaning this is an absolutely mandatory feature according to any legal framework.

It’s easy to understand the 200% in this success criterion. If we assume we design the interfaces at a 100% scale, meaning the element size is the initial size, then increasing the text by up to 200% will correspond to doubling the initial size. Other enlargement scales can also be used, such as 120%, 140%, and so on. In other words, we have to ensure that users can increase the text to double its initial size through supporting technologies or strategies (and this is not a minor detail).

To comply with this standard, we don’t need to provide text size increase tools in the interfaces. In practice, these features are nothing more than redundancy. Devices already allow this to be done in a standardized way. Users who really need this setting know it (because, without it, their lives would be much more difficult). Well, they already have this setting applied across their device. And that means we can eliminate these additional interface elements, simplifying the experience.

Standardized Access

An important concept to remember about assistive technologies, particularly in this case regarding increasing font size, is that most devices already have many of these tools installed by default. In other words, in many cases, users don’t need to purchase their own software or buy a specific type of device just to have this functionality.

Whether on mobile devices or even in web browsers, in the vast majority of cases, it’s easy to find installed features that allow you to increase the default font size we’re using throughout the interface. This principle of increasing font size can be applied to digital products, such as apps, or even to any type of website running on the standard web browsers used today.
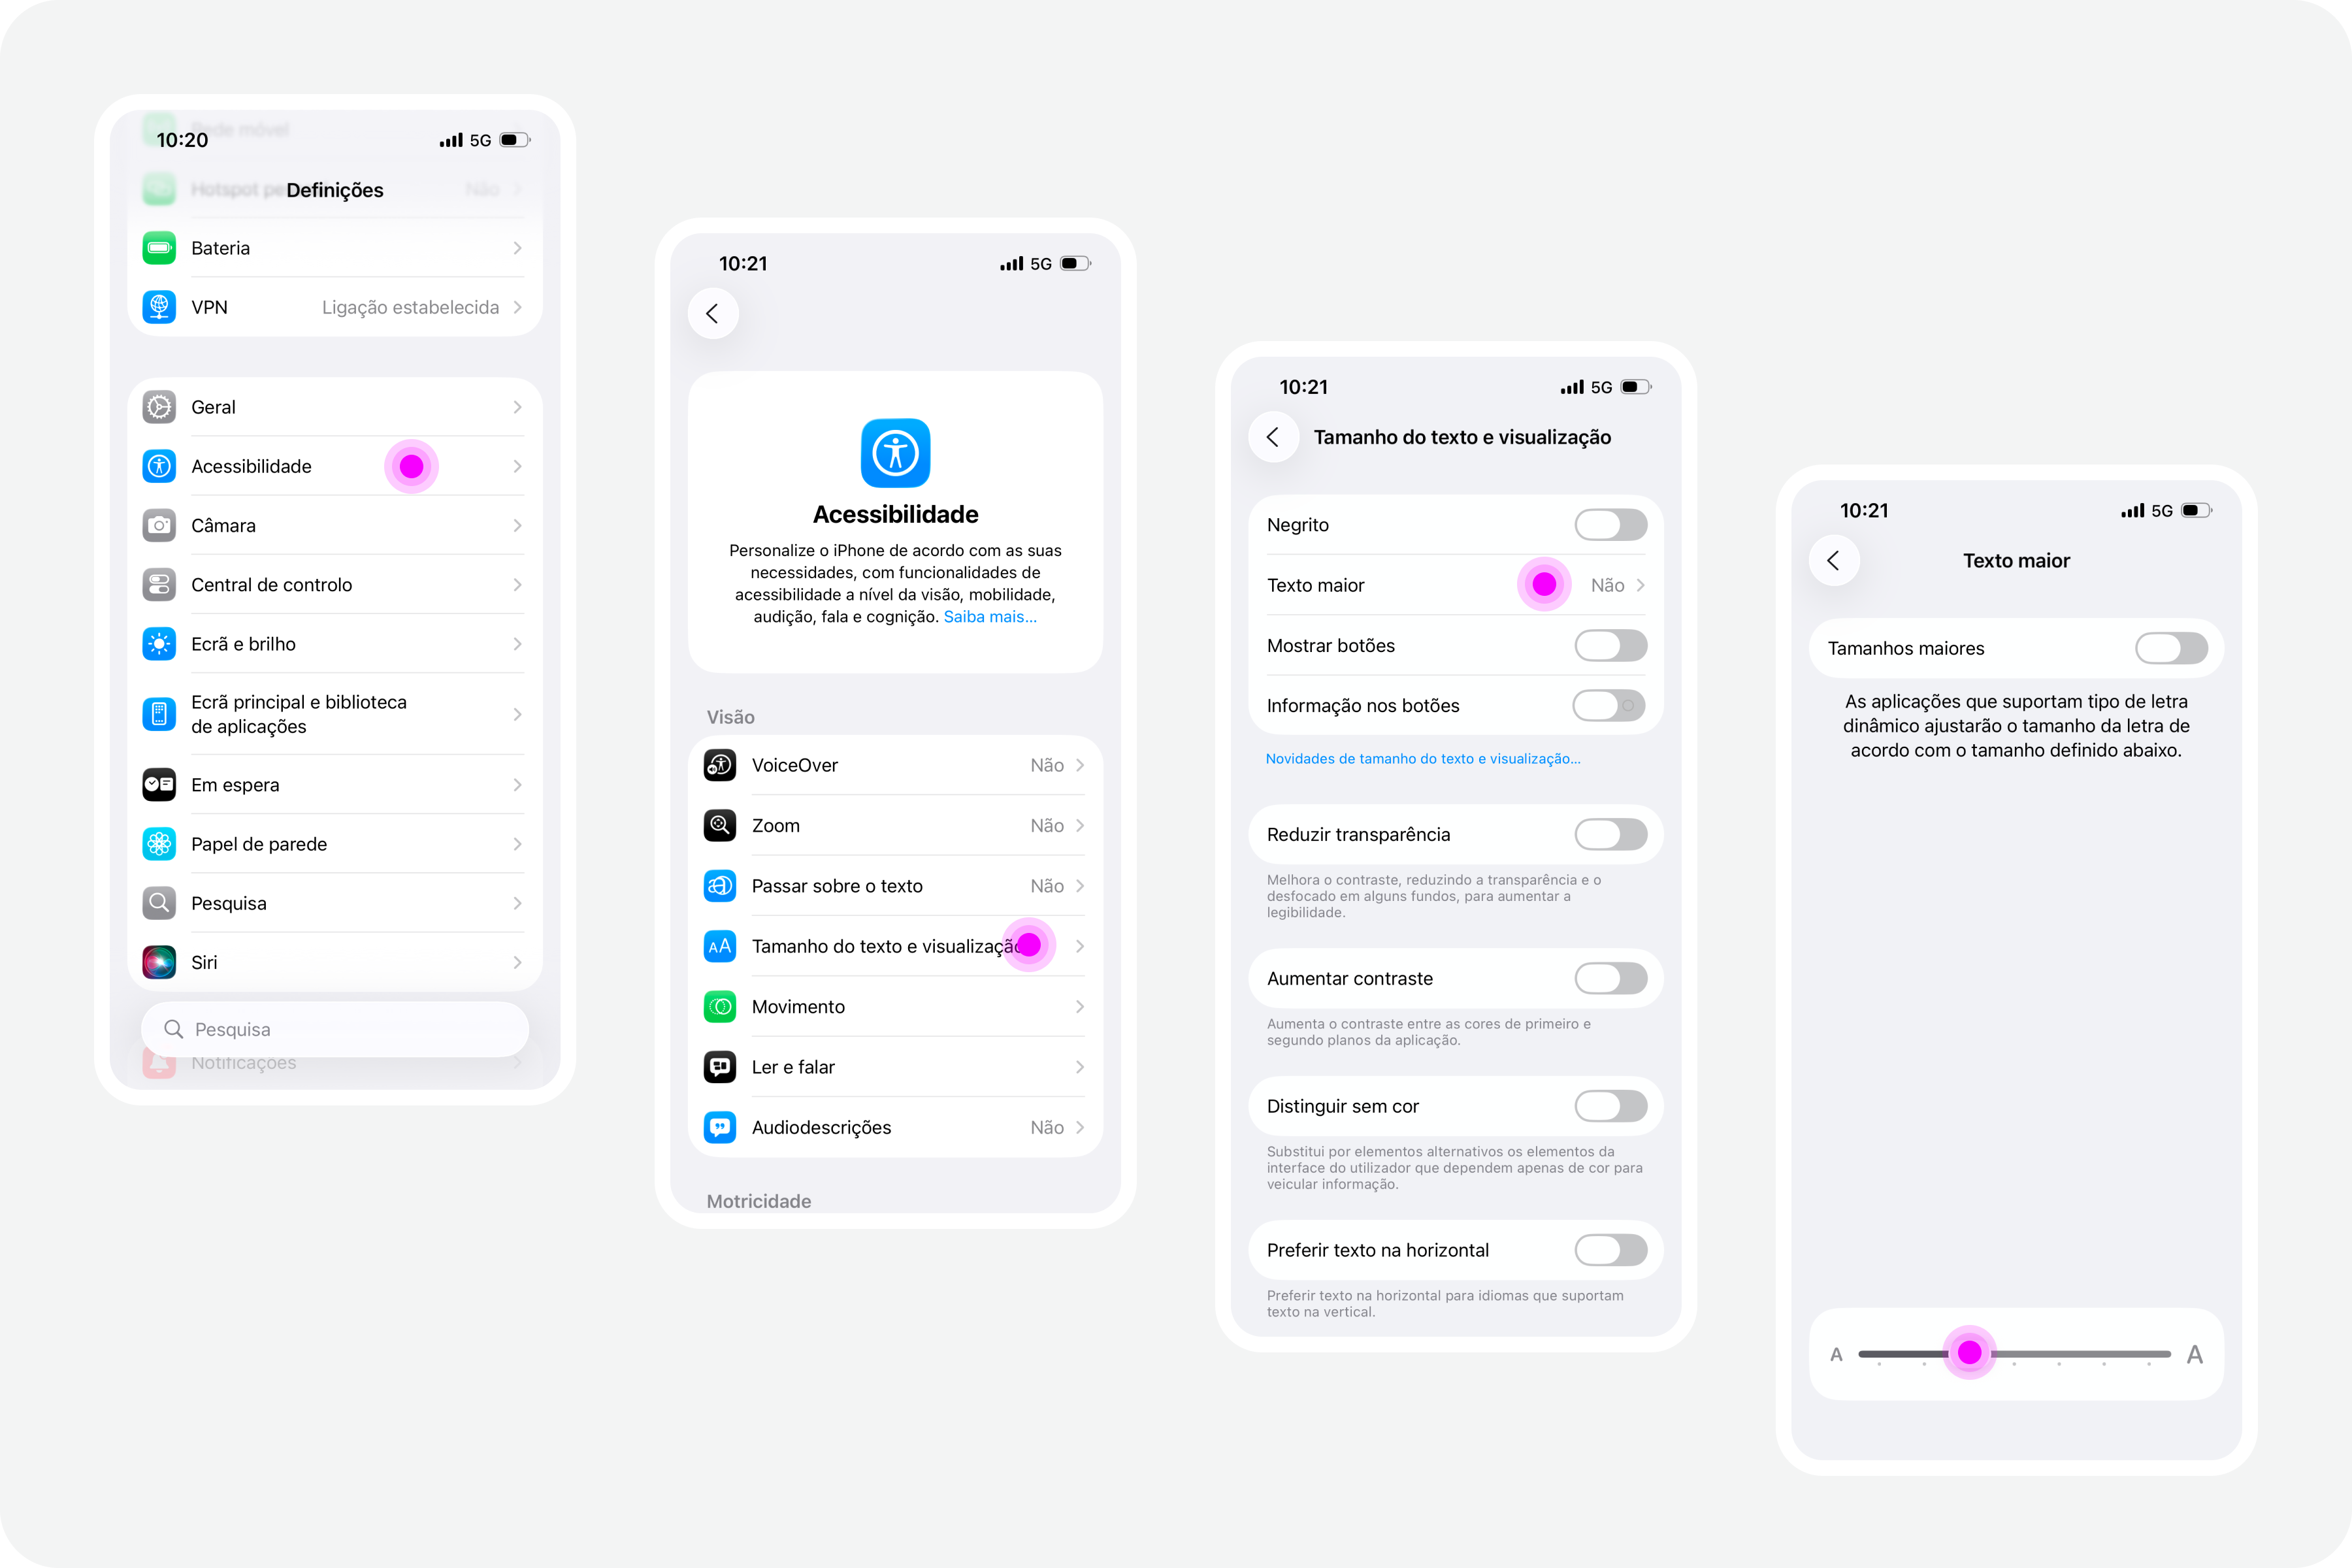
iPhones

On iPhone devices, the font size increase feature is integrated by default. To use this feature, simply access the “Settings” panel, select “Accessibility,” and within the “Vision” options group, access the “Text Size and Display” feature and configure the desired font size increase on that screen.

Google Chrome

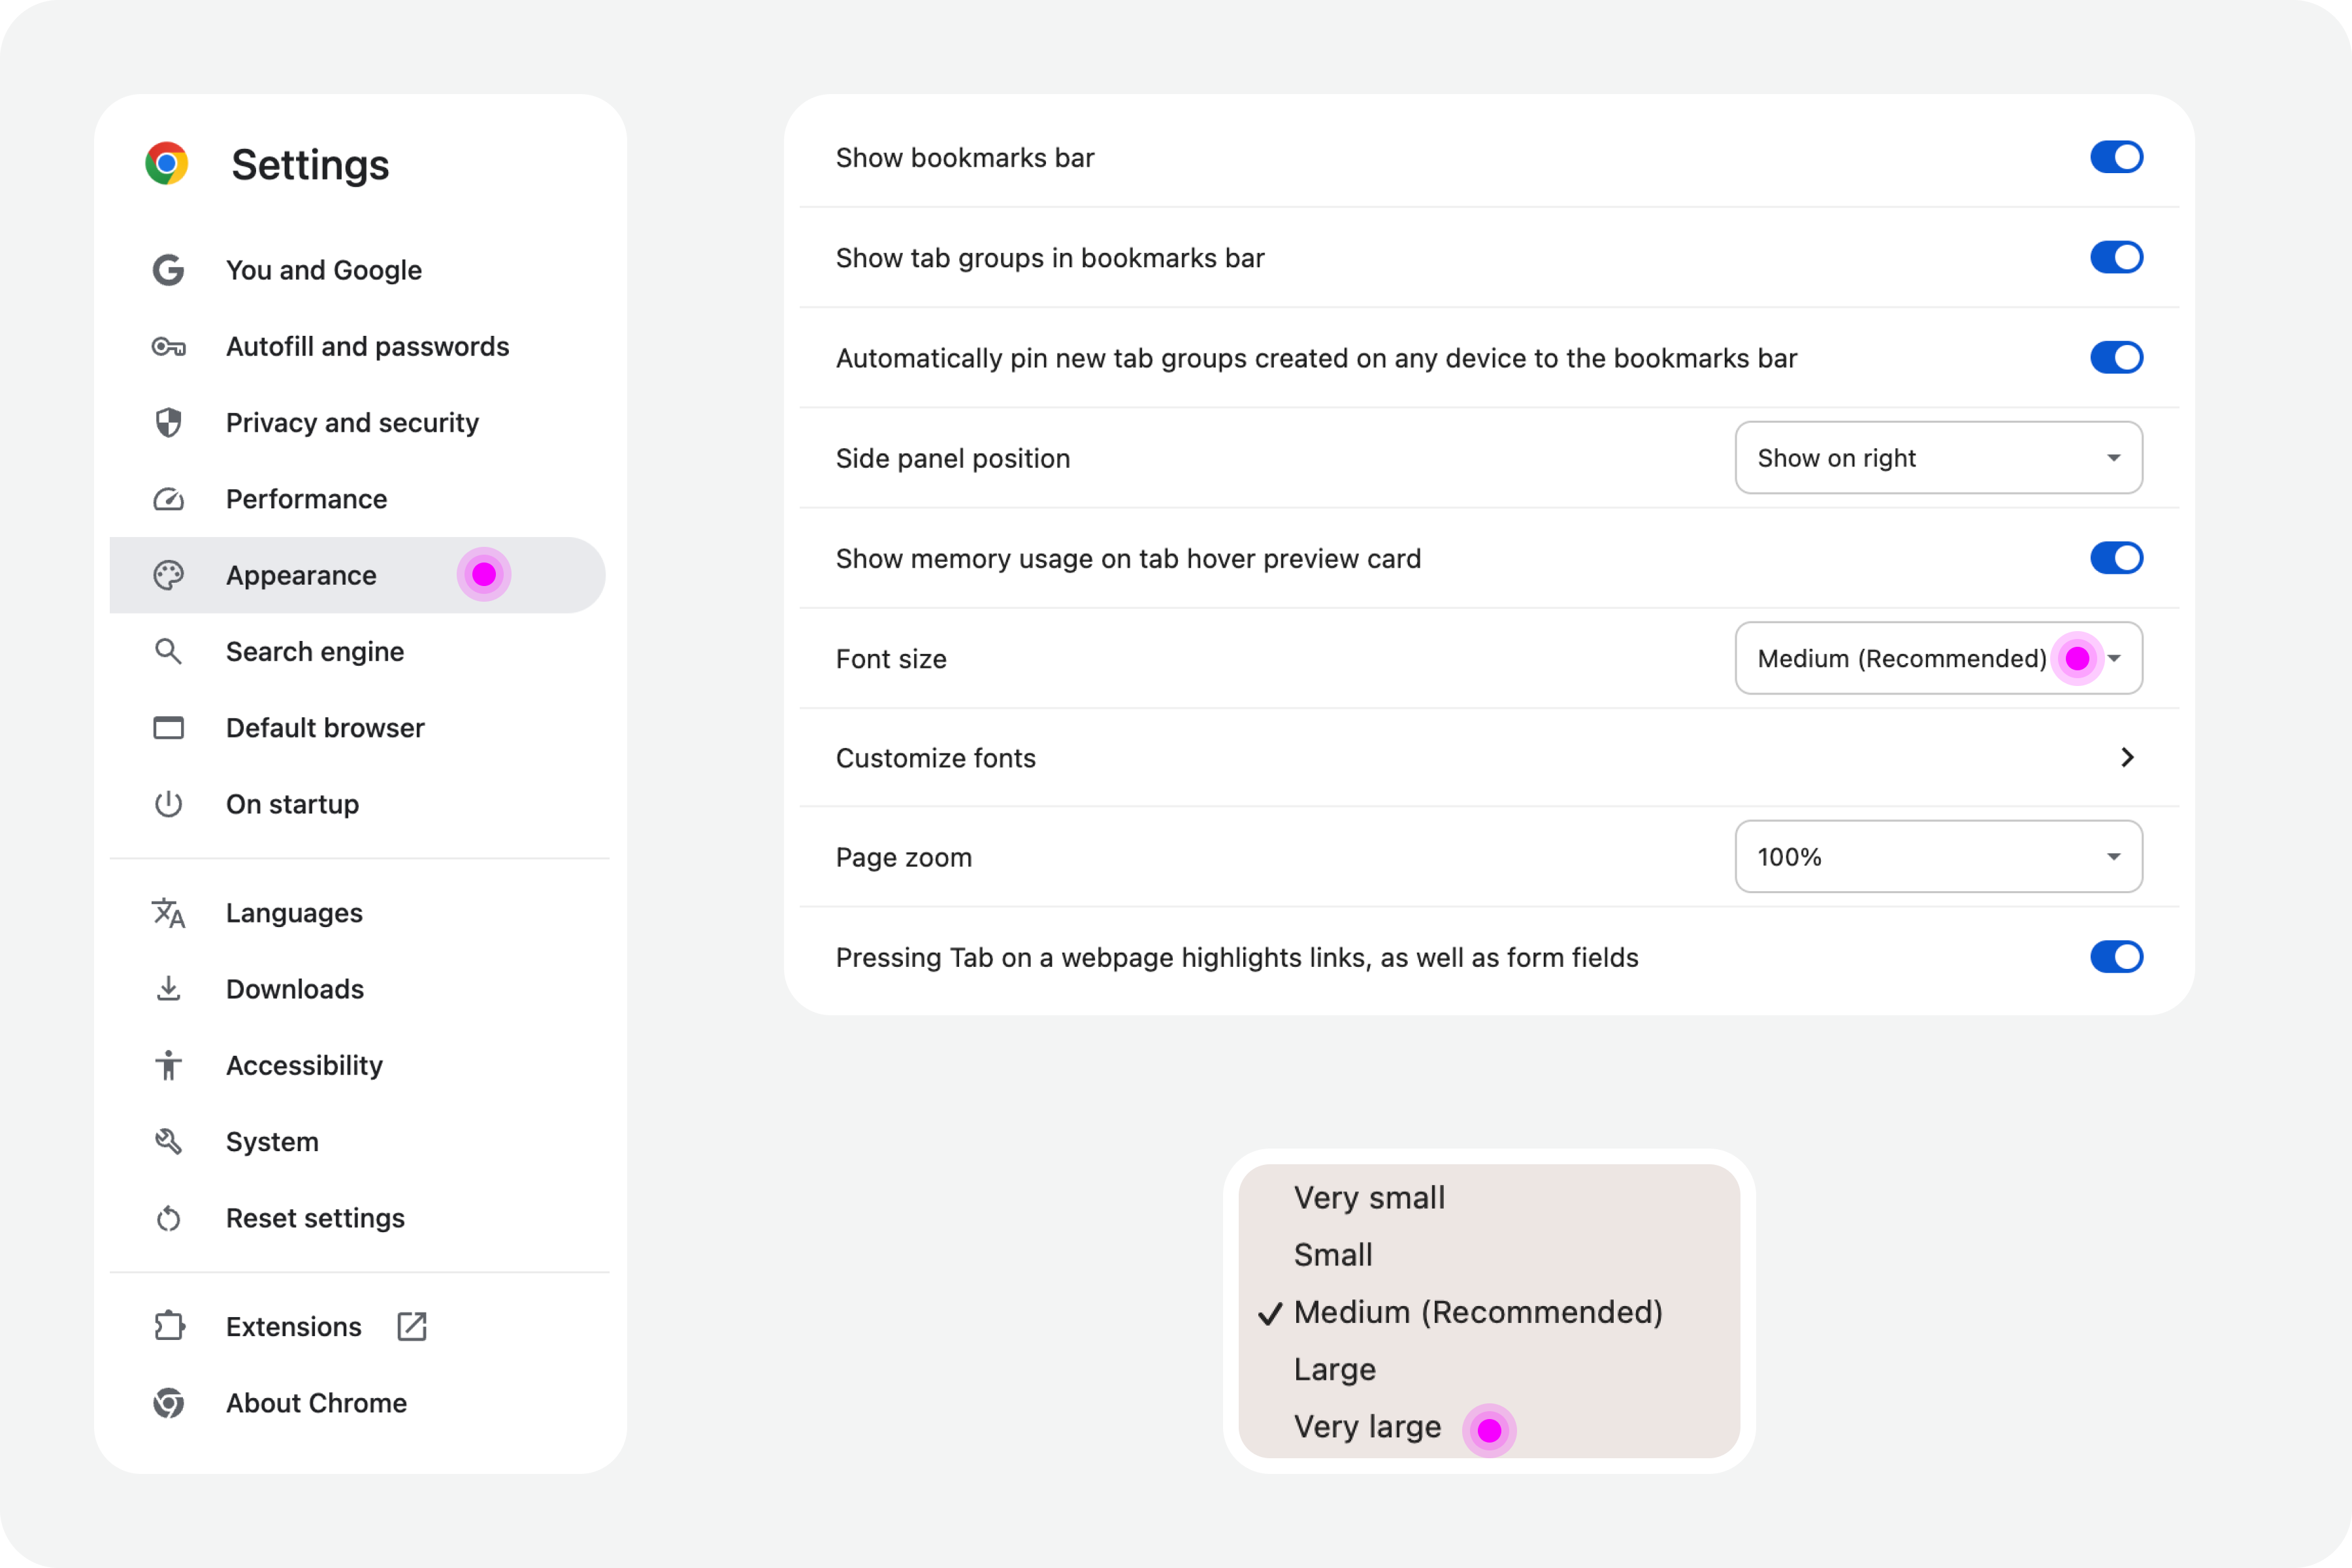
Web browsers also offer, by default, the functionality to increase font size. For example, in Google Chrome, this feature is available in the “Options” panel, specifically in the “Appearance” area. In the list of options that appear in this group, simply select the “Font size” option. Normally, the “Medium — Recommended” option will be selected. You can change this setting to any other available font size. Try, for example, the “Very large” option.

Test In Figma

To ensure that digital accessibility work becomes effective in the daily lives of teams, it is essential to find simple work processes. Actions or initiatives that can be integrated into the team’s routine, that address accessibility in an integrated way, and do not require a dramatic transformation of the current reality. If that were necessary, he believes, it wouldn’t happen most of the time. Therefore, designing simple work processes is half the battle for accessibility to truly happen, in this case, also within a design team.

Regarding testing font size increases in design, we have extraordinary tools at our disposal today. Those who remember the days of designing complex interfaces in Adobe Photoshop will recognize the differences in the tools we have today (and thankfully so). It’s now possible, through tools like Figma, to create such dynamism in design that testing font size increases for accessibility becomes almost unavoidable for the team.

Note: To take this test, you need to have a strong grasp of Figma’s text styles, auto layouts, and variables. These three are fundamental tools for success without much extra effort. If you haven’t yet mastered these features, it’s highly recommended that you start there. Don’t skip steps. Learning is a gradual process that must be followed in a structured, step-by-step manner.

Where Do We Want To Go?

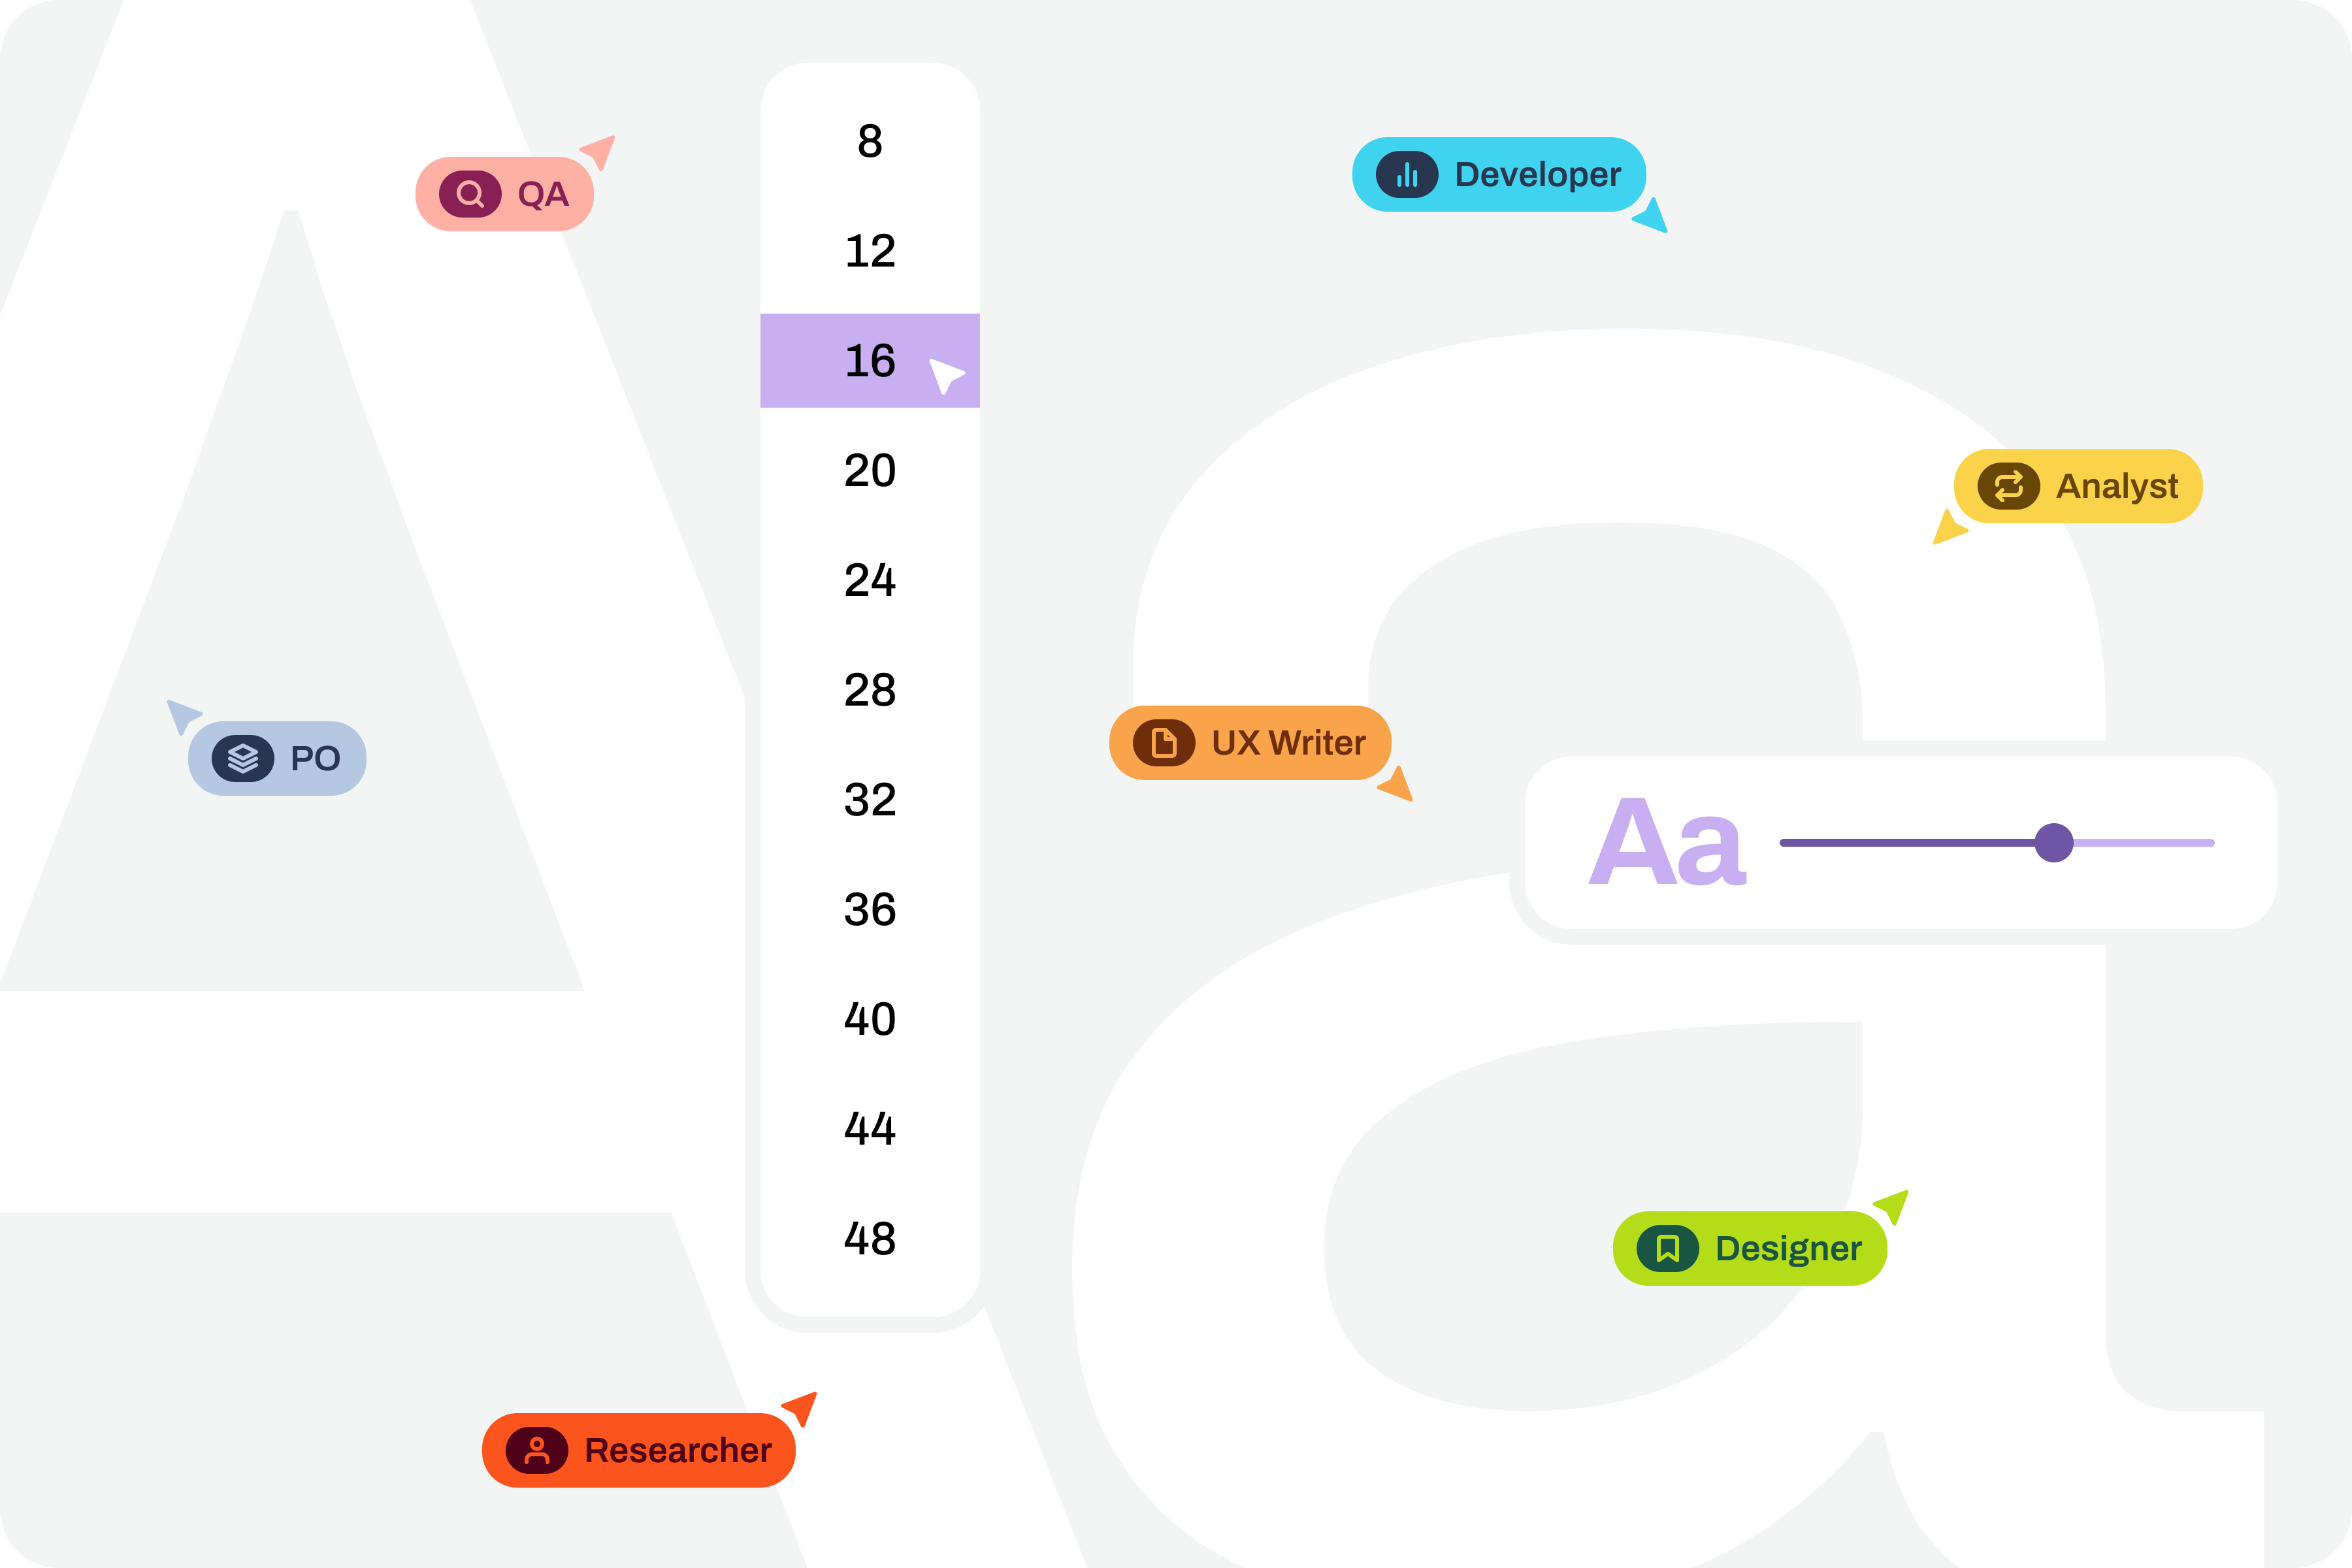
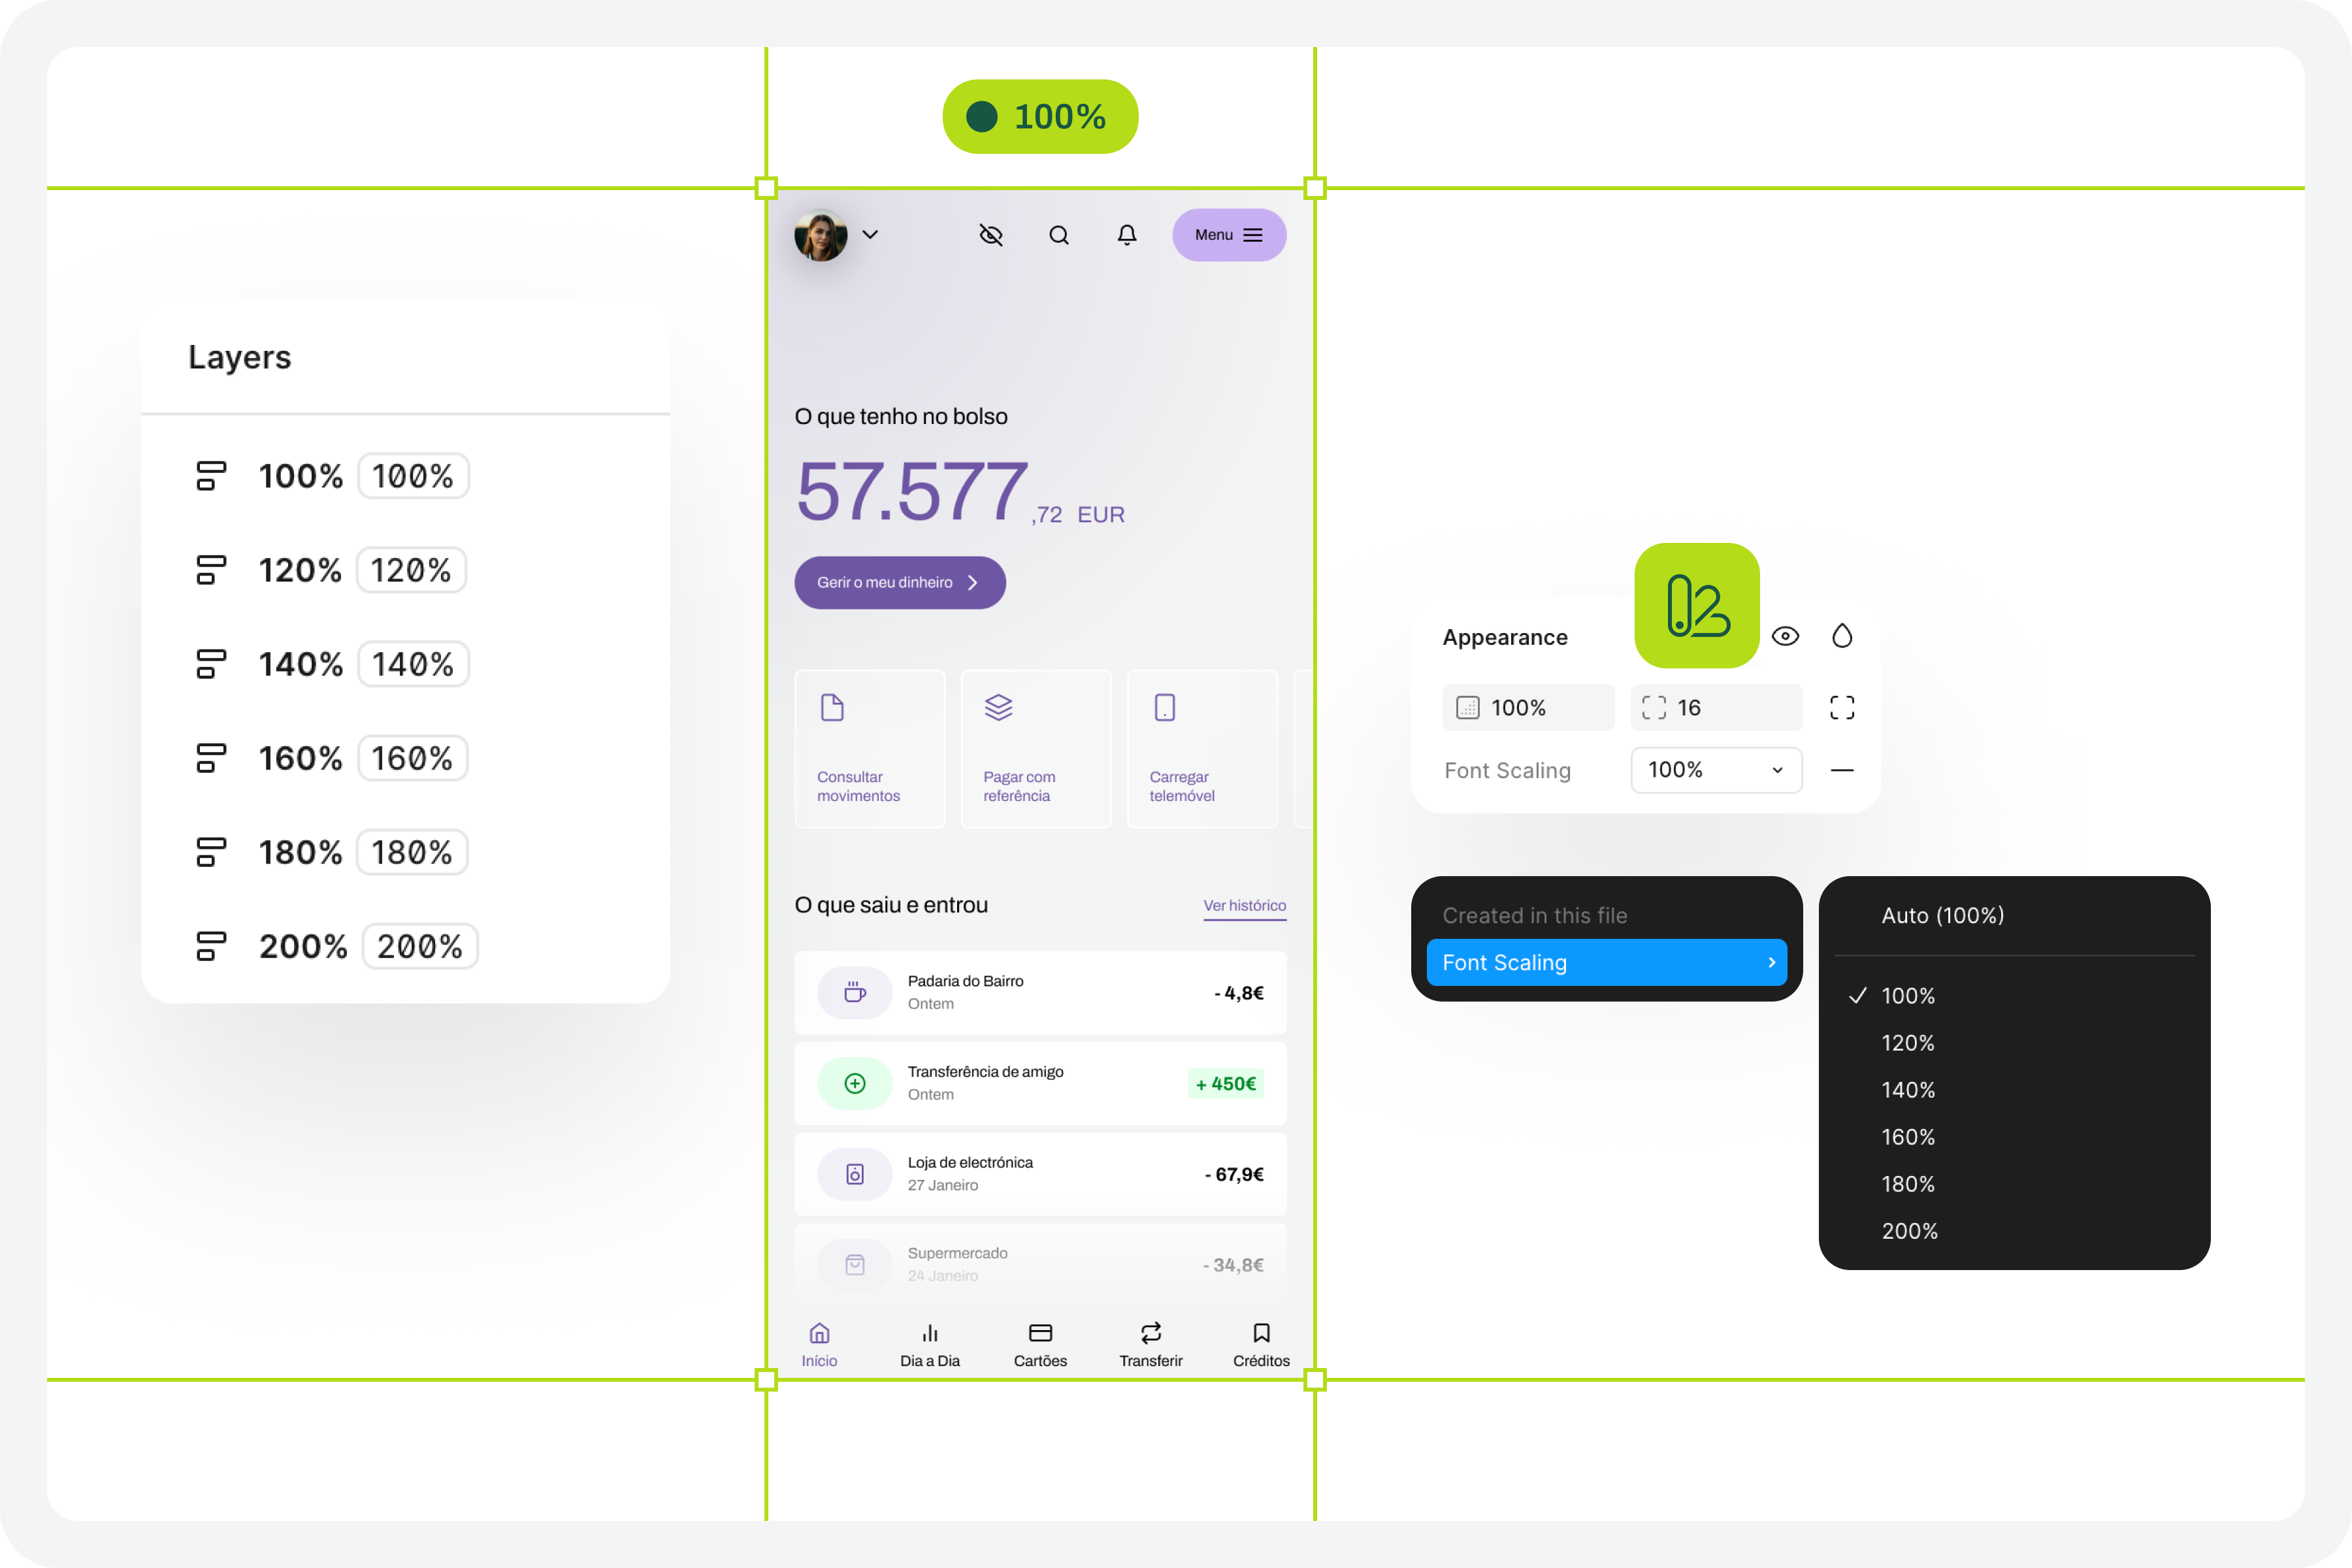
The font size increase test in Figma that we want to perform is simple. We want to have a set of variables available for all the text styles we use in the interface, allowing us to choose whether we want to see the interface with the text at a scale of 100%, 120%, 140%, 160%, 180%, or 200%. As we apply this set of variables (much like applying variables for light and dark mode), we observe the transformations of the text in the interface and understand to what extent adaptations are needed in each version of the interface with different typographic scales.

How Do We Make This Happen?

For this test to go so smoothly, you need to do some groundwork. Design systems can greatly help optimize much of this initial work. But I won’t lie to you. For the test to work well, your design needs to have a very serious level of organization and systematization.

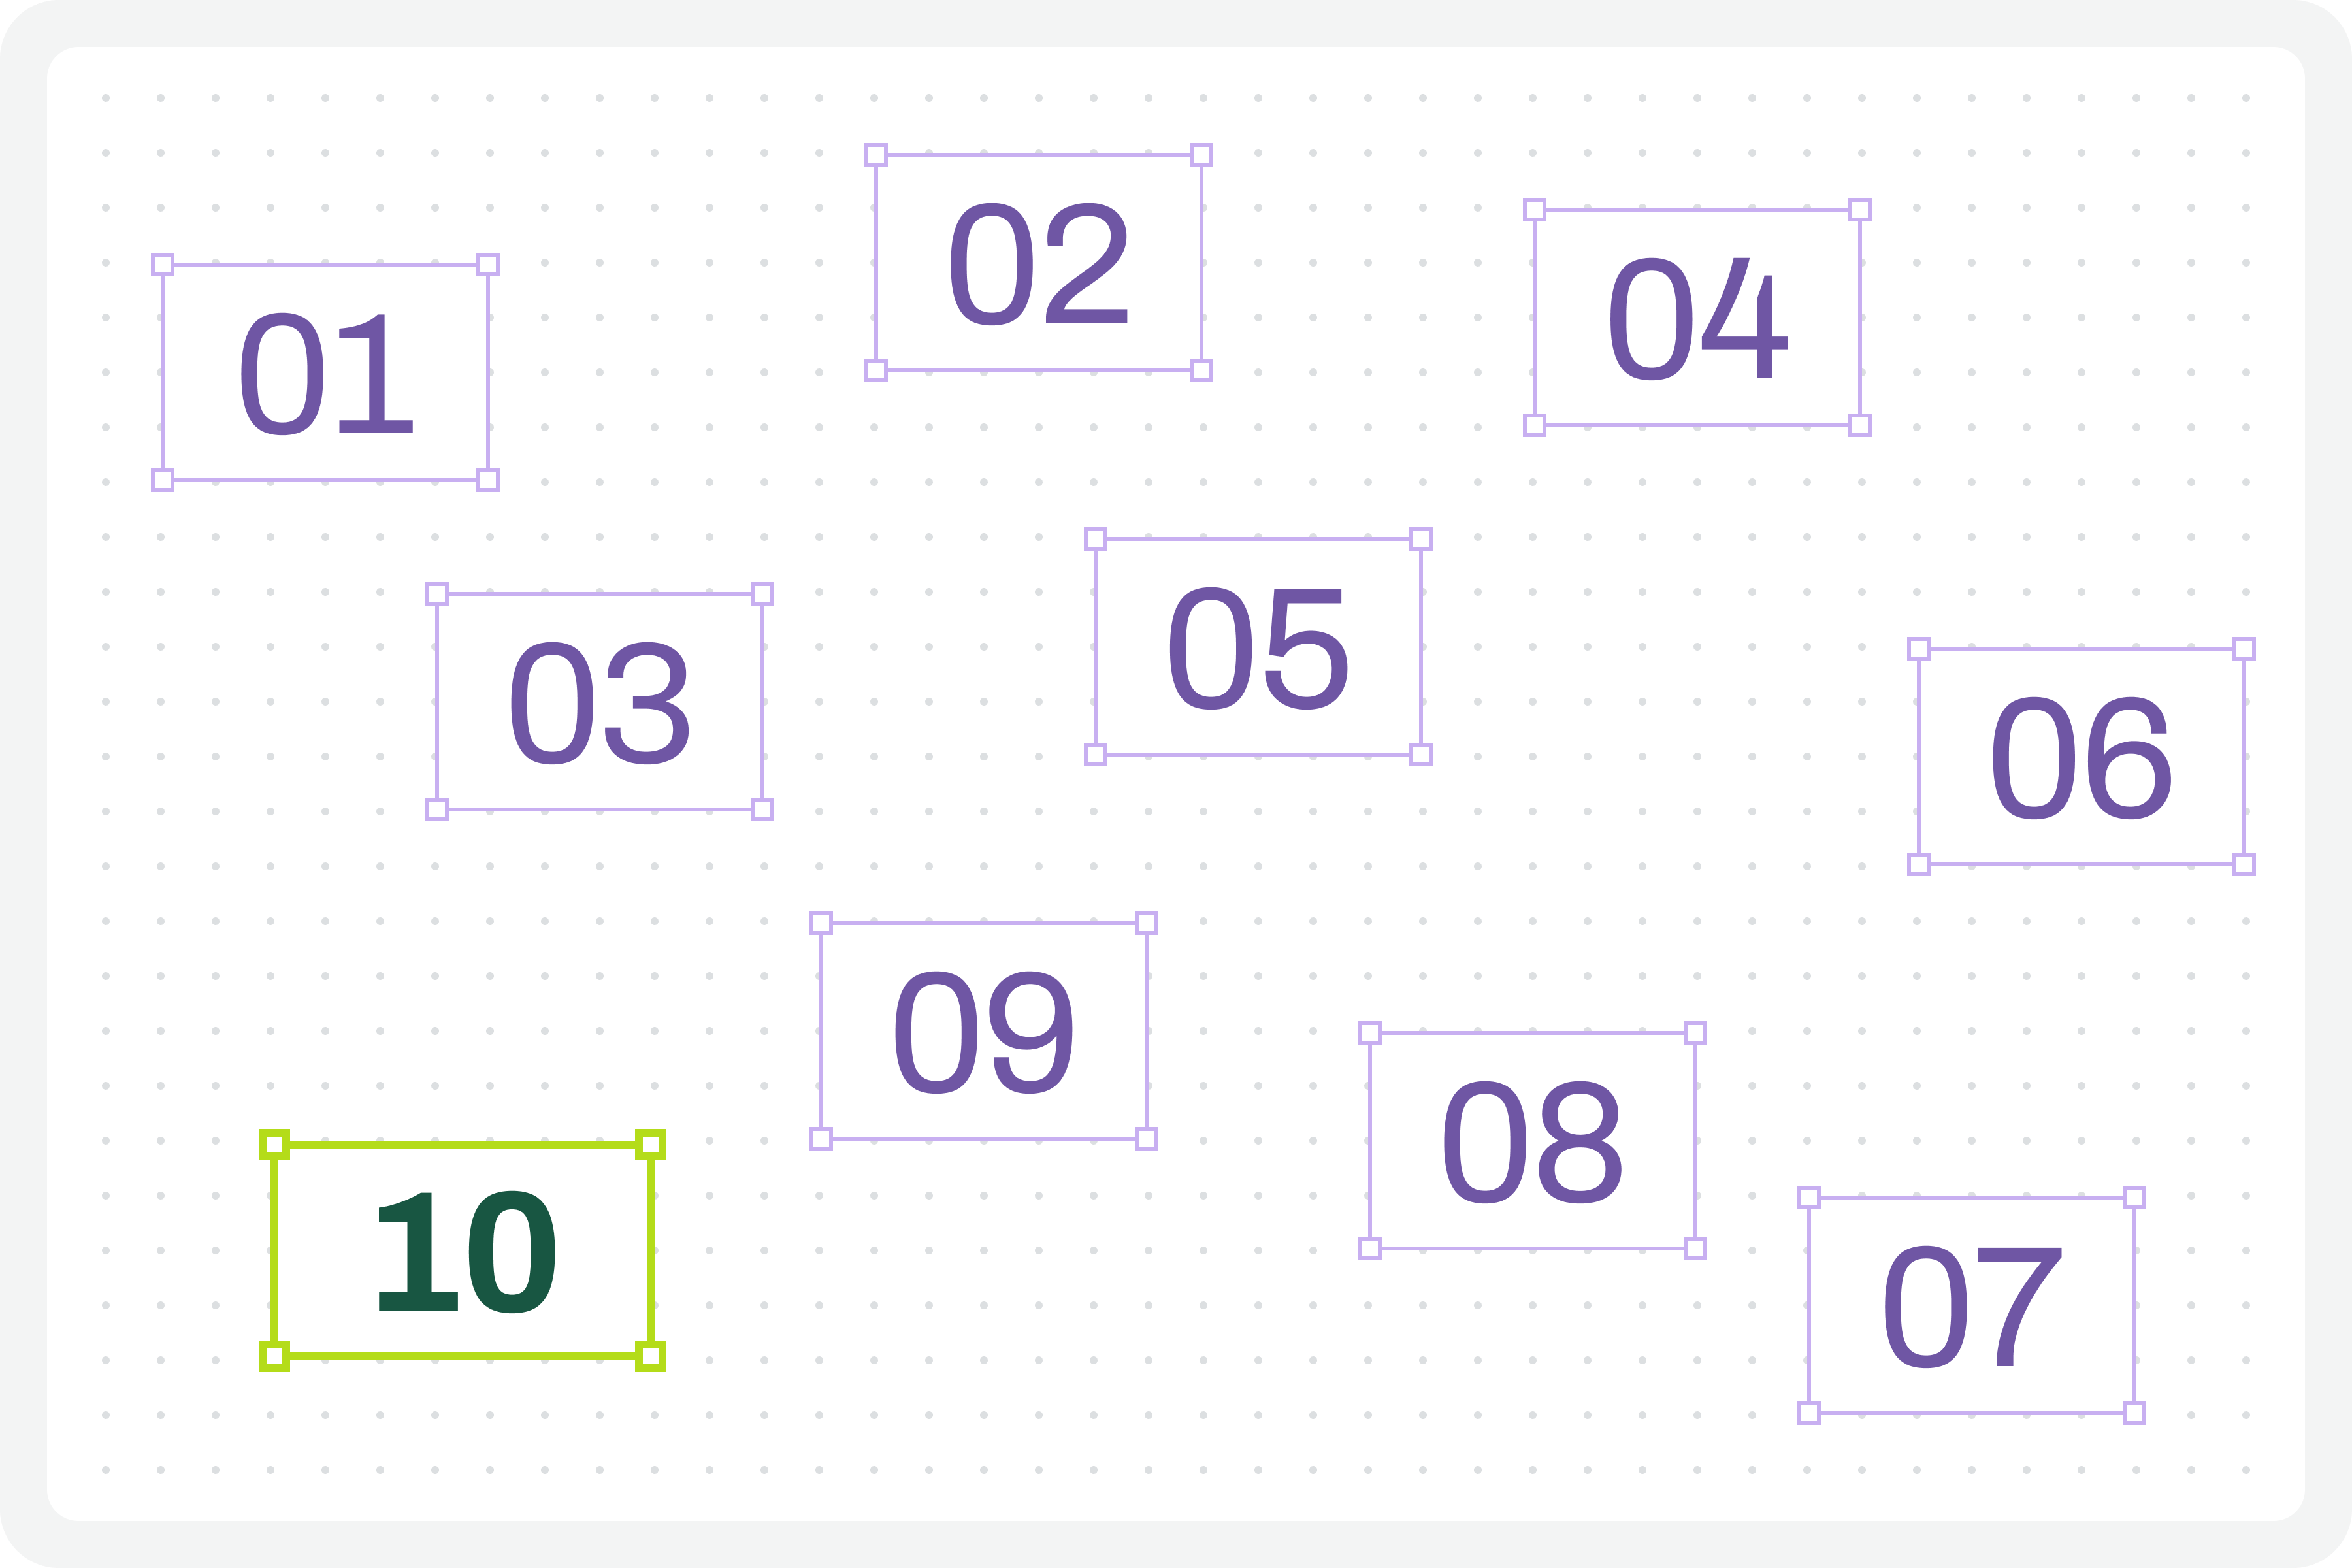
This isn’t really a guide, because each team will have its own work model, and these recommendations can be applied in different ways (and that’s okay). However, for this test to work, it’s important to ensure certain assumptions in the design. To help you phase the implementation of this test model, here are some steps to follow. Step-by-step instructions to guide you in organizing your files and ensuring you can fully execute this test in the simplest and most practical way possible.

1. Designing The Interfaces

It all starts with the design. Before any testing, the focus should, as it should, be on the design of each interface that we will want to test later. At this stage, there is still no specific concern with the font size increase test that we will perform later. Naturally, all interface design should, from the outset, follow the most basic accessibility recommendations applied to design.

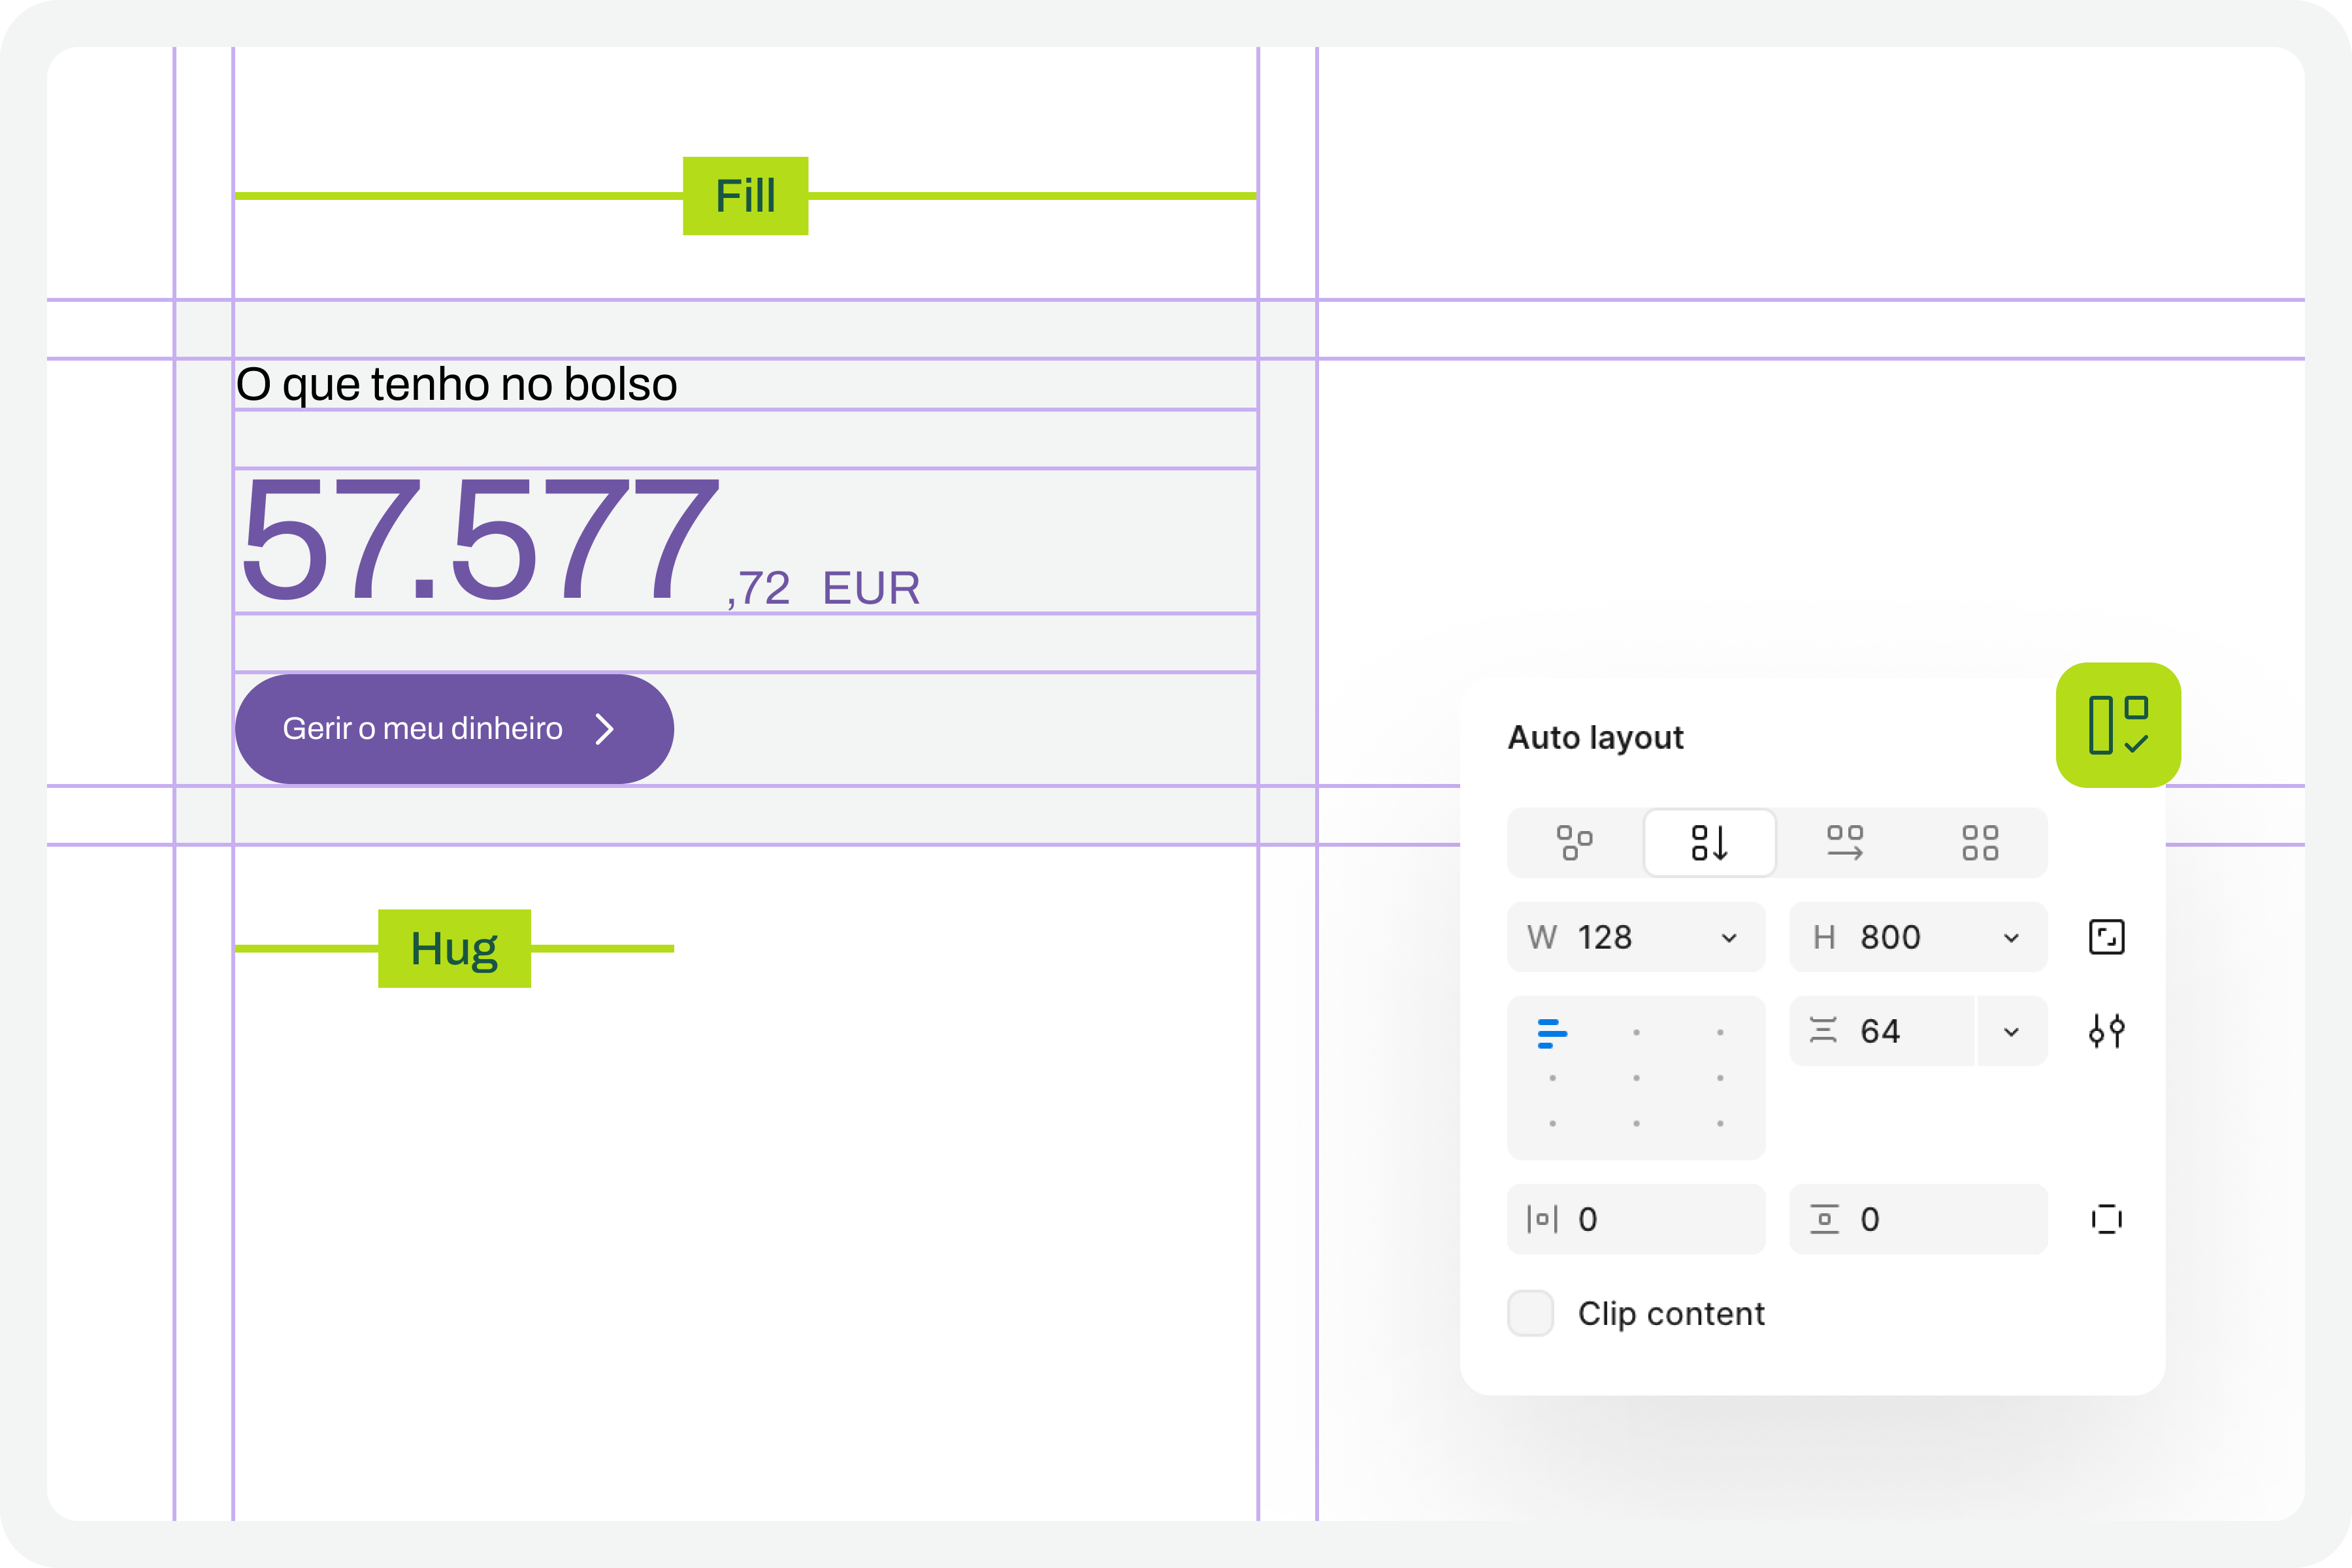
2. Apply Auto Layouts To All Elements

In every screen design you create, you’ll need to ensure you apply auto layouts perfectly. This is a very important step. It’s this consistent application of auto layouts to the entire structure and design elements that will later guarantee the scalability of the interface when we start testing font size increases. You really can’t underestimate this step. If you don’t pay it the attention it deserves, you’ll see when we test typographic scaling in the interfaces, everything breaking down like an elephant in a china shop.

3. Structuring And Applying Text Styles

To perform our font size increase test, we’ll also need you to have applied text styles to each interface design. You probably even started creating them as you were drawing. Great. If you haven’t done so, it’s important that you do it now. For the test to work perfectly, we really need this. Don’t leave any text element in the design without a text style applied.

4. Define The Set Of Variables 100%

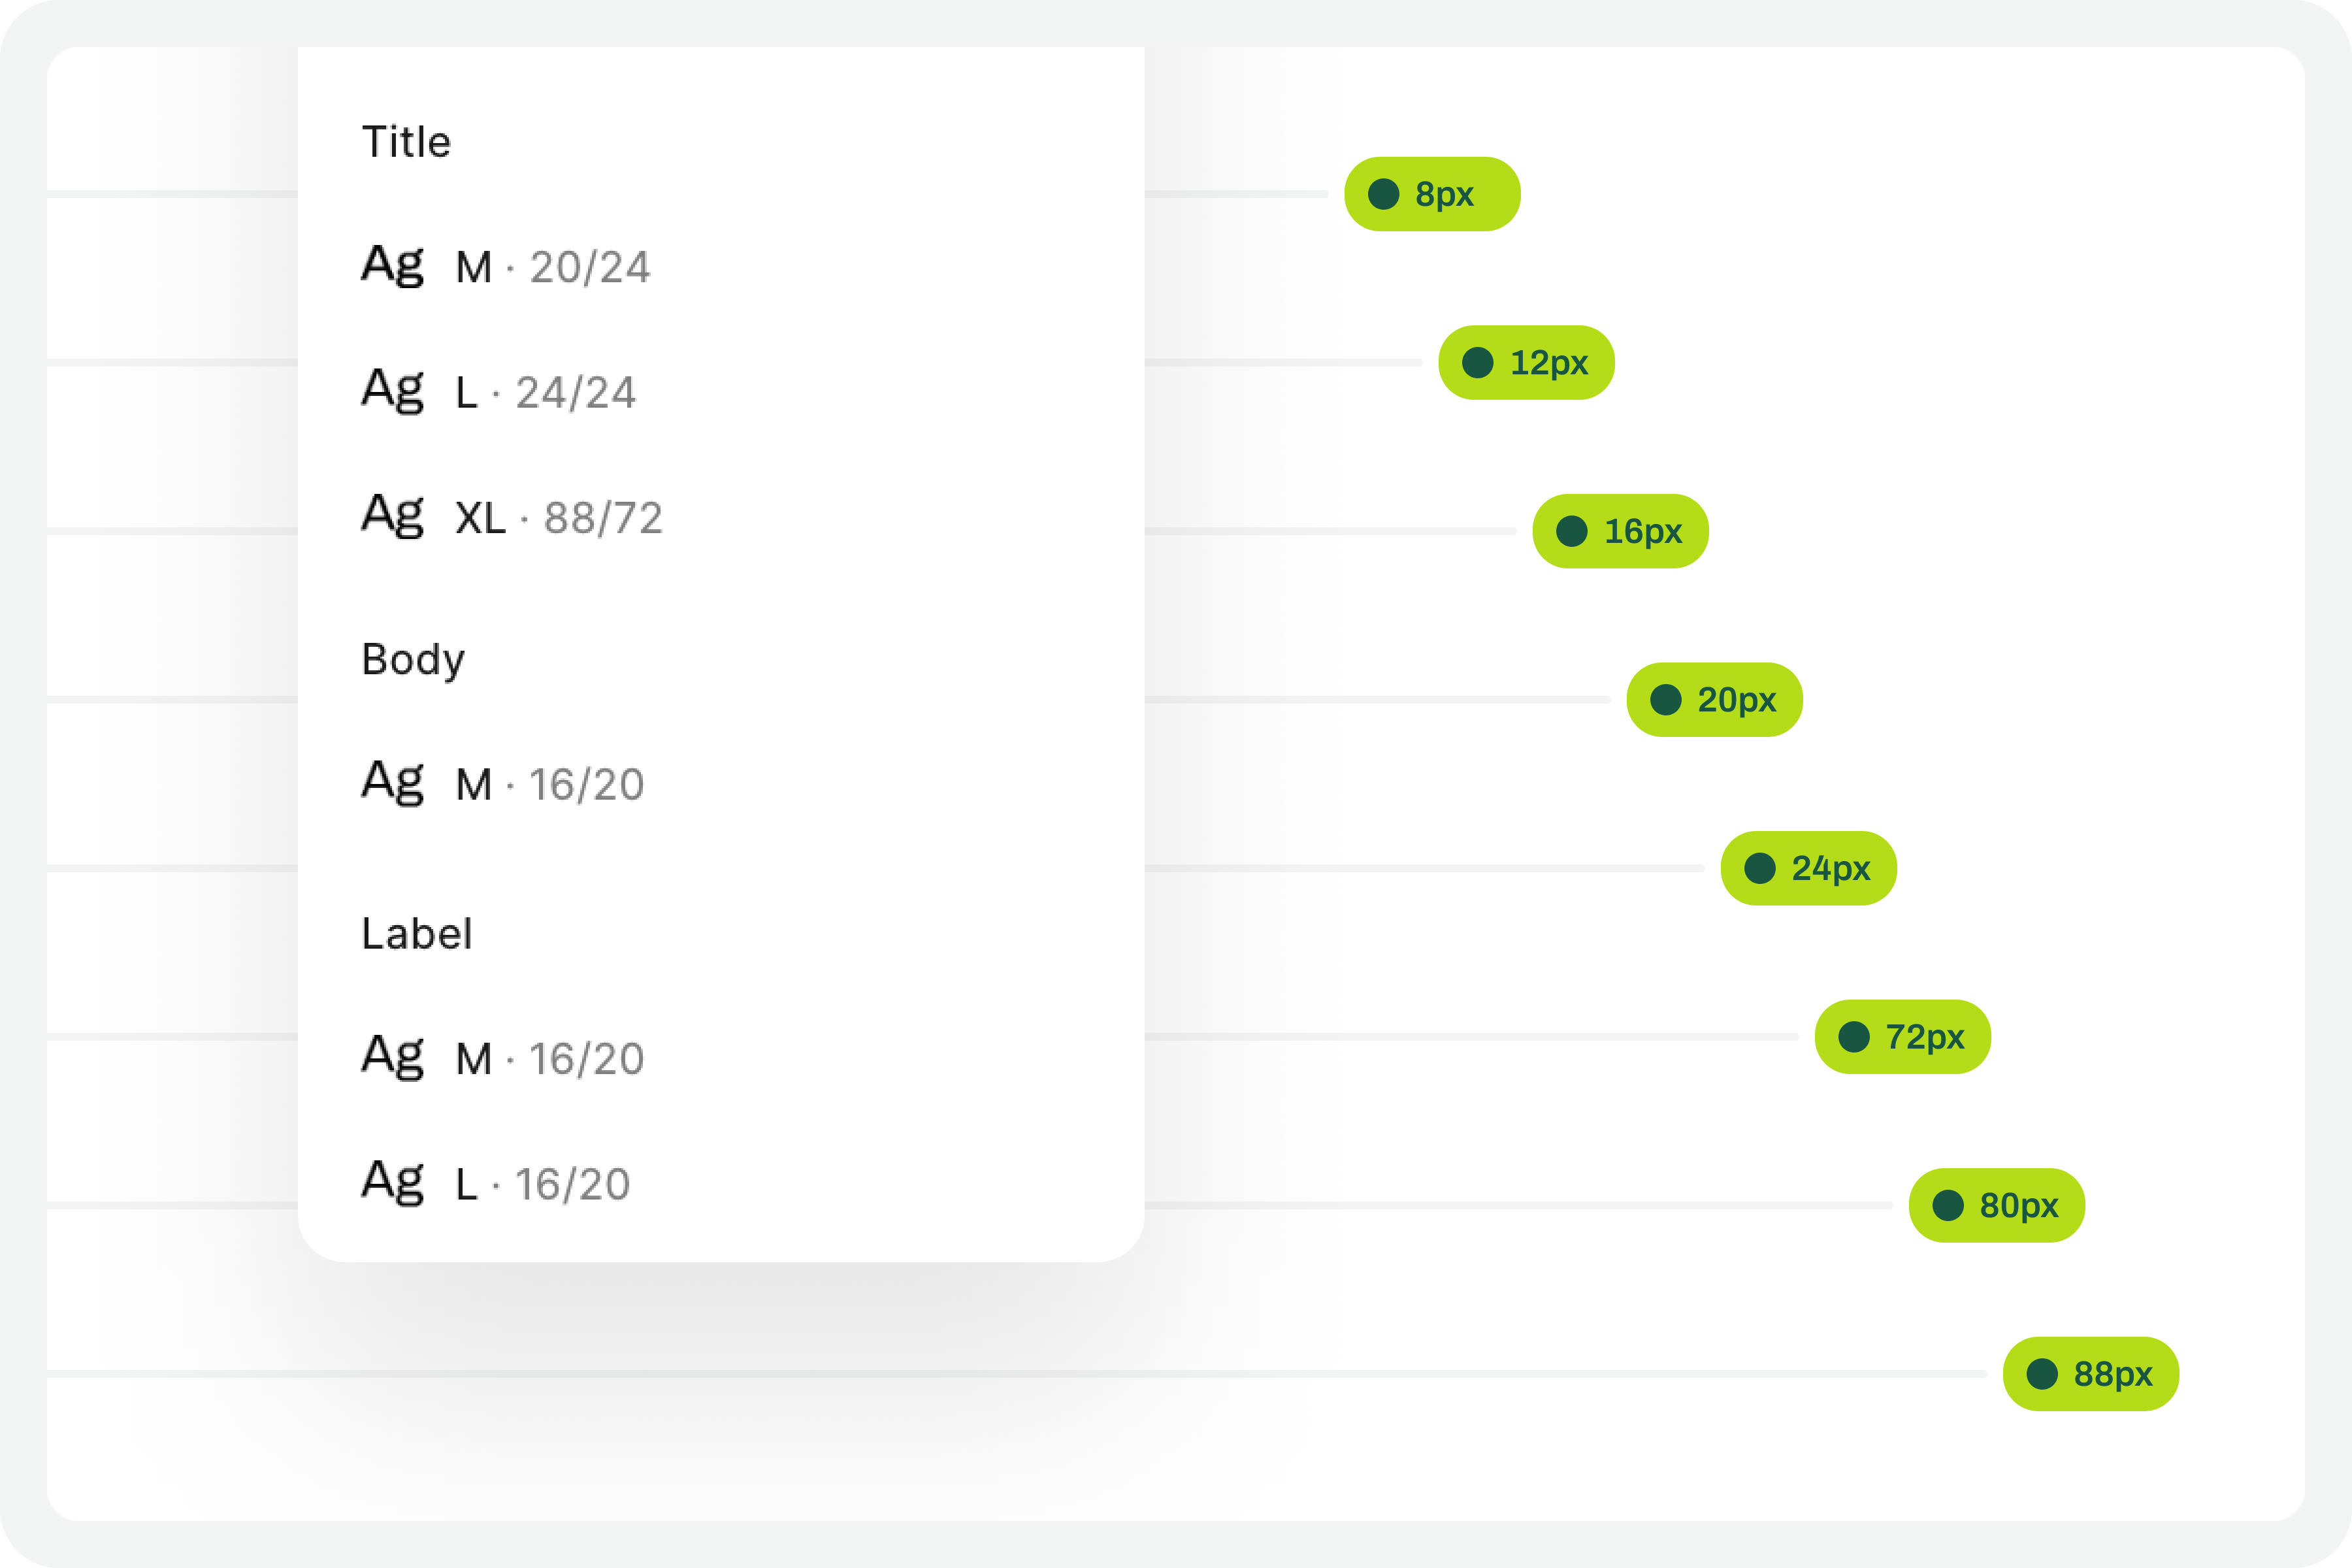
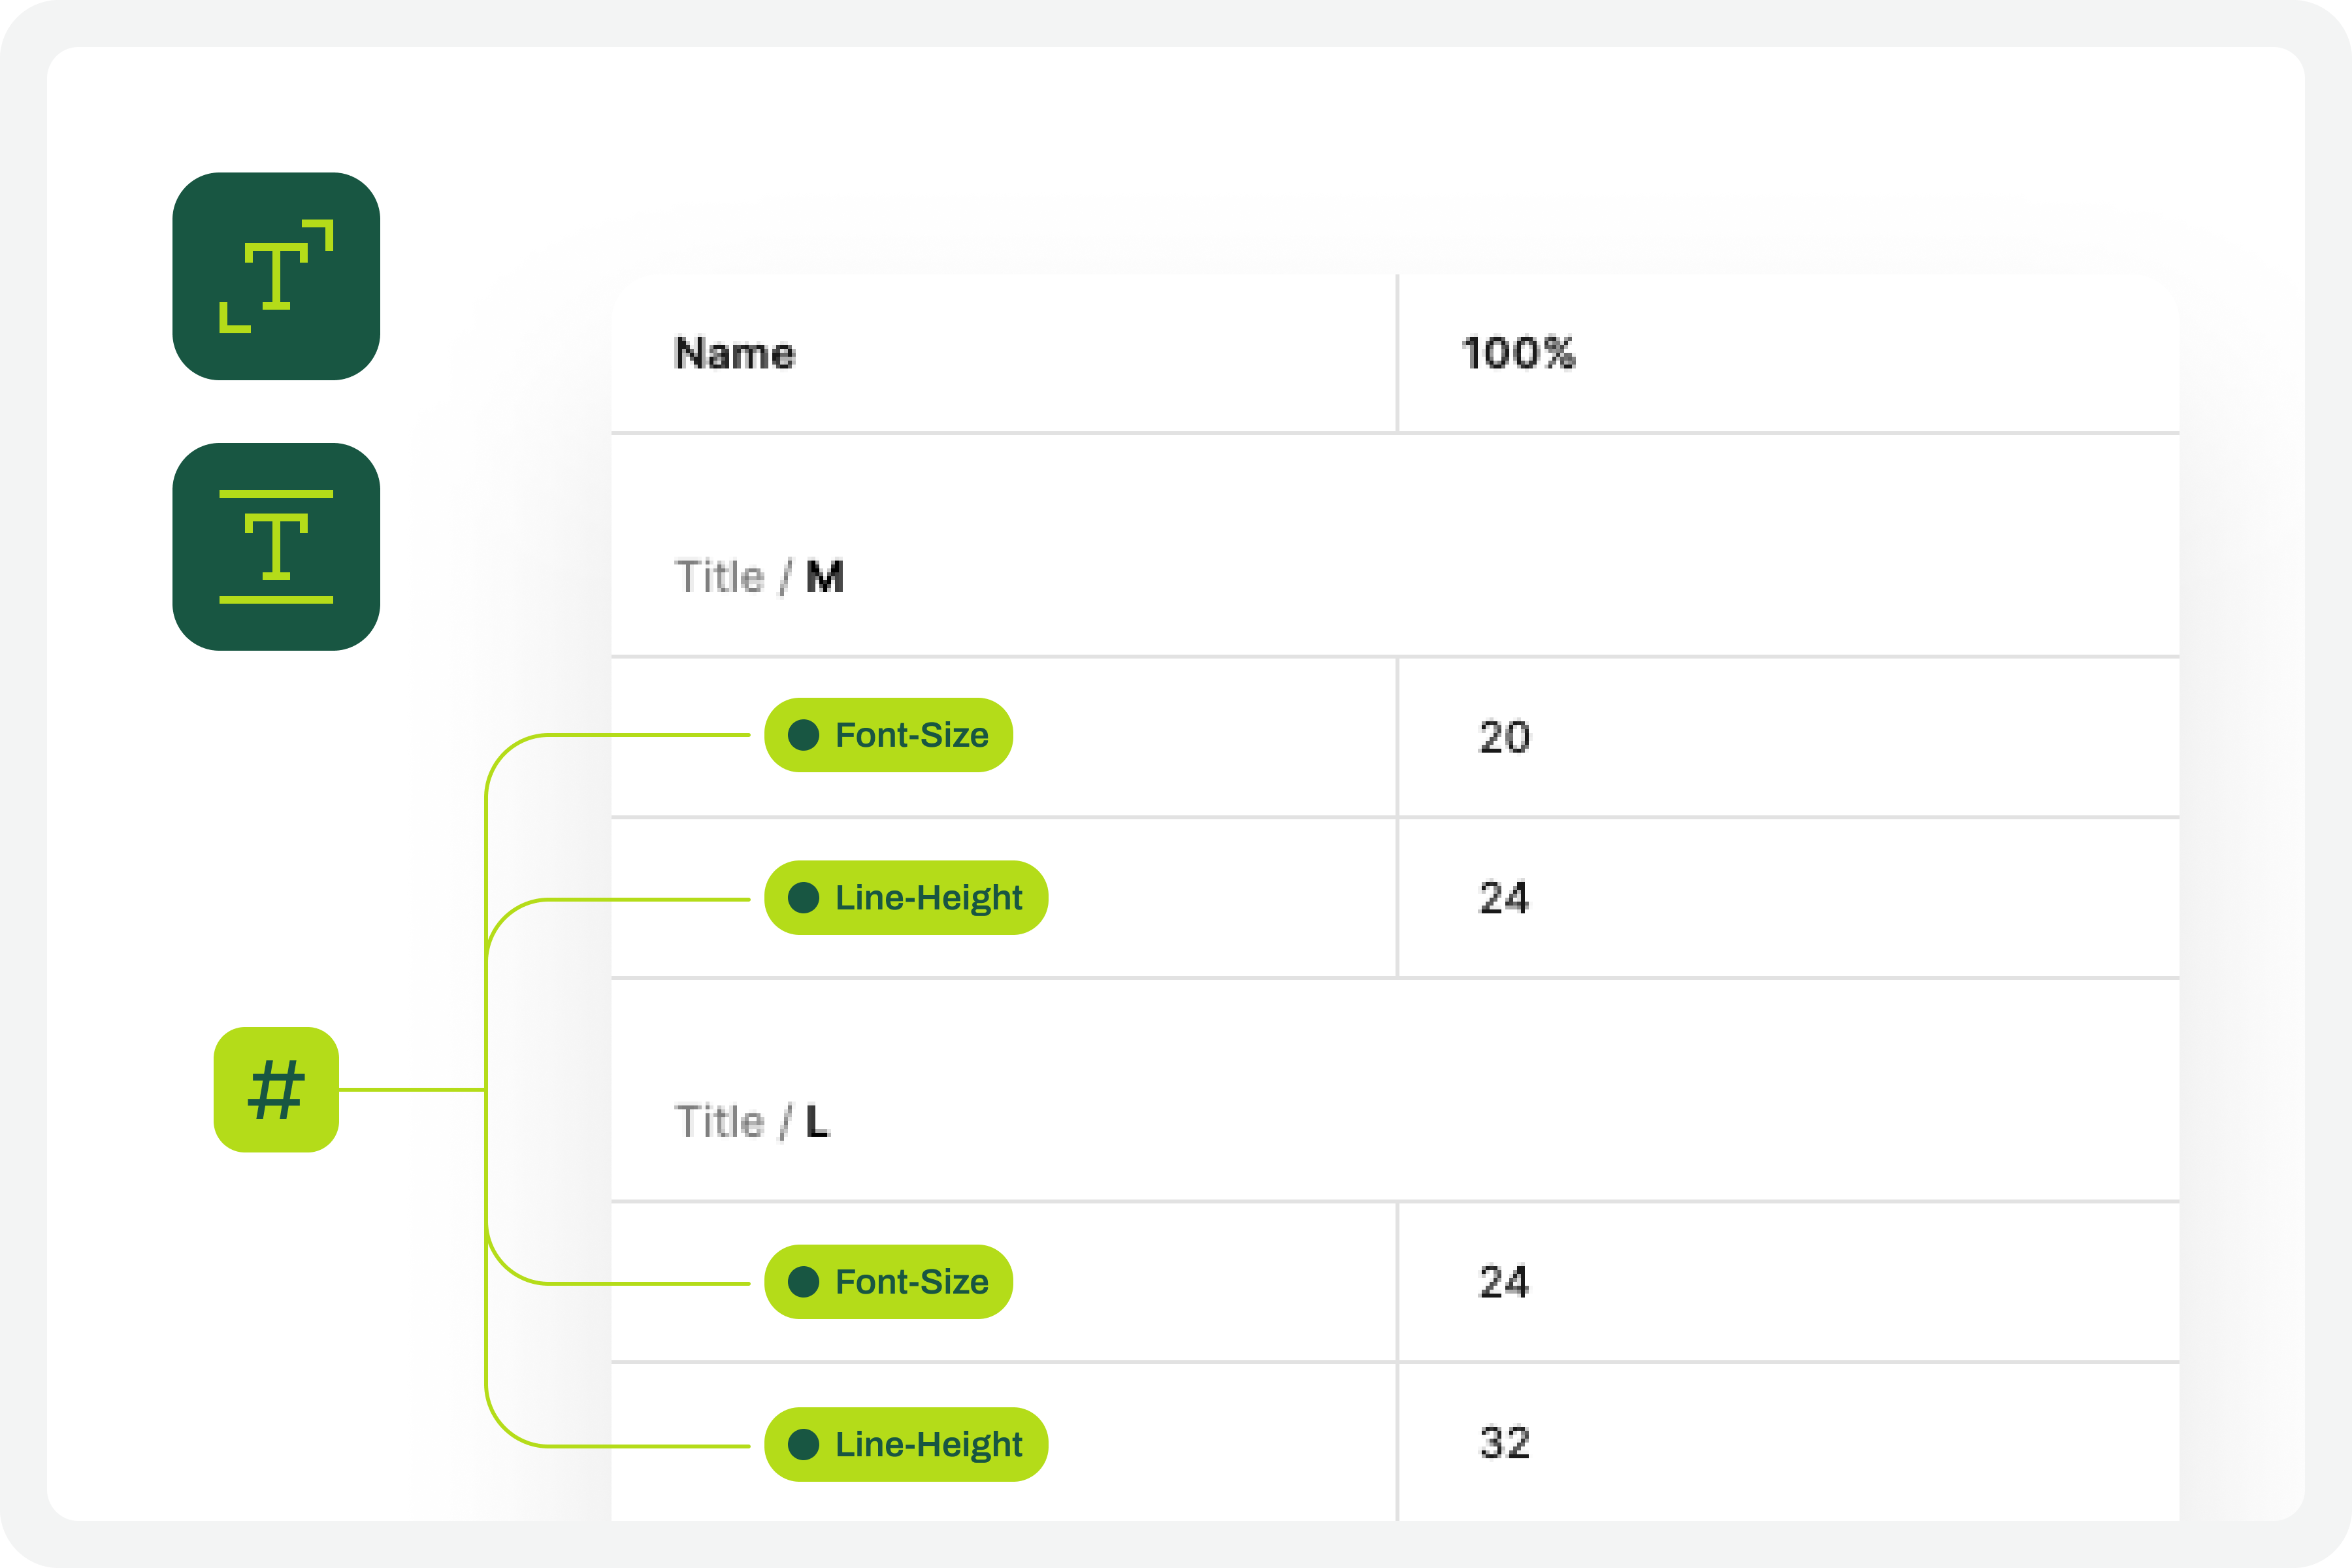
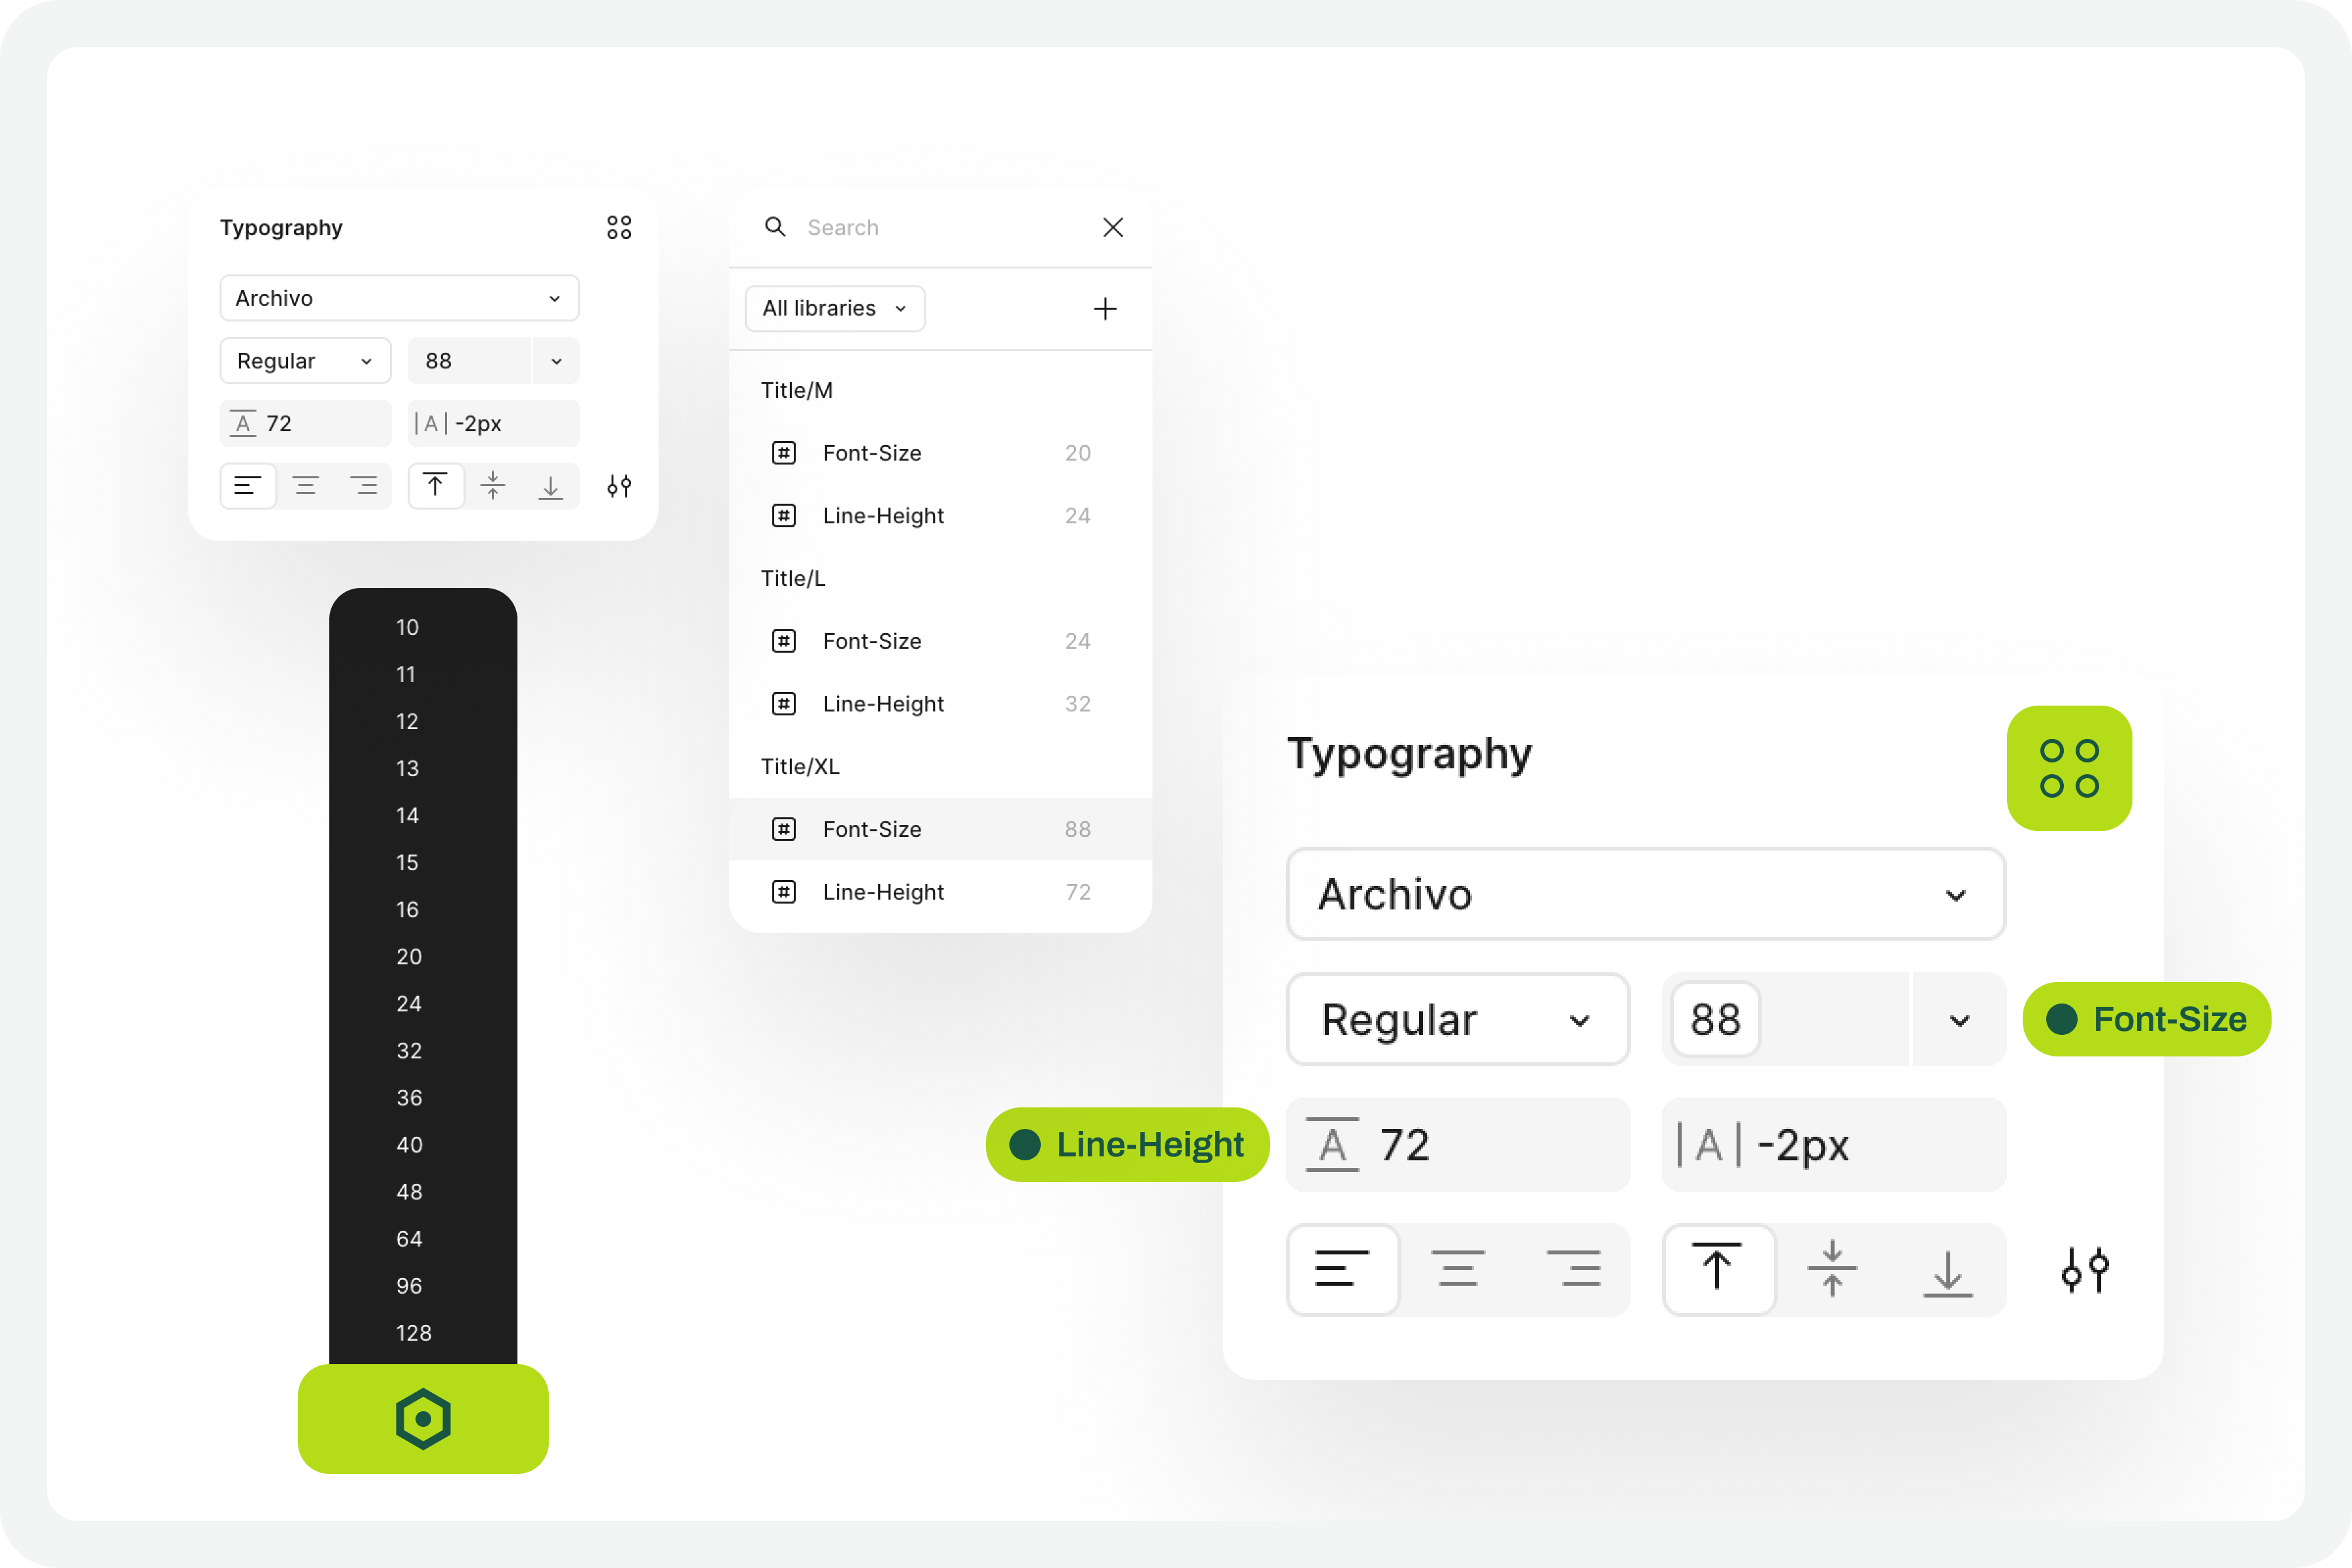
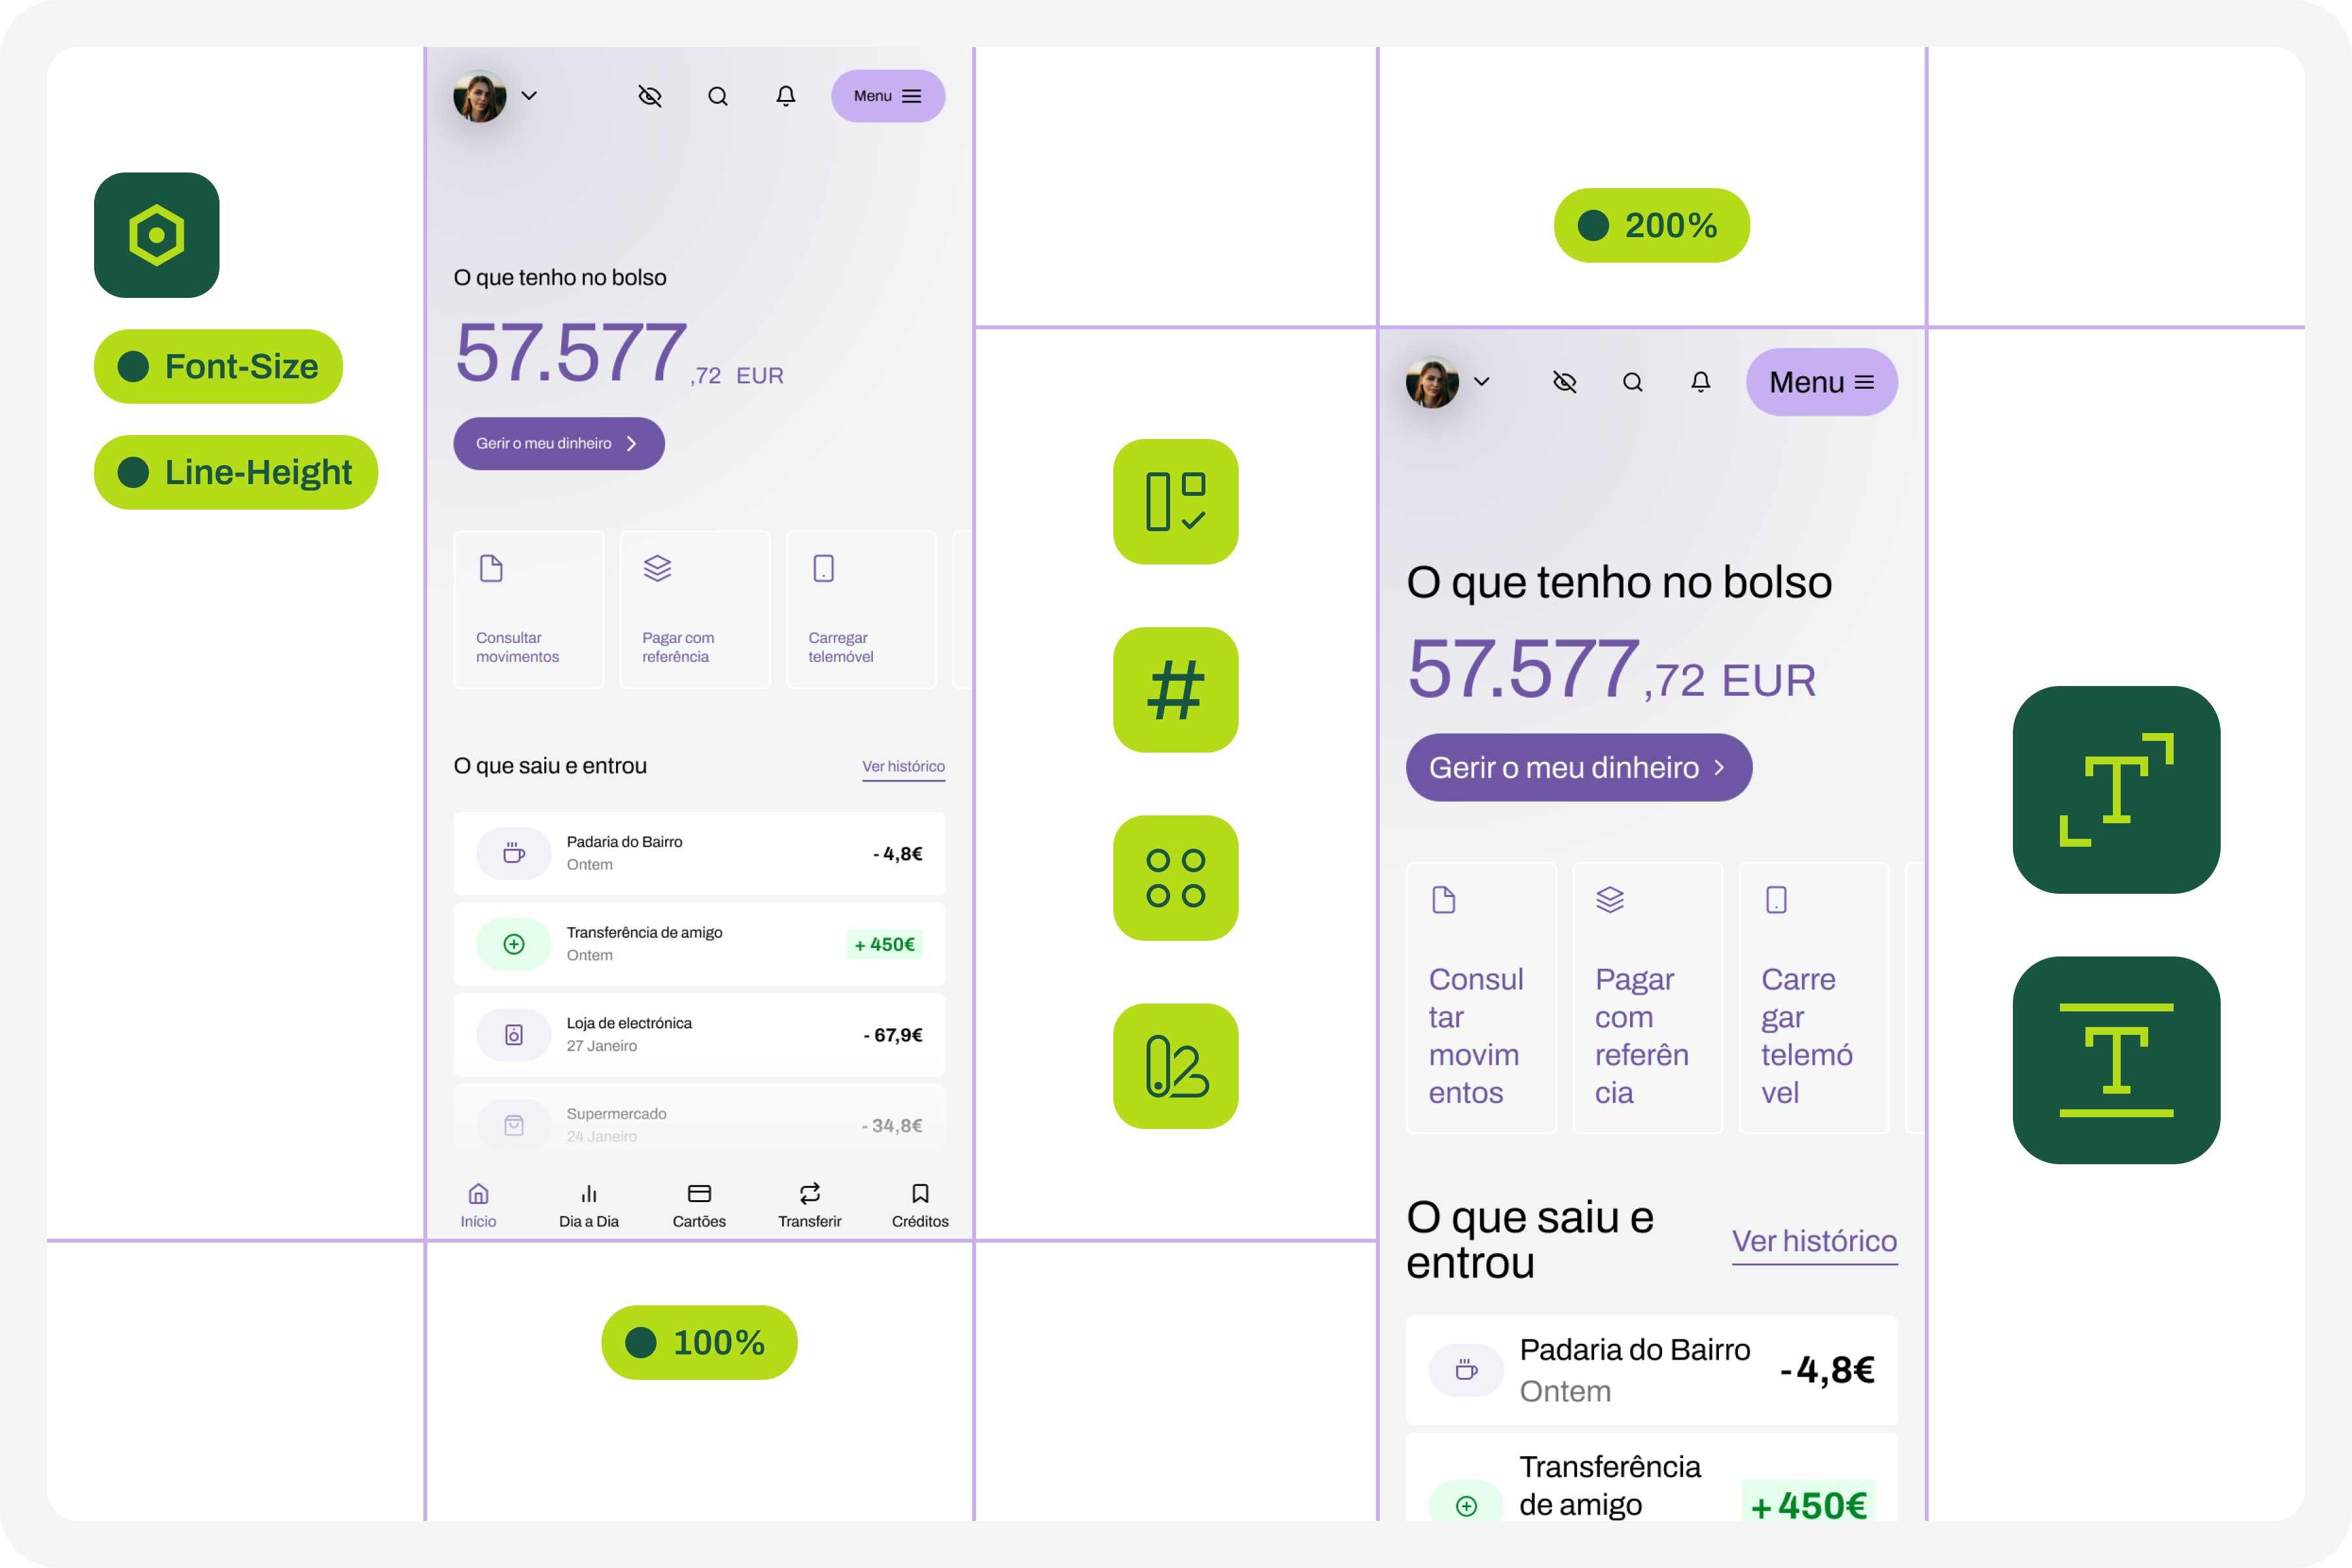
This test forces a fairly high degree of optimization. In practice, this means we will have to use Figma variables for all the characteristics of the text styles we have in the interface. At this stage, you must define Figma “number” variables for at least the font-size and line-height of the text styles you applied to the drawing. With this step, you are defining the font size increase scale values for a 100% visualization model, that is, the initial and reference version of the drawing. It is important that you structure these variables for each text style in the drawing because, subsequently, we will have to consider the enlargement scale of each of these text elements.

5. Apply The Variables To The Text Styles

Having defined the variables for the 100% scale text styles, you must now apply them to the elements of the text styles already created. Don’t forget to apply variables at least to the font-size and line-height characteristics. If you have more typographical variables, that’s fine. But you should at least have variables applied to font-size and line-height. This is really very important.

6. Define The Variables For Increasing The Text Size

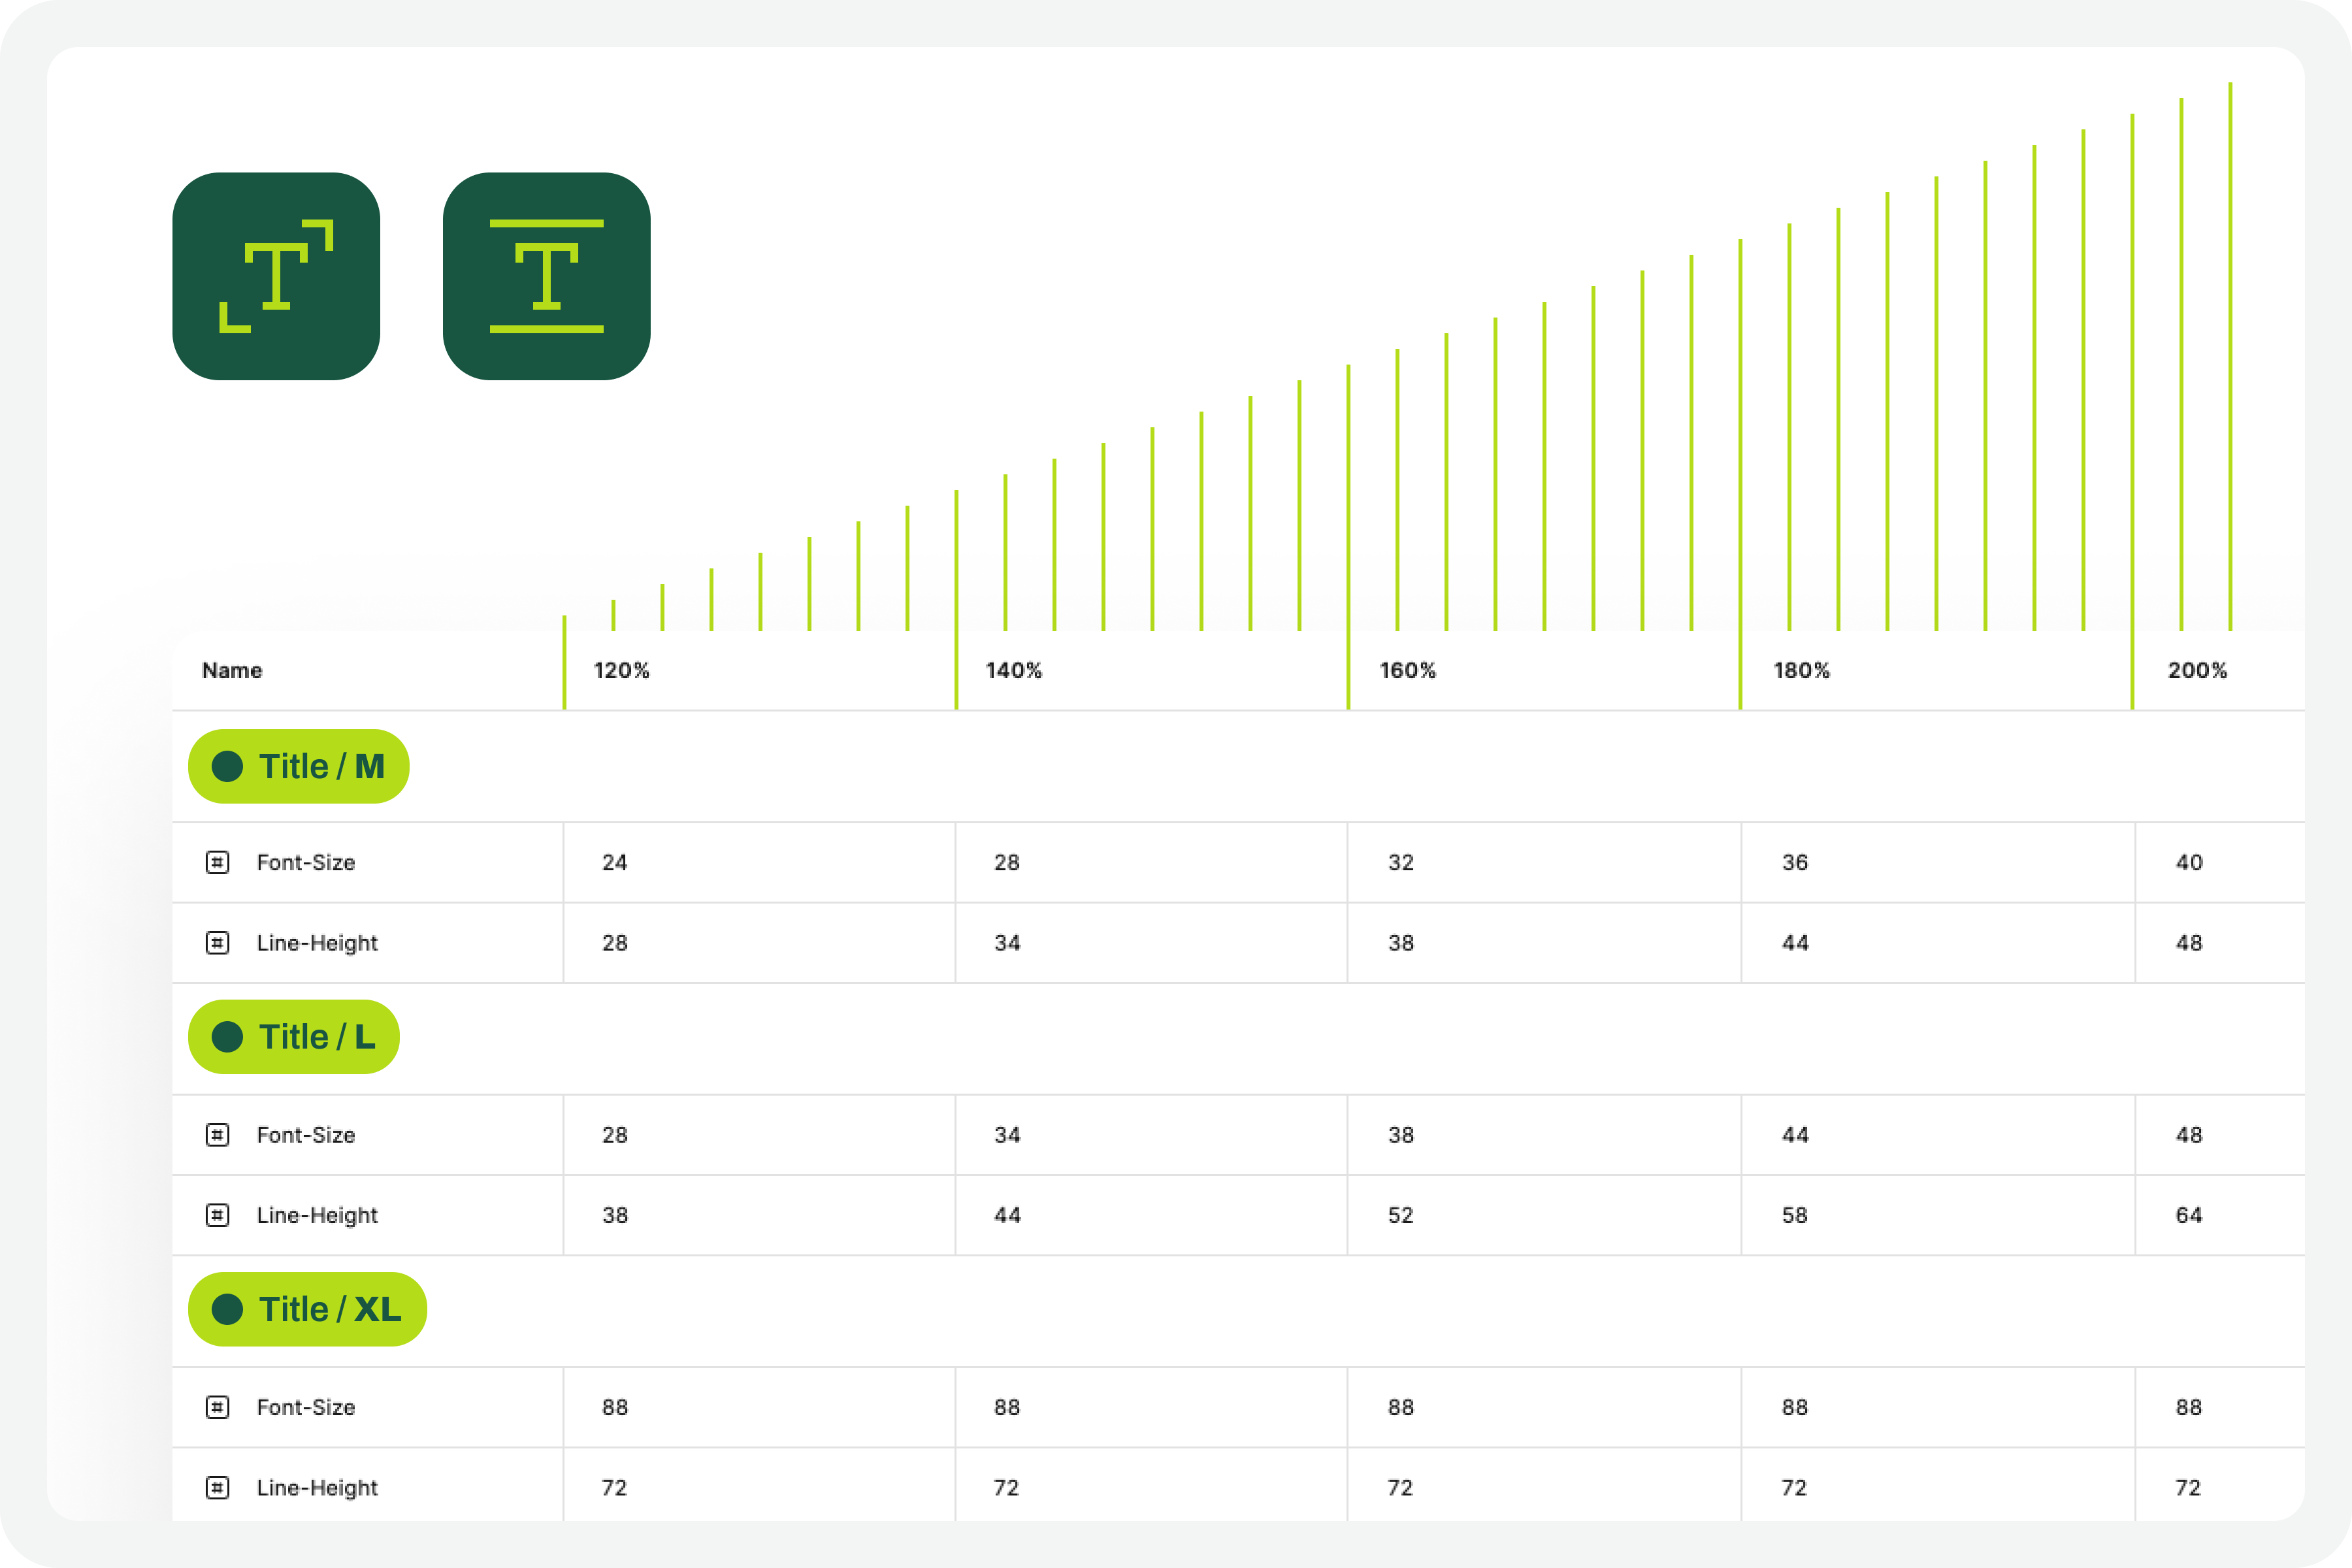
Now that you have the variables applied to the 100% scale text styles, the next step is to create the variables for the other font size increase scales. In practice, you have to create the variables that will tell the system what font size each text style will grow to when the increase scale is 120%, 140%, 160%, etc.

To define the font-size and line-height values, simply multiply the initial value by the scale percentage. For example, if a text style has a font-size of 16px, the size for the 120% scale will be 16 multiplied by 1.2, which gives a result of 19.2. Repeat this calculation for all font-size and line-height values of the font size increase scale percentages you choose.

You can also choose whether or not to apply rounding to the final values. This is an approximate test, and therefore any differences that may arise from rounding will not affect the final perception of the test result.

7. Apply Variables To Different Scale Versions

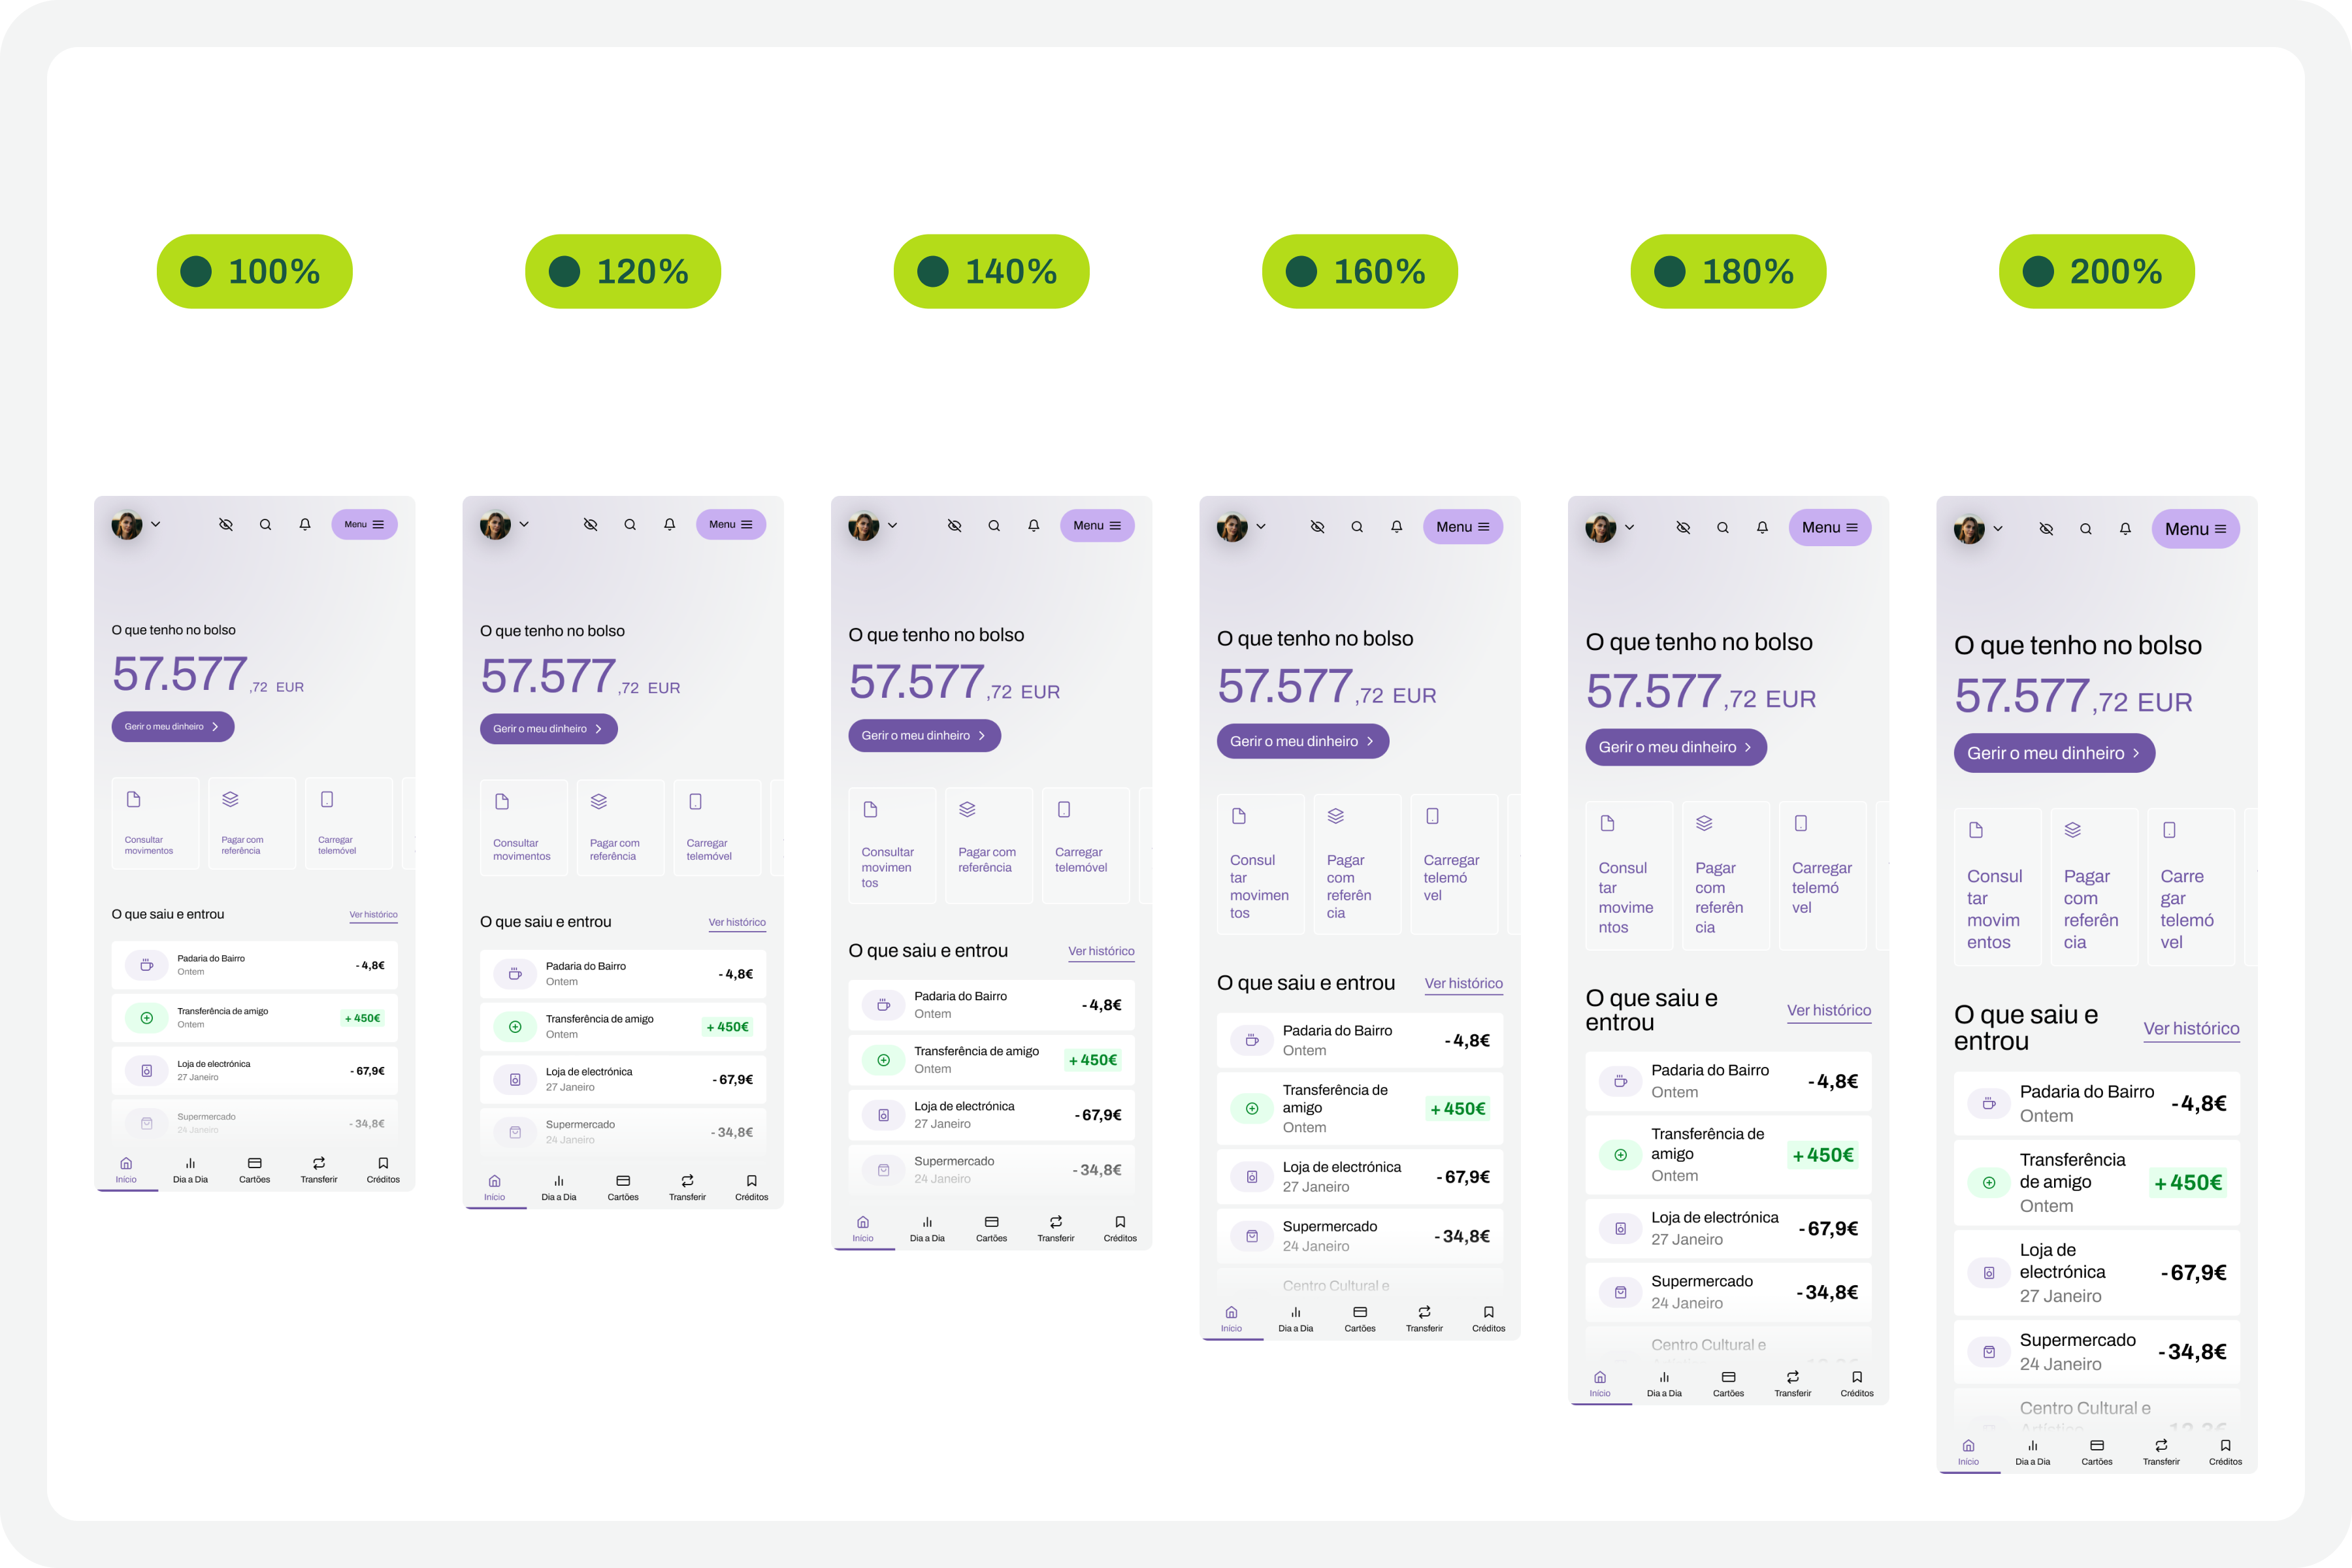
The moment of truth has arrived. The next step is to understand if we have everything working so that the test runs perfectly. Therefore, you should copy the original interface and apply the set of variables for each of the font size increase rates that make sense to you. Repeat this process for all the font size increase percentages you have defined.

As a suggestion, you can use the 120%, 140%, 160%, 180%, and 200% increase percentages as a reference. If you want to simplify, you can reduce the number of scaling percentages you are working with. Regardless of the number of percentages you are working with, you should always work with the minimum of 100% and 200% scales.

8. Identify Areas For Improvement

By applying different font size increase scales to the same screen, it’s easy to understand where improvements might be needed. This is where the real test of increasing font size in interface design and the most interesting accessibility work begins.

In your analysis of the various screens, keep some important aspects in mind:

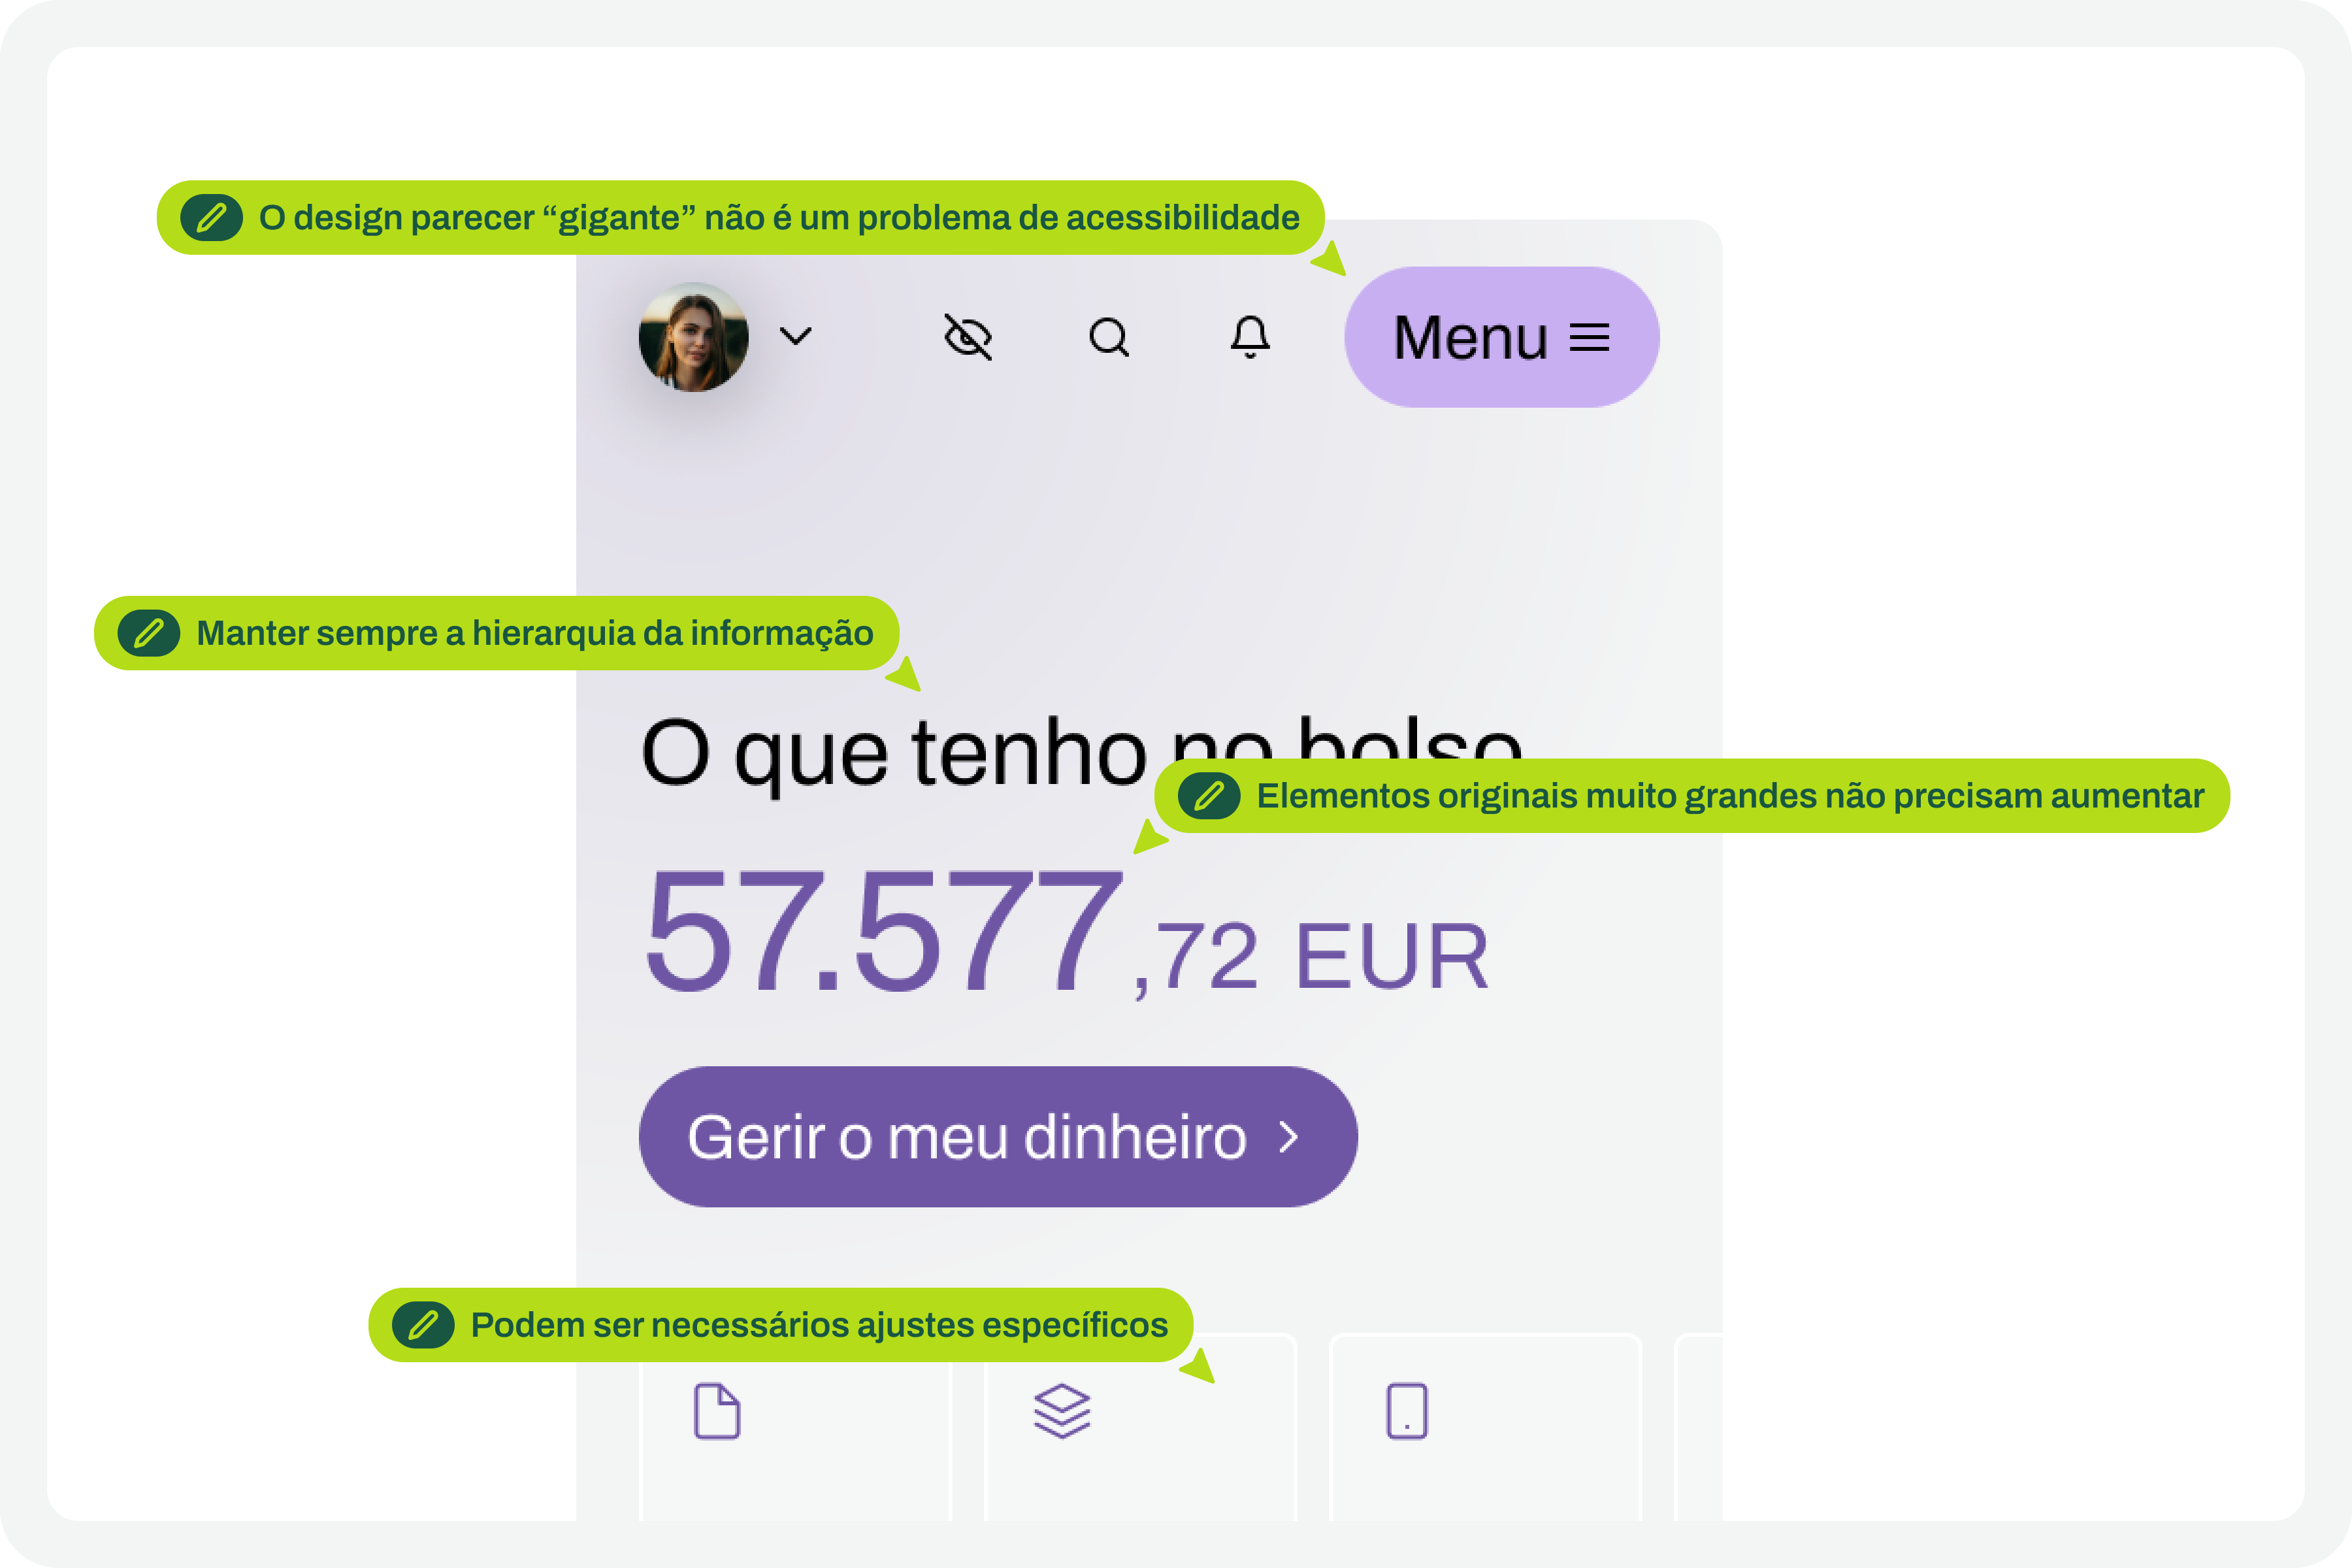
  • The fact that the text appears gigantic isn’t a problem and doesn’t “ruin” the design. Remember that this can mean the difference between someone being able to use a particular product or service or not.
  • An accessibility problem exists when increasing the font size makes it impossible for the user to read certain texts or to activate certain controls.
  • For text elements that are already very large, increasing the font size might not make sense. Doing so could make those elements disproportionate, which wouldn’t improve readability (since they are already a good size) and would occupy completely unnecessary space.
  • If there are elements that appear to be popping out of the screen, the first step is to confirm how you are applying auto layout. Many design aspects can be easily resolved with the proper use of auto layout.
  • Regardless of the scale of font size increase, it is essential to maintain the visual hierarchy of the typography, as this readability is important for perceiving the different levels of information present on the screen.
  • This test can help identify elements that may need adjustments directly in the code to function well at a given scale of increase. Not everything can be solved through design alone, and that’s perfectly fine. Accessibility is essentially a team effort.

9. Make Corrections And Adjustments To The Design

Finally, based on the various screens with different text enlargement scales applied, you can make the design changes that make sense. Some of these adjustments may only be necessary in code. In these cases, you document all these suggestions and pass them on to the development team. It is also crucial to reinforce (again) that some of the problems you may encounter in the design can be quickly resolved in the design process, with the simple and correct application of auto-layout properties.

10. Go Back To The Beginning And Repeat The Process

This is a cyclical approach. This means you should repeat these steps, or variations thereof, as many times as necessary throughout the project. It’s natural that, over time and with process optimization, some of these steps will cease to make sense. That’s absolutely not a problem. But the most important thing to realize here is that accessibility and this process of testing font size increases shouldn’t be done just once, and that’s it. It’s a test to be done many, many times throughout the day-to-day work of each project and team.

The Role Of Design Systems

At first glance, this list of steps might seem like a complex exercise. But it’s not. This is because the vast majority, if not all, of these steps are easy to execute in any context where a design system exists. In fact, design systems have become an unavoidable standard in the Product Design industry. We can discuss what each team calls a design system, but the truth is that it’s very difficult today to find a Product Design team that doesn’t have, at the very least, a minimally structured library of components and styles.

With this foundation, whether more or less documented, it’s very easy to apply this type of font size increase test using Figma variables. Furthermore, if your design system already has, for example, structured variables for light and dark mode, it means you’re already applying the exact same principles we used to perform this test. So, nothing new.

Working with design systems involves a level of structuring and organization that is also very useful for creating this type of test. There’s a myth that design systems limit creativity. This is not true. Design systems help solve the “bureaucratic” part of design, so we can actually have more time for what matters: in this case, testing accessibility and building more and more products and services that are truly accessible to the greatest number of people.

Example File

It’s always easier to see an example than just read a description of a process. If this is true in many disciplines of knowledge, in design, this premise makes even more sense. Therefore, in this Figma file, freely published and openly available to the community, you’ll find a practical example of the entire testing process described here. Remember that this is just an example. There may be countless ways to perform this type of test within the context of a Figma file.

Be sure to look at this approach with a critical eye. It’s a suggestion for testing font size increases that follows a specific process. Despite this, the approach should be adapted to your team’s specific reality, processes, and level of maturity. Simply copying formulas from other teams without understanding if they make sense in our own context is a sure way to make accessibility efforts disproportionate. Every situation is unique. This approach attempts to simplify accessibility work as much as possible in this specific context. And remember: if something happens, however small, it’s a step forward, not a step backward. And that should be celebrated by everyone on the team.

Reducing Laravel Permission Queries Using Redis (Benchmark Results)

Laravel permissions work great… until your application starts to scale.

If you’re using role/permission checks heavily, you might be hitting your database more often than you think.

In this article, I’ll show you a simple benchmark comparing the default behavior vs a Redis-based approach.

The Problem

In many Laravel applications, permission checks look like this:

$user->can(‘edit-post’);

Looks harmless, right?
But under the hood, this can trigger multiple database queries, especially when:

  • You have many users
  • Complex role/permission structures
  • Frequent authorization checks

At small scale, it’s fine.
At large scale… it adds up quickly.

Benchmark Setup

To test this, I created a simple benchmark comparing:

  • Default Laravel permissions behavior
  • Redis-cached permissions

Benchmark repo: https://github.com/scabarcas17/laravel-permissions-redis-benchmark

The idea was simple:

  • Run multiple permission checks
  • Measure database queries
  • Compare performance

Results

Default Behavior

  • Multiple database queries per permission check
  • Repeated queries for the same permissions
  • Increased load under high traffic

With Redis

  • Permissions cached in Redis
  • Near-zero database queries after first load
  • Much faster response times

Key Insight

The biggest issue is not the first query…
It’s the repeated queries for the same permissions.
By caching permissions in Redis, we eliminate redundant database access.

The Solution

To test this approach in a real scenario, I built a small package: https://packagist.org/packages/scabarcas/laravel-permissions-redis

GitHub repo:
https://github.com/scabarcas17/laravel-permissions-redis

This package adds a Redis layer on top of Laravel permissions, reducing unnecessary queries.

When Does This Matter?

This approach is especially useful if your app has:

  • High traffic
  • Many permission checks per request
  • Complex role/permission structures
  • Performance bottlenecks related to authorization

Final Thoughts

Laravel’s default behavior is solid and works well for most applications.

But if you’re scaling and noticing performance issues, caching permissions can make a real difference.

This benchmark is just a starting point—but it clearly shows the impact of reducing repeated database queries.

Feedback

I’d love to hear your thoughts:

  • Have you experienced performance issues with permissions?
  • How are you handling caching in your apps?

I accidentally gave my AI agent access to my live Payment key. Here’s what I built.

While building an agent last week, I realized something
uncomfortable: my agent had my live Payment API key sitting in its
context window.

One prompt injection attack. One malicious tool response. One
leaked log file. And that key is gone.

I couldn’t find a clean solution, so I built one.

What I built

AgentGuard is a credential proxy for AI agents. Instead of giving
your agent real API keys, you give it a token. When the agent makes
an API call, it goes through the AgentGuard proxy which:

  1. Validates the agent token
  2. Decrypts the real credential server-side
  3. Injects it into the request
  4. Forwards to the target API
  5. Logs the call

The agent never sees the real key. Ever.

The code change is 3 lines

Before:
requests.post(“https://api.stripe.com/v1/charges”,
headers={“Authorization”: “Bearer sk_live_real_key…”})

After:
requests.post(“https://proxy.agent-guard.dev/v1/charges”,
headers={
“X-AgentGuard-Token”: “your_agent_token”,
“X-AgentGuard-Credential”: “your_credential_id”
})

That’s it. Base URL changes, two headers added, everything else
stays the same.

What you also get

  • Full audit log of every API call your agent makes
  • Instant revocation — one click kills an agent’s access
  • Zero-knowledge encryption — keys encrypted in your browser,
    we literally cannot read them

Try it

agent-guard.dev — free to start, no credit card.

Would love feedback from anyone building agents in production.
What am I missing? What would make this actually useful for you?

An AI can now build in 1 hour what used to take a team 1 year. This isn’t vibe coding anymore. This is agentic coding.

Google engineer recently shared something wild.
Claude Code rebuilt in 1 hour what took a team 1 year.
That sparked one big question:
Will this change how we work?
👉 Yes. But not the way you think.
🧠 Vibe coding was just the start
We’ve been talking about vibe coding prompting instead of coding line by line.

That was step one.
Agentic coding is step two.
🤖 Assistant vs Agent
Assistants (Copilot, Claude):
You guide every step
You stay in control
Agents:
You give a goal
They plan, execute, test, fix
They iterate autonomously

👉 Example:
“Refactor this module + add tests”
The agent:
updates files
runs tests
fixes errors
delivers a ready result
You don’t code every step anymore.
You supervise the system.

⚙️ What’s changing right now
This isn’t theory.
Teams are already:
automating workflows
running multiple agents in parallel
reducing manual dev work
👉 The real gain is not just code generation

👉 It’s workflow automation
🧩 Your new role
The best devs are becoming:
Orchestrators
You:
define goals
delegate smartly
validate outputs
Not less technical.
Just more strategic.

⚠️ Reality check
AI won’t replace understanding.
Bad supervision = bad code.
Code can be generated.
Understanding cannot.
🛠️ How to start
automate small tasks first
write clearer prompts (goals > instructions)
always review before shipping

🔥 Final thought
The shift is already here.
The question is no longer:
“Should I use AI?”
But:
“Am I using it the right way?”

Solana Program Authority Security: 5 Upgrade Guardrails That Would Have Saved Step Finance’s $27M

On January 31, 2026, Step Finance lost 261,854 SOL (~$27.3 million) — not to a smart contract bug, but to compromised executive devices and stolen private keys. The attacker gained control of the program upgrade authority, deployed a malicious version, and drained the treasury in minutes.

Step Finance, SolanaFloor, and Remora Markets all shut down permanently in March. No smart contract audit would have prevented this. The vulnerability was operational: a single point of failure in program authority management.

This is a pattern-level problem. Here are five guardrails that make upgrade authority compromise survivable.

The Upgrade Authority Problem

Every upgradeable Solana program has an upgrade_authority — a single pubkey that can deploy new bytecode at any time. By default, this is the deployer’s wallet. If that key is compromised, the attacker owns the program.

┌──────────────────────────────────────────┐
│         DEFAULT SOLANA UPGRADE           │
│                                          │
│  Developer Wallet (hot key)              │
│       │                                  │
│       ▼                                  │
│  solana program deploy program.so        │
│       │                                  │
│       ▼                                  │
│  Program instantly updated               │
│  No delay. No approval. No alert.        │
└──────────────────────────────────────────┘

This is the Step Finance scenario. One compromised laptop → full program control → treasury drained.

Guardrail 1: Multisig Upgrade Authority

The minimum viable defense: transfer upgrade authority to a multisig.

Squads Protocol is the standard on Solana. Set up an M-of-N multisig where no single compromised key can trigger an upgrade:

# Create a Squads multisig (3-of-5)
solana program set-upgrade-authority <PROGRAM_ID> 
  --new-upgrade-authority <SQUADS_VAULT_ADDRESS> 
  --upgrade-authority <CURRENT_KEYPAIR>

Critical configuration choices:

  • Threshold: ≥ 3-of-5 — survives 2 compromised keys
  • Key storage: Hardware wallets (Ledger) — resistant to malware
  • Geographic distribution: ≥ 2 jurisdictions — survives physical seizure
  • Recovery plan: Documented, tested — prevents lockout

What it prevents: A single compromised device can no longer upgrade the program.

What it doesn’t prevent: Social engineering all signers, or a malicious insider. That’s where guardrail 2 comes in.

Guardrail 2: Time-Locked Upgrades

Even with multisig, upgrades should never be instant. A time lock gives the community and monitoring systems time to detect and respond.

use anchor_lang::prelude::*;

#[account]
pub struct UpgradeProposal {
    pub program_id: Pubkey,
    pub buffer_address: Pubkey,
    pub proposer: Pubkey,
    pub proposed_at: i64,
    pub execution_after: i64,
    pub executed: bool,
    pub cancelled: bool,
}

pub const TIME_LOCK_SECONDS: i64 = 172_800; // 48 hours

pub fn propose_upgrade(ctx: Context<ProposeUpgrade>, buffer: Pubkey) -> Result<()> {
    let clock = Clock::get()?;
    let proposal = &mut ctx.accounts.proposal;
    proposal.program_id = ctx.accounts.target_program.key();
    proposal.buffer_address = buffer;
    proposal.proposer = ctx.accounts.proposer.key();
    proposal.proposed_at = clock.unix_timestamp;
    proposal.execution_after = clock.unix_timestamp + TIME_LOCK_SECONDS;
    proposal.executed = false;
    proposal.cancelled = false;
    emit!(UpgradeProposed {
        program_id: proposal.program_id,
        buffer: buffer,
        executable_after: proposal.execution_after,
    });
    Ok(())
}

pub fn execute_upgrade(ctx: Context<ExecuteUpgrade>) -> Result<()> {
    let clock = Clock::get()?;
    let proposal = &ctx.accounts.proposal;
    require!(!proposal.executed, ErrorCode::AlreadyExecuted);
    require!(!proposal.cancelled, ErrorCode::Cancelled);
    require!(
        clock.unix_timestamp >= proposal.execution_after,
        ErrorCode::TimeLockActive
    );
    // Execute via BPF Loader CPI
    Ok(())
}

pub fn cancel_upgrade(ctx: Context<CancelUpgrade>) -> Result<()> {
    let proposal = &mut ctx.accounts.proposal;
    require!(!proposal.executed, ErrorCode::AlreadyExecuted);
    proposal.cancelled = true;
    emit!(UpgradeCancelled { program_id: proposal.program_id });
    Ok(())
}

Key design decisions:

  • 48-hour minimum lock for production programs holding >$1M TVL
  • Cancel is easier than execute — any single signer can cancel
  • On-chain events for every proposal, cancellation, and execution

Guardrail 3: Bytecode Verification Before Execution

A time lock is useless if nobody checks what’s being deployed:

# Build reproducibly
anchor build --verifiable

# Hash the output
sha256sum target/verifiable/program.so

# Community verifies the proposed buffer:
solana program dump <BUFFER_ADDRESS> /tmp/proposed.so
sha256sum /tmp/proposed.so
# Must match the published hash

If the proposed buffer’s hash doesn’t match the published source code’s verifiable build, cancel immediately.

Guardrail 4: On-Chain Upgrade Monitor

Deploy an automated monitor that alerts on any upgrade-related activity:

import { Connection, PublicKey } from "@solana/web3.js";

const BPF_LOADER = new PublicKey(
  "BPFLoaderUpgradeab1e11111111111111111111111"
);

async function monitorUpgrades(connection: Connection) {
  connection.onLogs(BPF_LOADER, (logs) => {
    const isUpgrade = logs.logs.some(l => l.includes("Upgrade"));
    const isSetAuth = logs.logs.some(l => l.includes("SetAuthority"));
    if (isUpgrade || isSetAuth) {
      // Fire alerts to Telegram, Discord, PagerDuty
      sendAlert(`🚨 Program upgrade detected: ${logs.signature}`);
    }
  });
}

If Step Finance had this, the team would have known about the malicious upgrade within seconds — not minutes after the treasury was drained.

Guardrail 5: Conditional Immutability

For mature programs, implement defense asymmetry:

pub fn freeze_program(ctx: Context<FreezeProgram>) -> Result<()> {
    // Any single multisig member can freeze (instant)
    let gov = &mut ctx.accounts.governance;
    gov.is_frozen = true;
    gov.freeze_started_at = Clock::get()?.unix_timestamp;
    Ok(())
}

pub fn unfreeze_program(ctx: Context<UnfreezeProgram>) -> Result<()> {
    let gov = &ctx.accounts.governance;
    let clock = Clock::get()?;
    // Emergency council only (5-of-7), 7-day delay
    require!(
        clock.unix_timestamp >= gov.freeze_started_at + 604_800,
        ErrorCode::UnfreezeDelayActive
    );
    Ok(())
}

Even if 4 of 5 normal multisig members are compromised, a single honest member freezes everything. Unfreezing requires a separate, higher-threshold council and a full week.

What Would Have Saved Step Finance

  • Multisig: Attacker needs 3+ keys, not 1
  • Time lock: 48h window to detect and cancel
  • Bytecode verification: Community spots unknown bytecode
  • Upgrade monitor: Alert within seconds
  • Conditional immutability: Any team member freezes instantly

With all five guardrails, $27.3 million stays in the treasury.

Implementation Priority

  1. Today: Transfer upgrade authority to a Squads multisig (30 min)
  2. This week: Set up upgrade monitor with alerts (2 hours)
  3. This sprint: Implement time-locked upgrades (1-2 days)
  4. This quarter: Add bytecode verification to CI/CD
  5. Post-stabilization: Evaluate conditional immutability

The cost of all five guardrails is measured in hours. The cost of not having them is measured in millions.

Key Takeaways

  1. Upgrade authority is root access. Treat it like cold storage for treasury funds.
  2. Multisig is table stakes, not the finish line. Without time locks and monitoring, coordinated attacks still succeed silently.
  3. Defense asymmetry saves you. Make freezing easy and upgrading hard.
  4. Monitor the BPF Loader. It’s the single chokepoint for all Solana program upgrades.
  5. $27.3M was lost to operational security, not code. Security is a stack — code, operations, and governance all need coverage.

This is part of the DeFi Security Best Practices series. The Step Finance incident is a wake-up call for every Solana team running upgradeable programs.

npm Has a Free Security Advisory API — Find Vulnerable Packages Before They Break Your App

Last month, a popular npm package with 10M+ weekly downloads got compromised. Teams scrambled to check if their projects were affected. Most used npm audit — but that only catches known vulnerabilities in your lockfile.

What if you could programmatically check ANY package for security issues, track its download trends, and monitor its dependency chain — all through free APIs? You can.

Here are 4 npm-related APIs that most developers don’t know exist.

1. npm Registry API — Package Metadata Without Auth

The npm registry itself is a CouchDB instance with a public REST API:

// Get full package metadata
const response = await fetch('https://registry.npmjs.org/express');
const data = await response.json();

console.log(`Latest version: ${data['dist-tags'].latest}`);
console.log(`Total versions: ${Object.keys(data.versions).length}`);
console.log(`License: ${data.license}`);
console.log(`Weekly downloads: check api.npmjs.org`);

No API key. No rate limits (be polite). JSON response.

What you can extract:

  • Every version ever published
  • All dependencies and devDependencies for each version
  • Maintainers and their emails
  • Repository URL, homepage, bugs URL
  • Publish dates for every version

2. npm Downloads API — Track Popularity Trends

// Daily downloads for last month
const res = await fetch('https://api.npmjs.org/downloads/point/last-month/express');
const data = await res.json();
console.log(`${data.package}: ${data.downloads.toLocaleString()} downloads last month`);

// Compare packages
const packages = ['express', 'fastify', 'koa', 'hapi'];
for (const pkg of packages) {
    const r = await fetch(`https://api.npmjs.org/downloads/point/last-month/${pkg}`);
    const d = await r.json();
    console.log(`${pkg}: ${d.downloads.toLocaleString()}`);
}
// express:    35,234,567
// fastify:     4,891,234  
// koa:         1,234,567
// hapi:          456,789

Range queries:

// Downloads per day for a specific range
const url = 'https://api.npmjs.org/downloads/range/2025-01-01:2025-03-24/react';
const res = await fetch(url);
const data = await res.json();

// Plot the trend
data.downloads.forEach(d => {
    const bar = '#'.repeat(Math.floor(d.downloads / 500000));
    console.log(`${d.day} | ${bar} ${d.downloads.toLocaleString()}`);
});

3. GitHub Advisory Database API — Security Vulnerabilities

GitHub maintains a free, public advisory database for npm packages:

// Search advisories for a package
const query = `
{
  securityAdvisories(first: 5, orderBy: {field: PUBLISHED_AT, direction: DESC}, ecosystem: NPM) {
    nodes {
      summary
      severity
      publishedAt
      vulnerabilities(first: 3) {
        nodes {
          package { name }
          vulnerableVersionRange
          firstPatchedVersion { identifier }
        }
      }
    }
  }
}`;

// Use via GitHub GraphQL API (needs token for GraphQL, but REST is free)
// Or use the REST endpoint:
const res = await fetch('https://api.github.com/advisories?ecosystem=npm&per_page=5');
const advisories = await res.json();
advisories.forEach(a => {
    console.log(`[${a.severity}] ${a.summary}`);
    console.log(`  Published: ${a.published_at}`);
});

4. Bundlephobia API — Check Package Size

// How much will this package add to your bundle?
const res = await fetch('https://bundlephobia.com/api/size?package=lodash@latest');
const data = await res.json();

console.log(`${data.name}@${data.version}`);
console.log(`  Size: ${(data.size / 1024).toFixed(1)} KB`);
console.log(`  Gzipped: ${(data.gzip / 1024).toFixed(1)} KB`);
console.log(`  Download time (3G): ${data.downloadTime}ms`);

Compare alternatives:

const alternatives = ['lodash', 'underscore', 'ramda', 'remeda'];
for (const pkg of alternatives) {
    const r = await fetch(`https://bundlephobia.com/api/size?package=${pkg}@latest`);
    const d = await r.json();
    console.log(`${pkg}: ${(d.gzip / 1024).toFixed(1)} KB gzipped`);
}
// lodash:      25.2 KB
// underscore:   7.1 KB
// ramda:       12.4 KB
// remeda:       5.8 KB

Putting It All Together: Package Health Check

async function packageHealthCheck(name) {
    console.log(`n=== Health Check: ${name} ===n`);

    // 1. Basic metadata
    const meta = await (await fetch(`https://registry.npmjs.org/${name}`)).json();
    const latest = meta['dist-tags'].latest;
    console.log(`Latest: ${latest}`);
    console.log(`Versions: ${Object.keys(meta.versions).length}`);
    console.log(`License: ${meta.license}`);

    // 2. Downloads
    const dl = await (await fetch(`https://api.npmjs.org/downloads/point/last-month/${name}`)).json();
    console.log(`Downloads/month: ${dl.downloads.toLocaleString()}`);

    // 3. Bundle size
    try {
        const size = await (await fetch(`https://bundlephobia.com/api/size?package=${name}@latest`)).json();
        console.log(`Bundle size: ${(size.gzip / 1024).toFixed(1)} KB gzipped`);
    } catch(e) {
        console.log('Bundle size: N/A');
    }

    // 4. Dependencies count
    const deps = meta.versions[latest].dependencies || {};
    console.log(`Dependencies: ${Object.keys(deps).length}`);

    // 5. Last publish date
    const time = meta.time[latest];
    const daysSince = Math.floor((Date.now() - new Date(time)) / 86400000);
    console.log(`Last published: ${time.split('T')[0]} (${daysSince} days ago)`);

    if (daysSince > 365) console.log('  ⚠️  WARNING: Not updated in over a year');
    if (Object.keys(deps).length > 20) console.log('  ⚠️  WARNING: Heavy dependency tree');
}

packageHealthCheck('express');

API Reference

API Base URL Auth Use case
npm Registry registry.npmjs.org None Package metadata, versions, deps
npm Downloads api.npmjs.org None Download counts, trends
GitHub Advisories api.github.com/advisories None (REST) Security vulnerabilities
Bundlephobia bundlephobia.com/api None Bundle size analysis

When These APIs Are Not Enough

  • Private packages: Need npm token for private registry
  • Real-time malware detection: Use Socket.dev or Snyk
  • License compliance: Use FOSSA for enterprise-grade scanning

Do you check your dependencies before installing? What tools do you use? I am curious what the community’s stack looks like for supply chain security.

Introducing JetBrains Central: An Open System for Agentic Software Development

AI is beginning to change how software is produced. Instead of just assisting developers inside the editor, AI agents now investigate issues, generate code, run tests, and execute multi-step workflows. As this work scales, software development extends beyond individual tools or sessions. It becomes a distributed system of agents, environments, and workflows that operate across IDEs, CLIs, pipelines, and collaboration tools.

In this new model, code generation is cheap and no longer a bottleneck. The real challenge is aligning outcomes with intent, along with managing the growing operational and economic complexity of agent-driven work. Without control over these factors, systems become harder to reason about, scale, and sustain.

This shift is happening quickly. Of the 11,000 developers worldwide who responded to the January 2026 JetBrains AI Pulse survey, 90% already use AI at work. Adoption of coding agents is also accelerating – 22% of developers already use AI coding agents, and 66% of all companies surveyed plan to adopt them within the next 12 months.

However, most of AI’s impact remains limited to individual productivity. No more than 13% of developers report using AI across the entire software development lifecycle, such as for code review or in the release pipeline, and organizations struggle to translate AI use into measurable improvements in software delivery speed, system reliability, or cost efficiency.

JetBrains Central: The control and execution plane for agent-driven software production

JetBrains Central transforms discrete AI-powered workflows into a unified production system. It connects tools, agents, and infrastructure, allowing automated work to run, be monitored, and be managed across teams – with clear visibility into results, costs, and performance.

Developers can initiate and manage agent workflows from the tools they already use – JetBrains IDEs, third-party IDEs, CLI tools, web interfaces, or integrations. Agents can come from JetBrains or external ecosystems, including Claude Agent, Codex, Gemini CLI, or custom-built solutions.

Become a design partner

JetBrains Central provides three core capabilities:

  1. Governance and control

Policy enforcement, identity and access management, observability, auditability, and cost attribution for agent-driven work. Some of these functionalities are already available via the JetBrains Central Console.

  1. Agent execution infrastructure

Cloud agent runtimes and computation provisioning that allow agents to run reliably across development environments.

  1. Agent optimization and context

Shared semantic context across repositories and projects, enabling agents to access relevant knowledge, and task routing to the most appropriate models or tools.

JetBrains Central is not a monolithic platform. Instead, it functions as a layered system that connects developer tools, AI agents, and development infrastructure. 

This architecture enables a no-lock-in approach to AI-driven development, allowing organizations to integrate new tools and models while preserving and extending the systems they have already invested in. This eliminates the need for costly replatforming.

Context, semantics, and integrations across the software delivery system

To be effective, AI agents must operate within real software production systems and organizational contexts – not in isolation.

JetBrains Central connects agents directly to the systems where software is built and run, including repositories, knowledge bases, delivery pipelines, and infrastructure. This allows agents to execute work within existing development workflows, rather than in separate AI environments.

At the core of this system, we are building a semantic layer that continuously aggregates and structures information from code, architecture, runtime behavior, and organizational knowledge. This enables agents to move beyond prompt-level interactions and operate with a system-level understanding of how software is designed, how it behaves in production, and what outcomes are expected.

On top of this foundation, JetBrains Central provides intelligent routing and task optimization, selecting the most appropriate models, tools, and execution paths for different tasks.

Agents collaborate with human teammates through the tools teams already use – such as Slack, Atlassian products, or Linear – ensuring that agent-driven workflows remain integrated into existing development systems instead of becoming isolated AI workflows.

Coordinating human and agent workflows with JetBrains Air

The recently launched Air App provides a dedicated workspace where developers can organize tasks, run agent-assisted workflows, and review results while staying close to their development environments.

For teams, JetBrains is developing Air Team – a space for coordinating work between humans and agents, enabling teams to organize tasks, run multi-step workflows, and stay aligned as work happens across systems. It builds on JetBrains Central and brings these capabilities into everyday team workflows.

The foundation for an AI-native software production system

JetBrains Central is designed to help individuals, teams, and organizations embrace the shift happening in software development.

Individual developers are free to use the tools and agents they prefer. Agents can assist with complex engineering tasks while developers remain in control of the development process and outcomes.

Engineering teams can coordinate work between humans and AI agents in a structured way. They can organize tasks, share context, and run multi-step agent workflows that accelerate development while keeping work transparent and reviewable.

Organizations gain centralized visibility and control over AI-driven development. JetBrains Central provides governance across teams and tools, including policy enforcement, security controls, auditability, and cost management. 

By integrating these layers into a unified production system, it ensures that AI-driven work can be scaled predictably across the entire enterprise.

“We’re increasingly leaning into agents and AI-driven workflows, which is creating a need for better visibility into costs and governance. That’s why we’ve started piloting JetBrains Central internally. It’s an evolving process, but it reflects how we build at JetBrains: by using our own products to better understand and shape them.”

Hadi Hariri
SVP of Operations, JetBrains

Availability and design partners

The Early Access Program will launch in Q2 2026 with a limited group of design partners to test JetBrains Central in real-world agentic workflows. Organizations interested in participating as design partners can apply to join the Early Access Program.

As JetBrains Central evolves, teams will be able to scale AI usage up or down, shift capacity across teams, and align spending flexibly according to their changing development priorities. To support this flexibility, we will soon introduce updated JetBrains AI pricing for organizations.

JetBrains Central is our step toward an open, AI-native system for software production, where humans and agents collaborate throughout the full lifecycle to get to market faster and deliver measurable outcome improvements. 

AI will not replace software development, but AI is already redefining it as a system. Our goal is to ensure that this system remains controllable, reliable, and aligned with real business outcomes.

Become a design partner