PDF version: github.com/atomsrkuul/glasik-core/blob/master/GN_PAPER_V2.pdf
Code: github.com/atomsrkuul/glasik-core (MIT)
Robert Rider | Independent Researcher
github.com/atomsrkuul/glasik-core (MIT)
Abstract
I present GN (Glasik Notation), a domain-adaptive lossless compression system for LLM conversation streams. GN maintains a persistent sliding window vocabulary updated continuously across compression calls, exploiting cross-chunk redundancy in real-world LLM workloads.
I introduce GCdict (GN Context Dictionary), a novel technique that uses conversation history as a preset dictionary for deflate compression of the literal stream residue. GCdict exploits the self-referential nature of LLM conversations and beats brotli per-message on all five evaluation corpora, including +30.8% on real Claude conversations.
Verified across four public datasets (ShareGPT, WildChat, LMSYS-Chat, Ubuntu IRC):
GN beats gzip-6 on all corpora
GN beats brotli-6 by +47% on Ubuntu-IRC (67B avg messages, 72 measurements)
GN beats brotli per-message on ALL corpora: Claude +30.8%, IRC +62.7%, ShareGPT +13.3%, LMSYS +12.7%, WildChat +2.4%
p50 latency 0.007ms per chunk
1. Introduction
Large language model deployments generate vast quantities of structured text: conversation histories, retrieved context, agent memory. These workloads share a distinctive statistical structure: conversations from the same deployment reuse vocabulary, formatting conventions, and domain-specific terminology.
General-purpose compressors compress each document in isolation. They cannot exploit cross-document redundancy because they maintain no state between compression calls. Each conversation turn is compressed independently, discarding vocabulary learned from prior turns.
GN maintains a persistent sliding window vocabulary across compression calls. The window accumulates frequently occurring byte sequences, building a domain-specific dictionary that improves compression monotonically with stream length. Unlike Zstandard offline dictionary training, GN adapts continuously to live data without an offline training step.
Primary contributions:
GN split-stream encoding: Separates token ID stream from literal byte stream, compressing each independently. Beats gzip on all corpora, beats brotli on short messages by up to +62%.
GCdict (GN Context Dictionary): Uses conversation history as a deflate preset dictionary for the literal stream residue. Exploits LLM conversation self-reference to beat brotli per-message on all corpora (verified 32 random seeds).
2. Architecture
2.1 Aho-Corasick Tokenizer
The core matching engine uses an Aho-Corasick automaton built from the current vocabulary. O(n) single-pass matching, independent of dictionary size. Token IDs assigned 1-254 (u8). The automaton rebuilds every 50 chunks (cold) or 100 chunks (warm), with an atomic pointer swap ensuring no blocking on the encode hot path.
Maintains up to 20,000 entries across compression calls, tracking byte sequence, cumulative frequency, last-seen batch, and compression saving. New patterns displace lowest-saving stale entries when the window is full.
This enables the monotonic improvement property: compression ratio increases with stream length as the vocabulary adapts to the domain. A single instance shared across all compression calls enables cross-session vocabulary accumulation.
2.3 Split-Stream Encoding
After AC tokenization, GN separates two streams:
Token ID stream: Pure symbol sequence (IDs 1-254), skewed distribution, compresses at ~9x with deflate
Literal stream: Unmatched bytes, compresses at ~2x with deflate
Separating streams improves ratio because each has distinct statistical properties. The mixed tokenized stream contains ESCAPE bytes that fragment deflate pattern matching.
2.4 GCdict: GN Context Dictionary
The core insight: LLM conversations are self-referential. The literal stream residue contains patterns from prior messages in the same conversation. A debugging session reuses error messages and variable names. A code review reuses function names and patterns. A customer support session reuses product terminology.
GCdict uses conversation history as a preset dictionary for deflate compression of the literal stream:
Deflate’s LZ77 engine, initialized with 32KB of conversation history, finds back-references to prior turns that standard deflate cannot see. This is GN-native — the same deflate engine with a better-initialized LZ77 window. No brotli internals.
Both encoder and decoder maintain the same conversation history, making GCdict fully lossless and deterministic.
Why brotli’s static dictionary fails where GCdict succeeds: Brotli’s 120KB dictionary is trained on web text. On IRC messages (67B avg), brotli achieves 1.17x — the web-text dictionary has minimal overlap with technical Linux support dialogue. GN’s domain-specific vocabulary achieves 2.53x on the same data. Brotli quality=1 (minimal static dict usage) achieves 1.757x — lower than deflate-9 (1.937x), confirming the static dictionary is brotli’s primary advantage, not better LZ77. GCdict replaces the static web-text dictionary with a dynamic conversation-specific dictionary.
3. Experimental Evaluation
3.1 Corpora
ShareGPT V3: Real ChatGPT conversations, avg 846B per message
WildChat: Multi-language LLM conversations, avg 952B per message
LMSYS-Chat-1M: Chatbot Arena conversations, avg 915B per message
Ubuntu IRC: Technical Linux support dialogues, avg 67B per message
Content extracted as clean message text. Hardware: Intel i3-1215U.
3.2 GN Split-Stream Results (b=8, 24 measurements)
Corpus
GN ratio
range
vs gzip
vs brotli
p50/batch
MB/s
ShareGPT
2.484x
2.422-2.559
+2.3%
-4.9%
0.43ms
15.4
WildChat
2.130x
2.088-2.169
+3.5%
-7.7%
0.54ms
17.6
LMSYS
2.362x
2.335-2.396
+1.0%
-5.2%
0.39ms
19.3
Ubuntu-IRC
2.534x
2.384-2.715
+61.9%
+47.1%
0.055ms
9.3
Per-chunk p50 latency: 0.007ms (0.055ms / 8 chunks).
GN beats gzip on all corpora across all 24 measurements.
On 67B average messages, standard compressors essentially fail:
gzip-6 per-message: 0.857x (actually expands)
brotli-6 per-message: 1.138x (barely compresses)
GN b=8: 2.534x (+47% vs brotli, +62% vs gzip)
Verified across 72 measurements across three corpus sizes and multiple seed sets.
Every single measurement positive vs brotli. Floor: +47%, ceiling: +61%.
Domain-specific vocabulary explains this: IRC messages about Linux troubleshooting
contain sudo apt-get, /dev/sda, ubuntu, terminal — patterns GN knows and
general-purpose compressors do not.
3.4 Claude Conversations: The Target Corpus
GN was designed for Claude LLM conversations. Tested on 41 real Claude conversations (4841 turns, avg 915B), 16 random seeds:
Corpus
GN cold
GN warmed
br/msg
vs br/msg
range
Claude convos
2.305x
2.766x
2.115x
+30.8%
30.6-31.2%
GN beats brotli per-message by +30.8% on real Claude data. Variance 30.6-31.2% across 16 random seeds — structural, not noise. vs brotli per-batch: +15.9%.
3.5 GCdict Results: All Public Corpora (32 random seeds, all_positive=true)
Production comparison: GCdict vs brotli per-message.
In production LLM streaming, messages arrive one at a time.
GN accumulates session history. Per-message brotli does not.
Corpus
GN cold
GN warmed
br/msg
vs br/msg
range
ShareGPT
2.513x
2.765x
2.441x
+13.3%
12.1-14.6%
WildChat
2.115x
2.265x
2.212x
+2.4%
0.9-3.4%
LMSYS
2.354x
2.577x
2.287x
+12.7%
10.8-14.6%
IRC
1.708x
1.925x
1.184x
+62.7%
59.9-64.5%
GN beats brotli per-message on ALL 4 public corpora, ALL 32 seeds, zero exceptions.
WildChat minimum: +0.9% — never negative.
vs brotli per-batch (same context, best case for brotli):
ShareGPT +3.8% (all positive), WildChat -1.3% (near tie), LMSYS +3.6%, IRC +11.7%
3.6 Literal Stream Analysis
The literal stream (unmatched bytes) is the primary compression challenge:
Literal stream = 91-95% of input on longer messages
Deflate compresses literals at 1.937x
Brotli compresses literals at 2.089x (7.8% gap)
Brotli quality=1 on literals: 1.757x — lower than deflate-9 (1.937x)
This confirms brotli’s static dictionary is its primary advantage. GCdict provides
a conversation-specific replacement that outperforms the web-text static dict.
4. Related Work
LZ77 and Deflate: Ziv & Lempel 1977. Deflate (RFC 1951) combines LZ77 with Huffman coding. Fixed 32KB window.
Brotli (RFC 7932): Adds 120KB static dictionary and context modeling. Dictionary fixed at specification time.
Zstandard: Offline dictionary training. Dictionary static after training. GN achieves adaptation without offline training.
LLM Context Compression: Token-level methods (LLMLingua, AutoCompressor) are lossy and require model inference. GN is complementary: byte-level, strictly lossless, CPU-only.
5. Limitations
GCdict requires conversation history at decode time (stateful)
Split-stream requires batching (4+ chunks) to amortize overhead
GN cold start (no session history) trails brotli by 5-8% on longer messages
WildChat -1.3% vs brotli per-batch (near tie); +2.4% vs brotli per-message (all positive)
Higher constant overhead than gzip for very small inputs under 200B
6. Conclusion
GN provides domain-adaptive compression that improves with conversation length.
GN demonstrates that LLM conversation history is itself a compression resource:
using prior turns as a preset dictionary exploits self-reference that
general-purpose compressors cannot access.
Key results:
GN beats gzip on all corpora, always
GN beats brotli per-message on all 5 corpora
Ubuntu-IRC: +47% vs brotli, 72 measurements, every run positive
p50 0.007ms per chunk — negligible latency overhead
Source: github.com/atomsrkuul/glasik-core (MIT)
References
Ziv & Lempel (1977). IEEE Trans. Information Theory, 23(3), 337-343.
Deutsch (1996). DEFLATE. RFC 1951.
Alakuijala & Szabadka (2016). Brotli. RFC 7932.
Collet (2016). Zstandard. RFC 8878.
Zhao et al. (2024). WildChat. ICLR.
Zheng et al. (2023). LMSYS-Chat. NeurIPS.
Lowe et al. (2015). Ubuntu Dialogue Corpus. SIGDIAL.
Deletang et al. (2023). Language Modeling Is Compression. arXiv:2309.10668.
The HTTP status codes 500 (Internal Server Error) and 503 (Service Unavailable) are both server-side error responses (part of the 5xx class), indicating that something went wrong on the server while processing a request. However, they serve distinct purposes and convey different meanings about the nature and cause of the error. Understanding the difference between them is critical for proper API design, error handling, and troubleshooting.
500 Internal Server Error
Definition:
The HTTP status code 500 indicates a generic server-side error. It means the server encountered an unexpected condition that prevented it from fulfilling the request, but it doesn’t provide specific information about what exactly went wrong.
When is 500 used?
Unhandled exceptions in the server code (e.g., null pointer exceptions, database failures, syntax errors).
Application crashes or configuration errors.
Bugs in server logic that result in failures during execution.
Any other error where the server knows something went wrong but can’t pinpoint the issue to a specific client-side or temporary server condition.
Key Characteristics:
It typically means the problem is unintentional and unplanned.
It is often a sign of a programming or system error that needs fixing by developers or system admins.
It is a permanent error until the issue is resolved — retrying the request will likely continue to fail.
Example Scenario:
A user submits a form on a website, but the server throws a runtime exception due to malformed SQL. The user receives a 500 error because the backend couldn’t handle the request properly.
🔹 503 Service Unavailable
Definition:
The HTTP status code 503 indicates that the server is currently unable to handle the request, usually due to being temporarily overloaded, down for maintenance, or in a throttled state.
When is 503 used?
Server is undergoing maintenance (planned downtime).
The server is overloaded (e.g., traffic spike, DDoS protection).
Backend services or dependencies are temporarily unavailable.
API rate limits have been exceeded (in some implementations).
Key Characteristics:
It usually means the server is intentionally or temporarily unavailable.
It implies the server should recover — it’s a transient issue.
A Retry-After header can be included to inform the client when to retry the request.
Example Scenario:
An API service is scheduled for maintenance between 1:00 AM and 2:00 AM. During this time, any request made receives a 503 status, possibly with a header like Retry-After: 3600 (indicating the client should wait an hour before retrying).
Best Practices in API Development
Use 500 only when an unexpected internal error occurs that the server could not handle.
Use 503 when the server is temporarily unable to process requests, but the situation is expected to resolve (like overload or maintenance).
Always log 500 errors internally and alert dev/ops teams.
When returning a 503, consider adding a Retry-After header to guide client behavior.
Don’t expose sensitive internal error details in 500 responses — use generic messages for security.
🔚 Conclusion
While both 500 and 503 status codes indicate server-side issues, they are fundamentally different in cause, expected recovery behavior, and how clients should respond. A 500 error suggests something went wrong unexpectedly and must be fixed, while a 503 signals that the service is temporarily unavailable, and retrying later might succeed. Proper use of these codes helps API consumers understand how to react and aids in faster issue diagnosis.
Okoro, this is the 25th website you’re building, and you don’t care to know what, why, and how Cloudflare actually works?
Wooo. Dishonor on you.
Well, on a serious note, this is the topic of the day.
Two. Three. Four.
Let’s Qwiikly get started.
The Internet’s Backbone
Sometime around November 2025, ChatGPT, X, Spotify, Canva, Zoom, League of Legends (literally half of the internet) went down.
But how so unanimously?
Cloudflare is your answer.
Cloudflare powers 20% of websites (really big ones).
The likes of Netflix, Discord, Shopify, Visa, etc. In numbers, this is around 200–250 million websites.
For this reason, it’s very crucial and… delicate.
Every request, response, and change cascades down to these ~200 million websites.
If that means going down, so be it.
Their Love Is Unconditional
On November 18th, 2025, Cloudflare went down.
There was another outage 17 days later, in the midst of the festive season.
By February 2026, it had partially gone down again for some users.
And if we go by history lessons, I’d also mention June 21, 2022; June 24, 2019; July 17, 2020; April 14–15, 2020; etc.
History repeats itself, they say.
But here’s the question you’ve all been tapping your feet to ask…
Why the strong affinity to this company? Aren’t there competitors? Is it so vital? Is it worth it?
The Game-Changing Technology
Imagine you have a popular African delicacy (say, “Egusi Soup”) that you loved during a visit to Nigeria.
You loved this soup so much that when you returned to your country, you still wanted to eat it and considered importing it.
Assuming the soup doesn’t spoil, it would cost an arm, a leg, and most importantlym time to get it to your country.
But there could be one way to solve this problem.
Request that the Nigerian restaurant open a branch in your country.
Let’s assume they honor this.
They get to your country, but their food tastes so good that they start receiving a ton of orders from different corners, precincts, and states.
Eventually, just like before, it may cost an arm, a leg, and most importantly, time to fulfill orders.
Well, not if they use Cloudflare.
What Cloudflare Does
Cloudflare is primarily a middleman in the web services industry.
Cloudflare’s mission is to help build a better internet by providing the infrastructure that makes businesses online fast, reliable, and secure.
Here’s what that means.
In our previous analogy, the first difference that employing Cloudflare would make **is this:
Cloudflare sets up a distribution system across countries. **
Across pivotal locations, it builds storefronts that equally disperse demand pressure.
The closer each location is to you, the faster you get your tasty Egusi Soup.
Cloudflare CDN
The feature that does this is the Cloudflare CDN.
Instead of a website keeping its files in one single location, Cloudflare stores copies of those files (videos, music, images) on thousands of servers worldwide.
Speed: When you click a link, Cloudflare pulls the data from the closest and most convenient server to you, making load times significantly faster.
Redundancy: If one server goes down, there are thousands of others ready to take its place.
DDoS Protection & Encryption
Cloudflare also sets up patrols around each location to prevent abuse of services, neutralize fabricated excessive demands, and filter out bad customers.
DDoS Protection: If a group of hackers tries to “jam the phone lines” by flooding a site with fake traffic (a DDoS attack), Cloudflare manages that overflow to keep the website online.
Encryption & Safety: Cloudflare acts as a middleman where traffic gets encrypted, protecting sites from malware and unauthorized intrusion attempts. This allows businesses to have top-tier security without having to build it themselves.
DNS
In keeping with its commitments to speed, reliability, and security, Cloudflare also offers a DNS service.
Before you can visit a site like google.com, your computer needs to know its “address.”
This is called DNS (Domain Name System), and it functions like a phone book.
So instead of matching names to phone numbers, DNS matches web names to numerical IP addresses.
Cloudflare provides one of the fastest and most reliable DNS services in the world — often known by the address 1.1.1.1.
Now, the question I’ll leave with you all is: why aren’t there more competitors?
And that is a wrap.
Btw, I’m a solo developer who’s a free agent currently — openly looking for software engineering roles. My portfolio is at www.me.soapnotes.doctor.
Our final bug-fix update for the 2025.11 On-Premises servers is now available. Version 2025.11.4 addresses a few issues, including the folowing:
Bitbucket Cloud connection issues related to Atlassian deprecating older APIs;
Unresolved output parameters causing the build to fail;
Excessive Git operations on changes checking;
VCS problems causing performance issues.
All TeamCity bug-fix updates include performance and security improvements, so we recommend that you never skip these minor updates. See TeamCity 2025.11.4 Release Notes for the complete list of resolved issues.
Why update?
Staying up to date with minor releases ensures your TeamCity instance benefits from the following:
Performance improvements.
Better compatibility with integrations.
Faster, more stable builds.
Enhanced security for your workflows.
This update is also crucial for teams utilizing Bitbucket Cloud connections in TeamCity, as they no longer function as expected due to changes in Bitbucket API.
Compatibility
TeamCity 2025.11.4 shares the same data format as all 2025.11.x releases. You can upgrade or downgrade within this series without the need for backup and restoration.
How to upgrade
Use the automatic update feature in your current TeamCity version.
Download the latest version directly from the JetBrains website.
Pull the updated TeamCity Docker image.
Need help?
Thank you for reporting issues and providing feedback! If you have questions or run into any problems, please let us know via the TeamCity Forum or Issue Tracker.
AI coding assistants are no longer shiny add‑ons: they are standard parts of our daily workflows. We know developers’ perspectives on them in the short term, and many say they get more done and spend less time on boilerplate or boring tasks. But we know far less about what happens over years of real work in real projects – and whether what developers perceive has changed in the workflow has actually changed.
There are already a number of studies on developer-AI interaction, but the existing research is often limited in scale or depth, and the studies are rarely long-term investigations. Our Human-AI Experience team (HAX) was interested in developers’ experience with AI tools over a long period of time, so they analyzed two years of log data from 800 software developers. They also wanted to analyze self-reported perceptions and compare them with the objective data, so they conducted a survey and follow-up interviews.
Here we present our findings from our HAX team’s mixed-method study, which our team is presenting this week at ICSE 2026 in Rio de Janeiro.
The study demonstrates how developers’ workflows have evolved with AI tools. A major takeaway from the study is that AI redistributes and reshapes developers’ workflows in ways that often elude their own perceptions.
In this blog post, we:
Present our methodology for the study, namely:
Log data from a two-year period
Survey and interview responses
Describe the components of developer workflows, including relevant previous research.
Discuss the results of our mixed-methods study.
Analyzing how developers are evolving their workflows with AI tools
In this section, we will describe how we set up the HAX study, investigating both how developers behave (using log data) and what developers perceive (through interviews).
A major advantage of this design is that the methods compensate for each other’s blind spots. Logs can show that workflows are changing, but not why; self-reports can explain motivations and context, but they are biased and often miss subtle behavioral shifts. By triangulating across both, mixed methods make it easier to spot gaps between perception and practice and to build a more complete, grounded picture of how AI is reshaping everyday development work.
Telemetry in research
Telemetry is a well-established method for gathering data, in use since at least the 1800s. The word itself comes from the Greek for ‘far’ (tele) and ‘measure’ (metron), and it usually refers to data collected remotely. Its use enables more accurate experiments and better observability without constant manual measurement.
For example, telemetry is useful in healthcare settings for measuring blood pressure, heart rate, and oxygen levels over extended periods. In research, it can be used to capture continuous, real‑time data (for example, physiological, environmental, or system-performance signals) and send it to a central system for monitoring and analysis.
In the context of our research, telemetry is the stream of fine-grained, anonymized events that IDEs automatically record as developers work: which actions they take, when they take them, and in what sequence. That is, it collects information like the number of characters typed (not the actual characters), debugging sessions started, code deletions, paste operations, and window focus changes. If you’re interested, see our Product Data Collection and Usage Notice for further details.
We know from previous studies that telemetry can indeed uncover interesting patterns in developers’ behavior. For example, these researchers found that developers actually spend a good chunk (70%) of their time on comprehension activities like reading, navigating, and reviewing source code.
How developers behave: Investigating log data from a two-year period
For this study, telemetry served as a behavioral lens on developer workflows. Instead of asking developers how they think AI assistants affect their workflows, we looked at what actually happens in the editor over a span of two years: how much code is written, how often code is edited or undone, when external snippets are inserted, and how frequently developers switch back into the IDE from other tools. By aggregating and comparing these signals for AI users and non‑users, telemetry made it possible to observe subtle, long-term shifts in everyday practice that would be hard to capture through surveys or controlled lab tasks alone.
More specifically, our team worked with anonymized usage logs from several JetBrains IDEs, including IntelliJ IDEA, PyCharm, PhpStorm, and WebStorm. We filtered down to devices that were active in both October 2022 and October 2024 so the same developers could be tracked over a full two-year window. Note that the first date (October 2022) was chosen because that was when ChatGPT was first released.
From there, we built two groups: 400 AI users, whose devices interacted with JetBrains AI Assistant at least once a month from April to October 2024, and 400 AI non-users, whose devices never used the assistant during the study period. The reasoning behind checking for use from April 2024 was that at that point, AI assistants had become widely available and stable in IDEs; we also wanted to ensure that the users really had integrated AI assistants into their workflows.
As the telemetry logs are by nature complex, our team picked out well-defined events, i.e. user actions, to represent each of the workflow dimensions which are described in more detail below. These are:
Typed characters – productivity
Debugging session starts – code quality
Delete and undo actions – code editing
External paste events without an in-IDE copy – code reuse
IDE window activations – context switching
Of course, any chosen proxy would have its limitations, and our chosen metrics do as well. That being said, our goal with this study was to detect patterns of change in developer workflows over time and not to identify causal effects.
By aggregating these metrics per user per month, we could see how each dimension evolved over time for AI users versus non-users, focusing on patterns of change. Overall, our dataset comprised 151,904,543 logged events performed by the 800 users.
Our data processing involved computing the total number of occurrences per device per month. This means we had a clear, high-level dataset of monthly counts for every action, which is ideal for tracking activity and identifying meaningful behavioral trends.
What developers perceive: Qualitative insights from surveys and interviews
To balance the behavioral view with developers’ own perspectives, our team also ran an online survey aimed at professional developers. We framed the questions around the same workflow dimensions, asking how they felt AI assistants had affected their productivity, code quality, editing habits, reuse patterns, and context switching. In total, 62 developers completed the survey, giving us a broad picture of perceived benefits, drawbacks, and changes since they started using AI tools.
The details of the survey can be found in §3.1 of the paper, as well as in the supplementary materials. In addition to demographic questions, the survey included:
Scale questions about overall experience and reliance on AI tools for coding
Scale questions on developer perception, specific to the workflow dimensions
Open-ended question asking for a specific example of workflow impact and AI tools for coding
The first two types of questions (items 1 and 2) were constructed as 5-point scales, where the participants were asked to provide a rating, indicating the degree to which they agreed or disagreed with a statement. In our survey, the scale concerned the degree of change: with (1) being significantly decreased and (5) significantly increased.
The questions from item 2 can be summarized as follows:
For productivity, we asked directly about overall productivity and also about time spent coding.
For code quality, we asked directly about the quality of code and also about code readability.
For code editing, we asked about the frequency of editing or modifying their own code.
For code reuse, we asked about the frequency of use of code from external sources, e.g. libraries, online examples, or AI-suggested code.
For context switching, we asked directly about the frequency of context switching – switching between different tasks or thought processes.
After the survey, our team invited a smaller group of participants to short, semi-structured interviews. In those conversations, we dug deeper into how they actually use AI day to day: when they reach for it, how they decide whether to trust a suggestion, and whether their work feels more or less fragmented now. Those qualitative stories helped us interpret the telemetry curves: for example, understanding why someone might report “not much has changed” even when their logs show big shifts in how much they type, delete, or paste external code.
Dimensions of the developer workflow
To understand the developer workflows better, our HAX study divided the areas of interest into the following dimensions, mentioned above:
Productivity
Code quality
Code editing
Code reuse
Context switching
Productivity captures the most intuitive question people ask about AI tools: Do they help developers get more done? This dimension sets the stage by asking whether AI-assisted workflows are simply faster at producing code, and how that plays out over time compared to developers who do not use AI at all.
And although the impact of LLM-based coding tools on developer productivity has been a subject of many studies, there is not yet a clear picture of how – or whether – AI assistance really has a positive impact on developers’ productivity. On top of that, researchers use various measures (e.g. characters typed, tasks completed, completion requests accepted). Interestingly, this study observed that developers perceived their productivity as increasing with Copilot despite the data showing otherwise. Another study had similar findings: even though developers thought that their completion time of repository issues improved by 20%, the numbers actually show that they were 19% slower at completing tasks. In our study, we chose to measure code quantity.
Code quality shifts the focus from “how much code is written” to “how well the code is written.” Rather than inspecting code directly, this dimension looks at how often developers enter debugging workflows as a behavioral signal of running into problems or uncertainty. It introduces the idea that AI might change not only the number of issues that surface, but also how and when developers choose to investigate them, offering a window into how confident they feel about the code that ends up in their projects. Researchers in this study observed that developers spend more than a third of their time double-checking and editing Copilot suggestions.
Code editing looks at what happens after the first draft: how frequently code is reshaped, corrected, or thrown away. Here, the interest is in how much developers are editing, undoing, and deleting – as a way of understanding whether AI turns programming into a more iterative, high‑revision activity. This dimension helps illuminate the “curation” side of AI use: accepting suggestions, reworking them, and deciding what ultimately stays in the codebase. This study looked not at the time spent editing, but how much is deleted or reworked: of the code that is at first accepted, almost a fifth is later deleted, and about 7% is heavily rewritten.
Developers have always reused code (e.g. from libraries, internal snippets, Stack Overflow), but AI assistants introduce a new, often opaque channel for bringing external code into a project. Code reuse as a workflow dimension zooms out to ask where code comes from in the first place. We know from previous studies like this one that AI assistants provide boilerplate code and suggest commonly used patterns or snippets derived from training data. This dimension focuses on how often developers appear to integrate code from outside the current file or project, framing AI as part of a broader shift in reuse practices rather than an isolated feature.
Modern development work already involves frequent jumping between integrated development environments (IDEs), browsers, terminals, and communication tools, and AI assistants promise to streamline some of this jumping by keeping more help inside the editor. Context switching widens the lens from code to attention. This dimension asks whether that promise holds in practice, or whether AI ends up reshaping – rather than simply reducing – the ways developers move their focus across tools and tasks during everyday work.
For one, this study has shown that interacting with AI assistants can add cognitive overhead and fragment tasks, as developers alternate between writing code, interpreting suggestions, and managing the dialogue with the system. This raises an open question: are these tools actually reducing context switching overall, or mostly trading one form of interruption for another?
Two lenses on AI-assisted workflows
By combining different methods, our study is able to deliver a more complete picture of how AI coding tools change (or don’t change) developers’ workflows. We also learned that behavioral changes are largely invisible to the developers themselves. Together, these patterns sketch out what it really means to evolve with AI in a modern IDE.
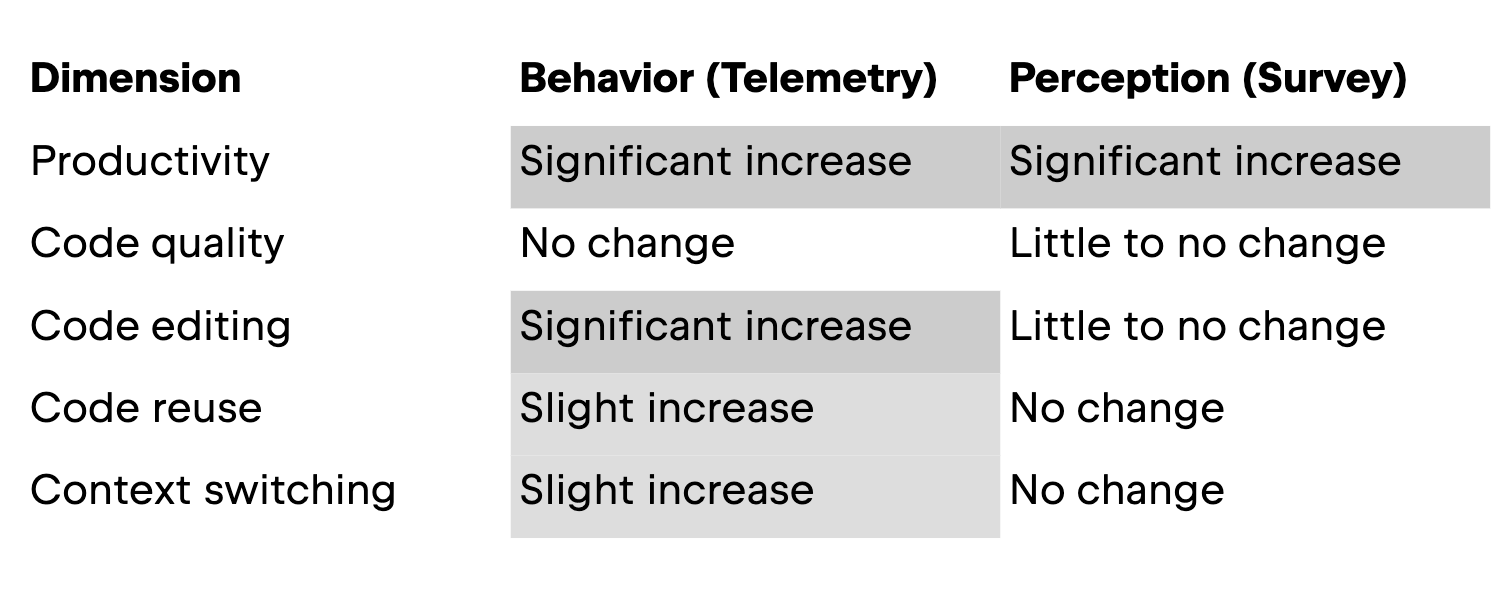
In this section, we walk you through the results, presenting them by dimension. The table below displays an overview of our results.
Productivity
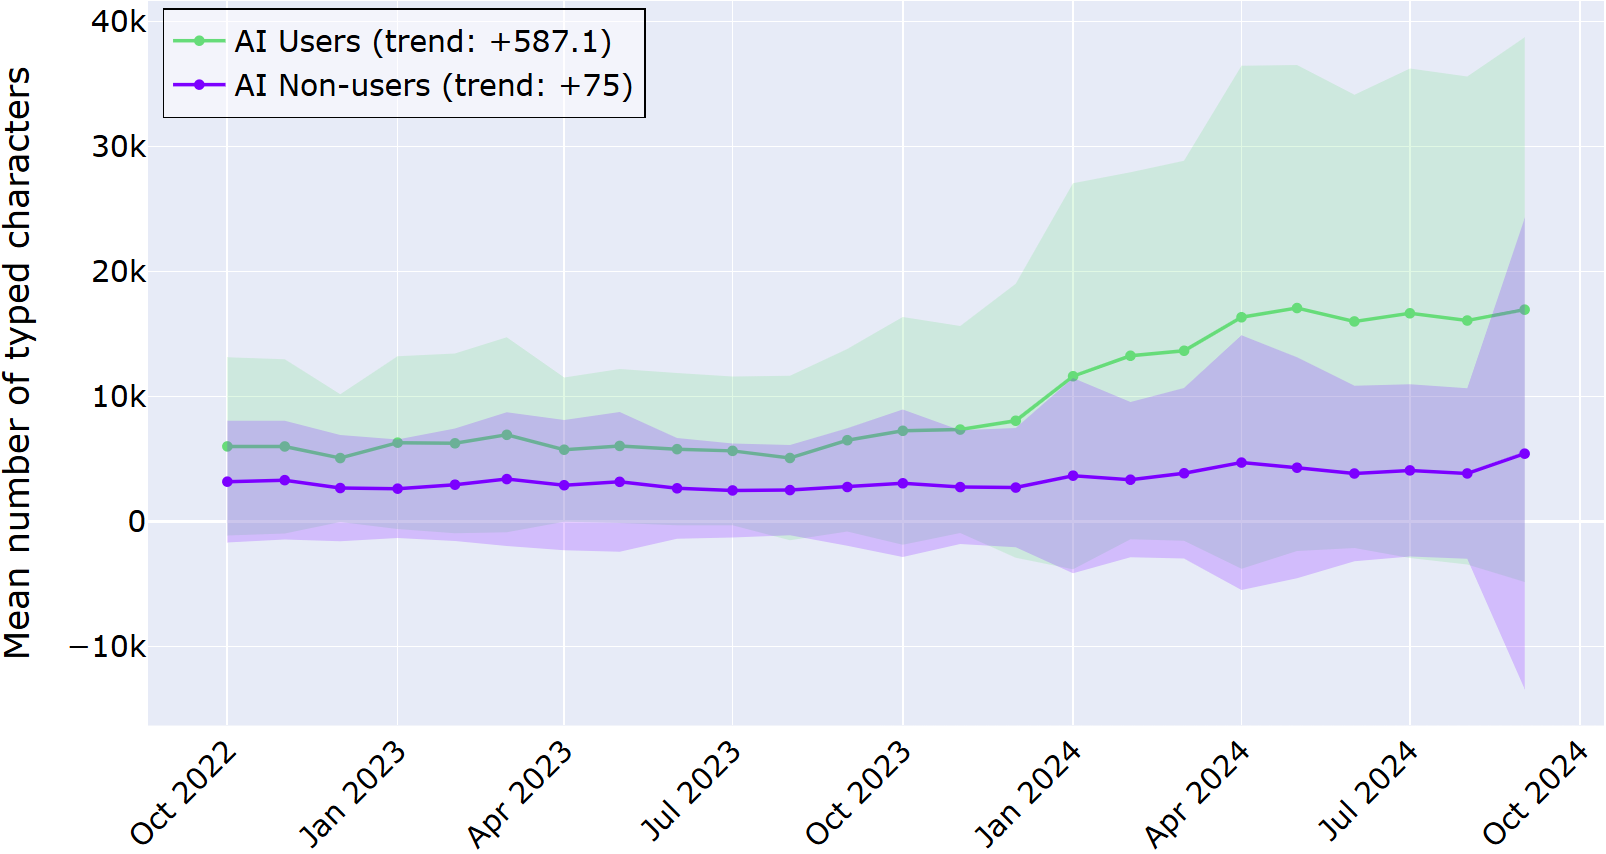
The first dimension of our study looked at how AI assistants affect productivity, measured in the telemetry part as how much code developers type over time and in the survey as how the developers perceived their productivity and time spent coding. Here, both the actual behavior and perception are aligned: with an in-IDE AI assistant, developers are writing more code.
In the graph below, the average number of typed characters is displayed for the AI users and AI non-users for the investigated time period. Shaded regions represent a ±1 deviation from the mean.
From the graph above, it is clear that developers who adopted the in‑IDE AI assistant consistently typed more characters than those who never used it, and this gap grew over the two‑year period. The log data revealed the trend that AI users increased the number of characters typed by almost 600 per month, in contrast to AI non-users, who only displayed an average increase of 75 characters per month. This data suggests that the difference is not just a one‑off spike; it’s a sustained shift in developer behavior.
Survey respondents (all AI users) similarly experienced an increase in productivity. Over 80% of respondents reported that the introduction of AI coding tools slightly or significantly increased their productivity, while two respondents said that it slightly or significantly decreased it. Regarding time spent coding, more than half said that their coding time decreased, while about 15% indicated that it increased.
Interview participants largely echo this in their own words. For example, one developer (3–5 years of experience and a regular AI user) said:
When I get stuck on naming or documentation, I immediately turn to AI, and it really helps.
In this dimension, both the perception and actual behavior are similar. These results demonstrate that developers are producing more code in the editor and perceive a productivity increase with AI tools.
Code quality
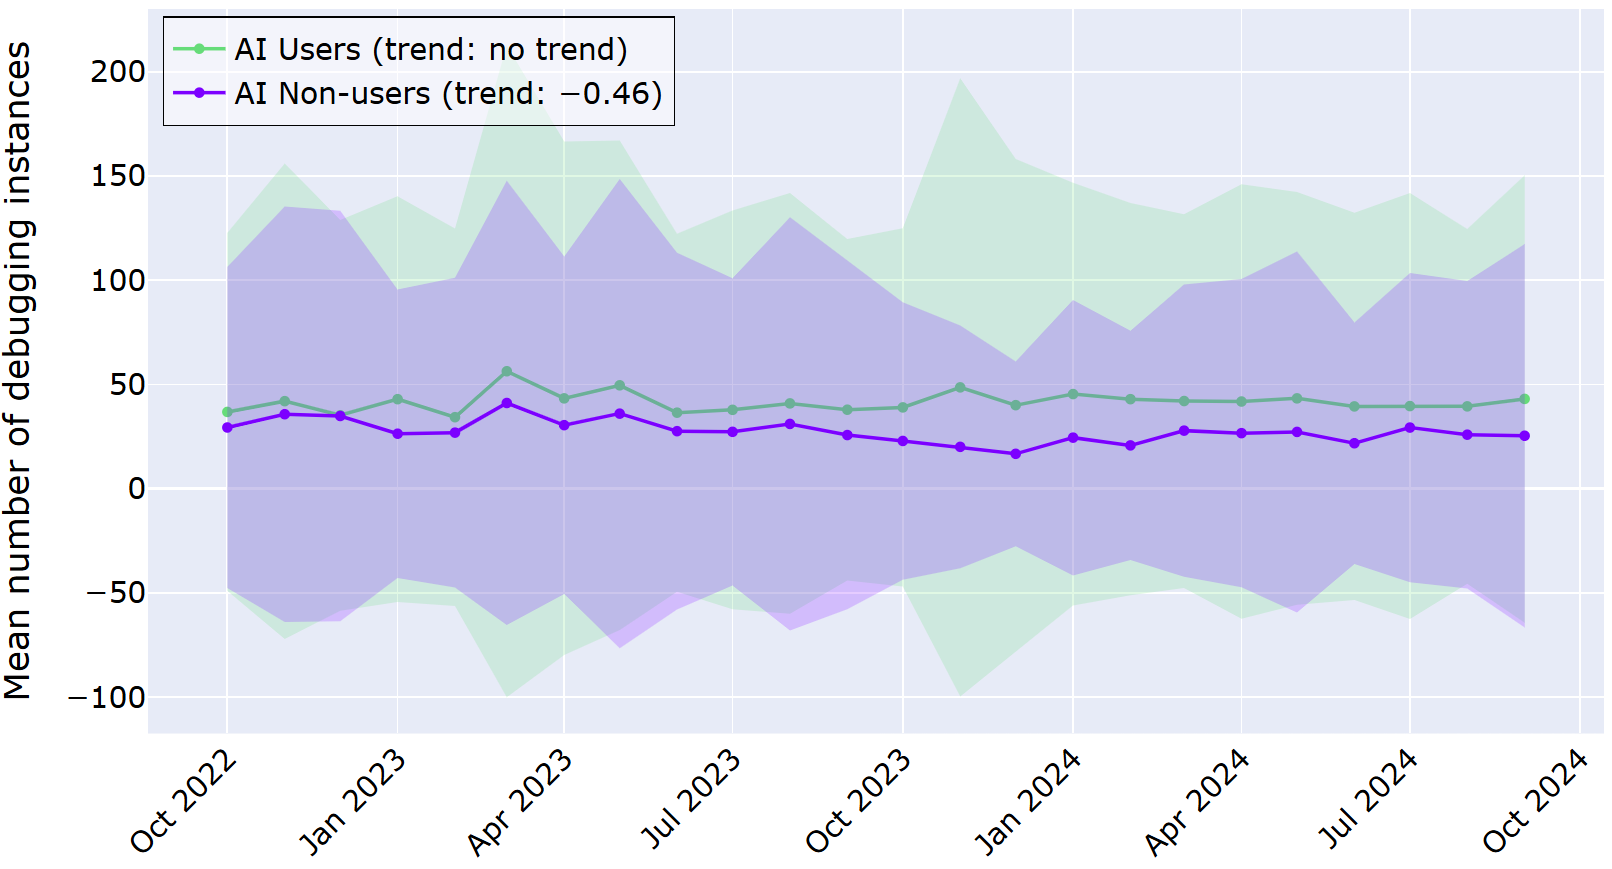
For code quality, the study uses a simple behavioral signal: how often developers start a debugging session in the IDE. This is not a perfect measure of “good” or “bad” code, but it does tell us how frequently people feel the need to step through their program to understand or fix something. In this dimension, the developers’ behavior and perception are not aligned, at least not in a statistically significant way: there is no change in AI users’ debugging behavior, but a slight improvement in perception of code quality and readability.
In the graph below, the average number of started debugging instances is displayed for the AI users and AI non-users for the investigated time period. As before, shaded regions represent a ±1 deviation from the mean. Across the two years, both AI users and non‑users show active debugging behavior, and the differences between the groups are much less dramatic than for the productivity measure.
The above graph shows the average number of debugging instances per month for each group as two lines that sit close together. Our statistical analysis told us that for AI users, there was no significant change in behavior over time. For AI non-users, there was a slight decrease in debugging starts in the time period.
Most survey respondents say using AI coding tools has somewhat positively changed their code quality. Namely, when asked whether the quality of their code increased because of using AI coding tools, almost half say that it slightly or significantly increased, while about 10% say that it slightly or significantly decreased. For the readability of the code, the respective numbers are 43.5% and 6.5%, though 50% indicate that they did not observe a change.
Despite this improvement with AI, some developers still do not completely trust AI-generated code. For example, a developer with 3–5 years of experience reported in the interview:
I triple-check it, and even then, I still feel a bit uneasy.
For this dimension, our results show us that although developers report an increase in code quality from their point of view, their behavior (in the proxy we chose to analyze) does not show a change for AI users.
Code editing
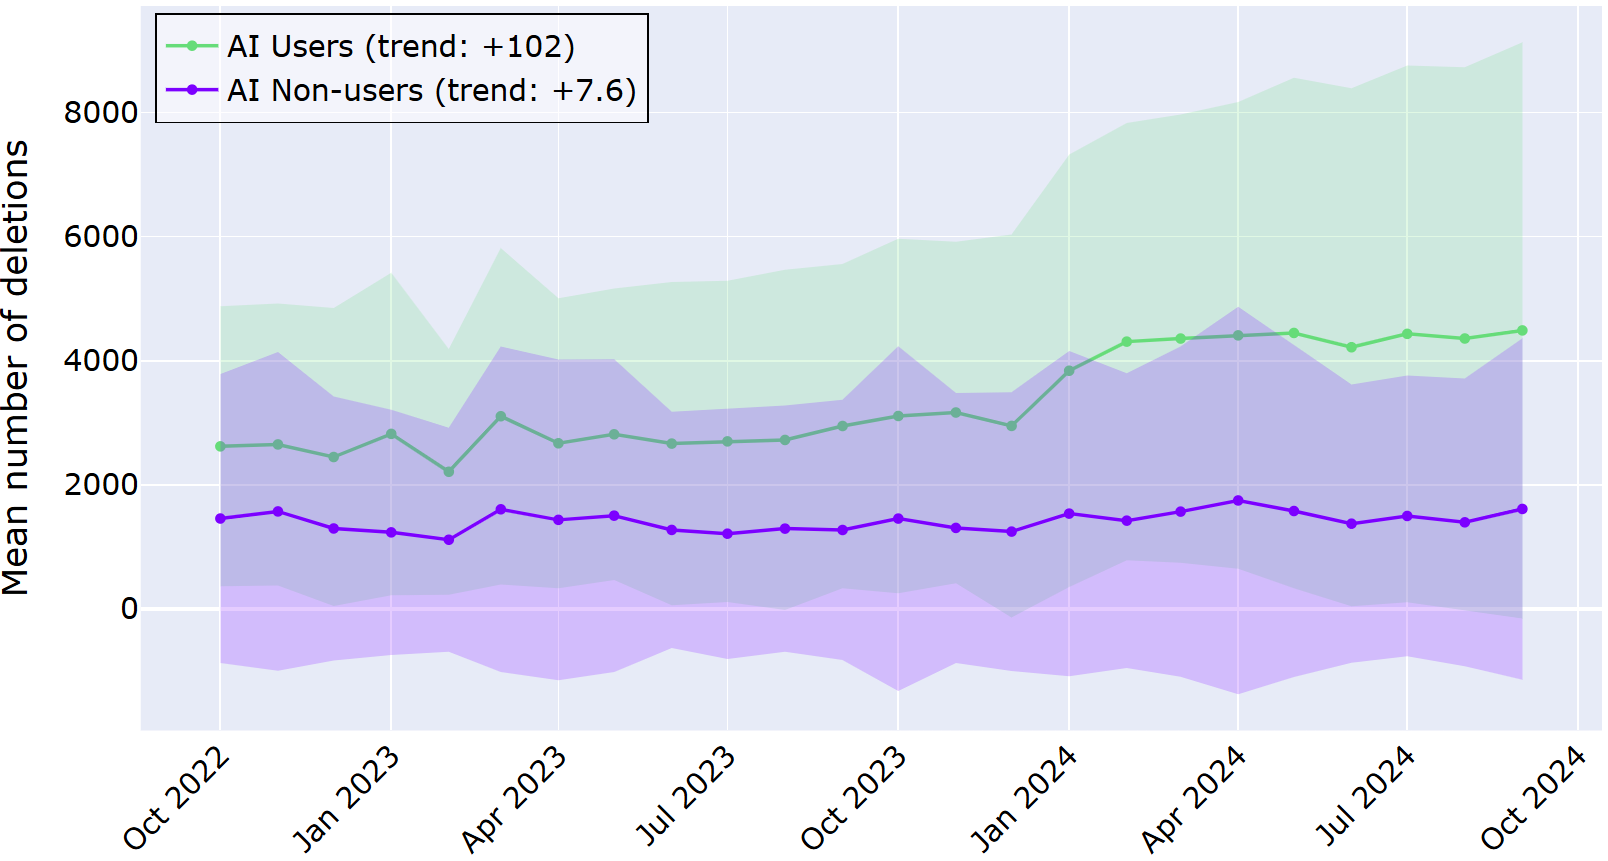
When we look at code editing, the difference between behavior and perception is more striking: while the developers reported little change, the log data showed a stark rise in their behavior over time. Here, the telemetry value was how often developers delete or undo code, and in the survey, they were asked whether they thought they edited their own code more with AI tools.
In the graph below, the average number of deletions is displayed for the AI users and AI non-users for the investigated time period. As before, shaded regions represent a ±1 deviation from the mean. Across the two years, the trend lines show a big difference between AI users and non‑users.
The AI users’ line sits noticeably higher, with a statistically significant increase of about 100 deletions per month. In contrast, AI non-users increased their deletions in the same period, on average, only about 7 times per month. This data suggests more frequent editing and rework when AI is helping to generate code.
In the qualitative data, the developers do not report seeing such a big change. Half of the respondents reported no perceived change in their code-editing behavior since adopting AI tools; about 40% reported a slight or significant increase, and about 7% reported a decrease. A system architect with more than 15 years of coding experience said:
AI is like a second pair of eyes, offering pair programming benefits without social pressure – especially helpful for neurodivergent people. It’s not always watching, but I can call on it for code review and feedback when needed.
Compared to the previous dimension of code quality, developers’ perception and actual behavior with respect to code editing are inverted. Namely, they do not perceive a significant change in how much they are editing code, but the log data shows a large increase for developers who have adopted AI assistance.
Code reuse
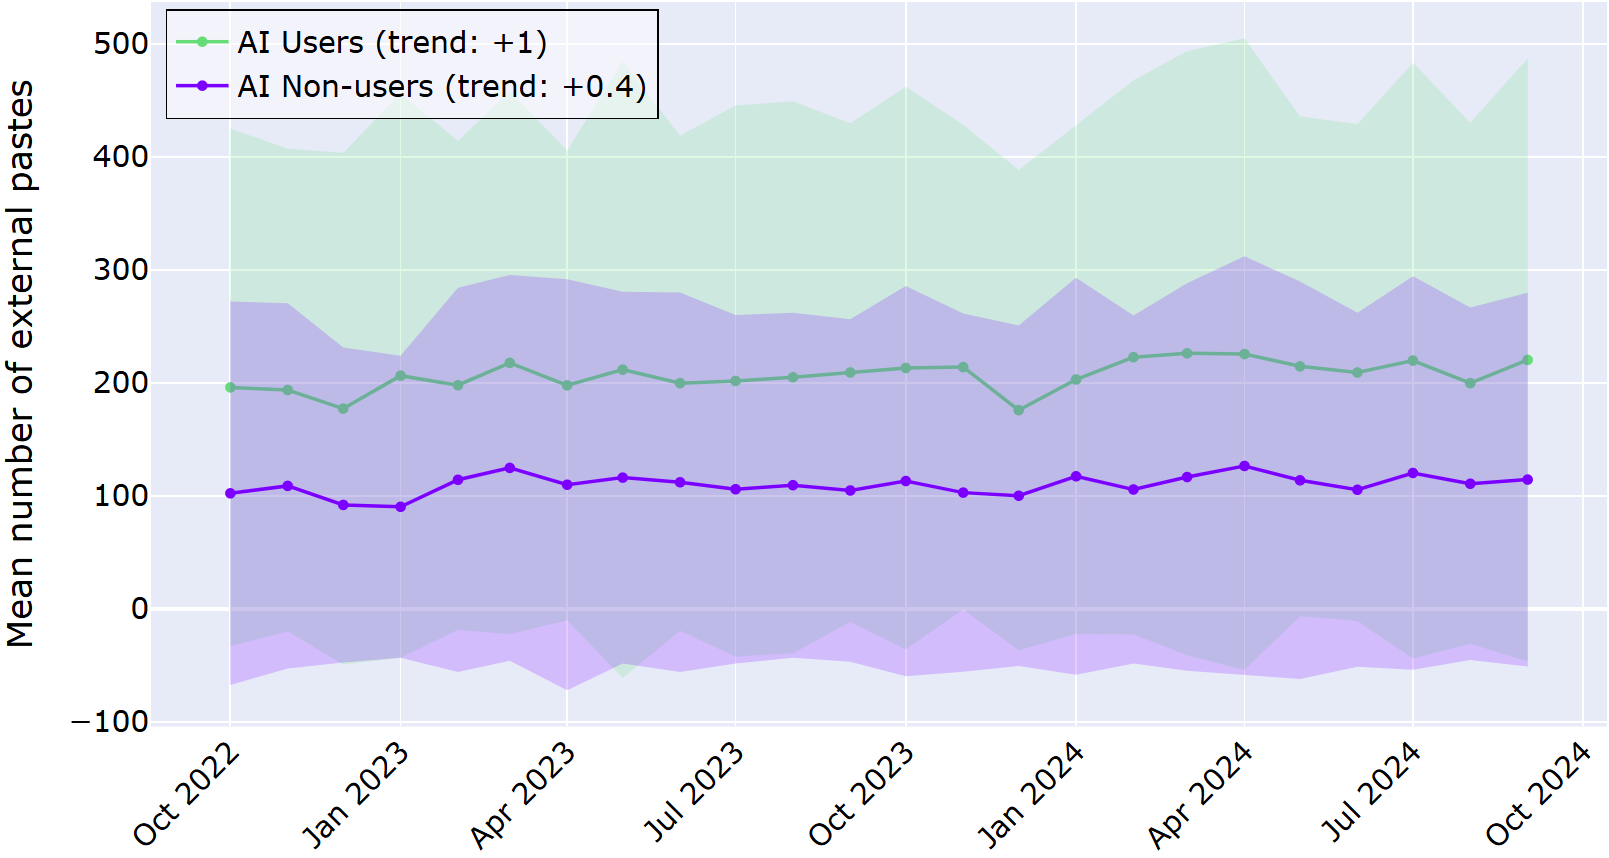
For code reuse, the study looked at how often developers paste content into the IDE that does not come from a copy action inside the same IDE session. The results for this dimension are less divergent, both between AI users vs. non-users and between perception vs. behavior.
In the graph below, the average number of external pastes is displayed for the AI users and AI non-users for the investigated time period. As before, shaded regions represent a ±1 deviation from the mean. Across the two years, the trend lines do not show a big change for either AI users or non‑users.
The trend line for AI users is higher overall than for AI non-users, indicating that they reuse external code more frequently. However, there is not a large change over time for either group.
The responses from the survey and interview don’t show a clear pattern either. In the survey, about a third of respondents said they perceived that their use of code from external sources slightly or significantly increased with the adoption of AI tools, while a fifth reported it decreased; 44% observed no change.
From previous studies, we might have expected that developers using AI tools are more likely to reuse external code. In contrast, they report a different picture. For example, a developer with over 15 years of experience says:
For me, it’s better to take responsibility for what I did myself rather than adopt a third-party solution.
Context switching
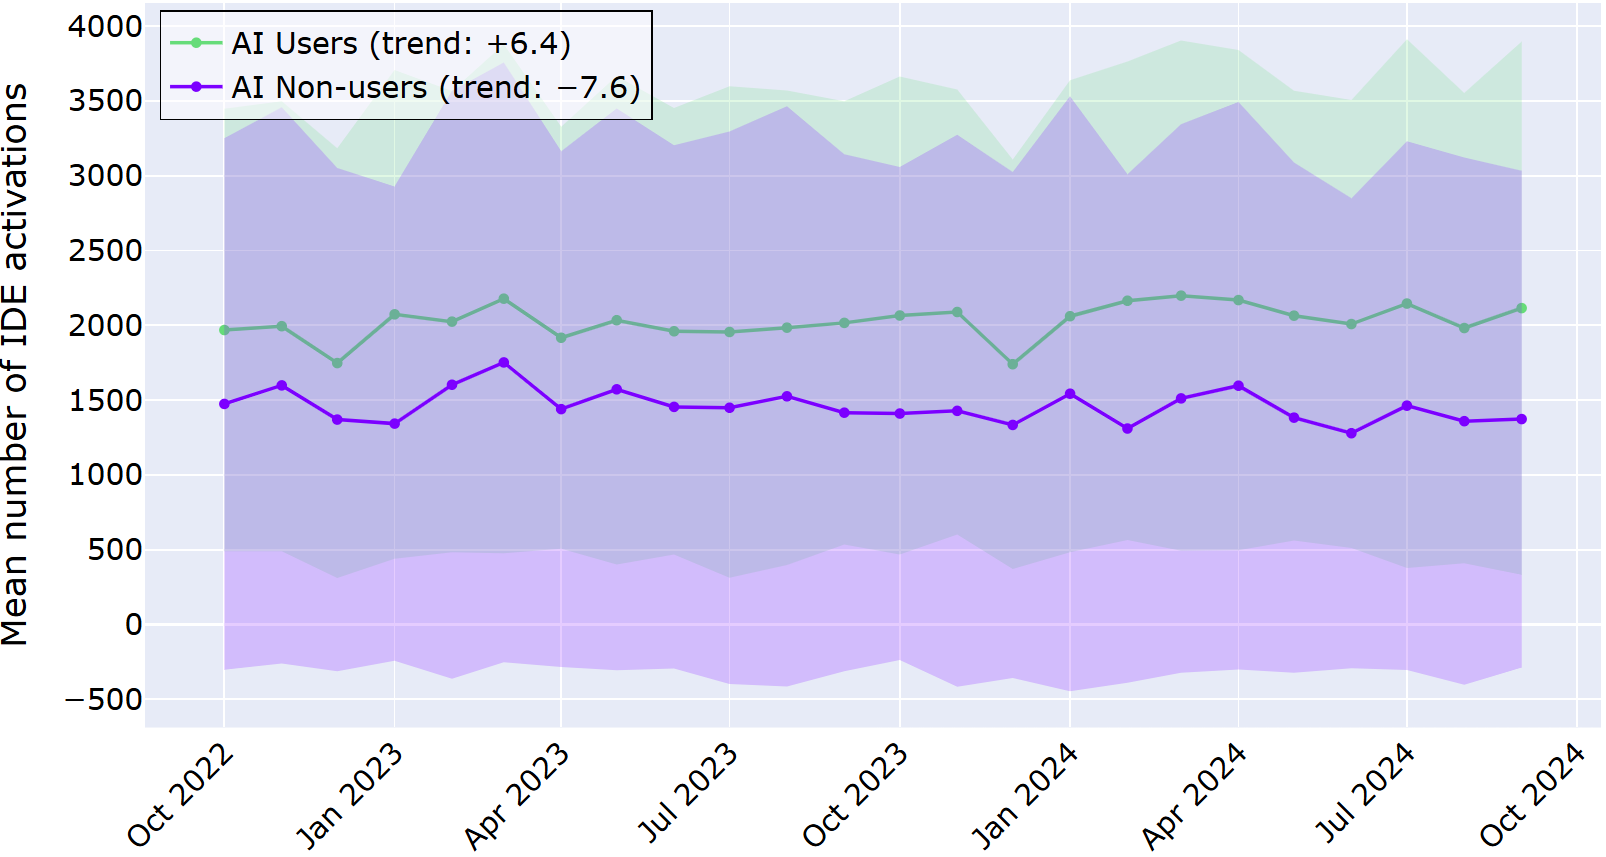
The last dimension we studied is context switching, or how often developers jump back into the IDE after working in another window, such as a browser. AI tools, especially in-IDE ones, are often marketed as a way to keep developers “in flow” by reducing the need to leave the editor for help. Although the qualitative data does not show a pattern in either direction, the telemetry tells a more complicated story: over time, AI users actually show more IDE activations than non‑users, meaning they are switching contexts at least as much, if not more.
In the graph below, the average number of IDE activations is displayed for the AI users and AI non-users for the investigated time period. As before, shaded regions represent a ±1 deviation from the mean. Across the two years, the trend lines do show a slight increase for AI users.
Like for the previous dimension, the trend line for AI users overall sits higher. However, here the trends diverge: AI users show an increase of about 6 IDE activations per month, while AI non-users show the opposite, a decrease of about 7 per month.
In contrast to the differences seen in the log data, the survey responses were less suggestive of a clear pattern. Namely, about a quarter of respondents indicated an increase, about a fifth a decrease, and about half no change.
In the interviews, developers indicate that using AI tools does not result in a simple drop in context switching, but a different pattern of fragmentation. One developer said:
I stopped switching contexts, saving a few seconds every time I would have googled something.
In this workflow dimension, we have seen a similar pattern as before: there was a slight increase in the log data for AI users, but no clear pattern in the qualitative data. This suggests that even with in-IDE AI assistance, developers are still switching contexts, sometimes even more than those not using AI assistance.
AI’s impact on effort and attention
Taken together, the results of our HAX study suggest that AI coding assistants are quietly reshaping developer workflows in ways that otherwise can go unnoticed. That is, our study shows that these shifts are subtle enough that developers don’t always see them clearly in their own habits. That’s why combining methods in investigations, like telemetry with surveys and interviews, matters: it reveals the gap between what feels different and what actually changes in day‑to‑day behavior.
Check out our paper
If you’re building or adopting AI tools, the takeaway is simple: don’t just ask whether people like them. You should look closely at what they are actually doing!
Git integration in JetBrains IDEs has been evolving for more than fifteen years, and throughout that time, we followed one guiding principle: At the lowest level, we simply run porcelain Git commands, parse their output, and avoid doing anything Git itself would not do. All user scenarios and UI are built on top of that. This approach kept the integration reliable and made it much less likely that the IDE would corrupt the repository state.
Over time, Git grew more complex, repositories grew larger, and some operations became noticeably slower. By then, the pattern was hard to miss. We saw more community projects focused on Git performance, users kept reporting slow command execution, and we could reproduce the issue ourselves. Even rewording a single commit in the IntelliJ IDEA monorepo could take tens of seconds, depending on the machine and OS.
Interactive rebase was one of the clearest pain points, along with several IDE actions built on top of it. So we decided to focus on low-level optimizations there and turn the work into a dedicated internship project.
Interactive rebase: A technical deep dive
To see where those seconds went, we need to look at what Git actually does during an interactive rebase.
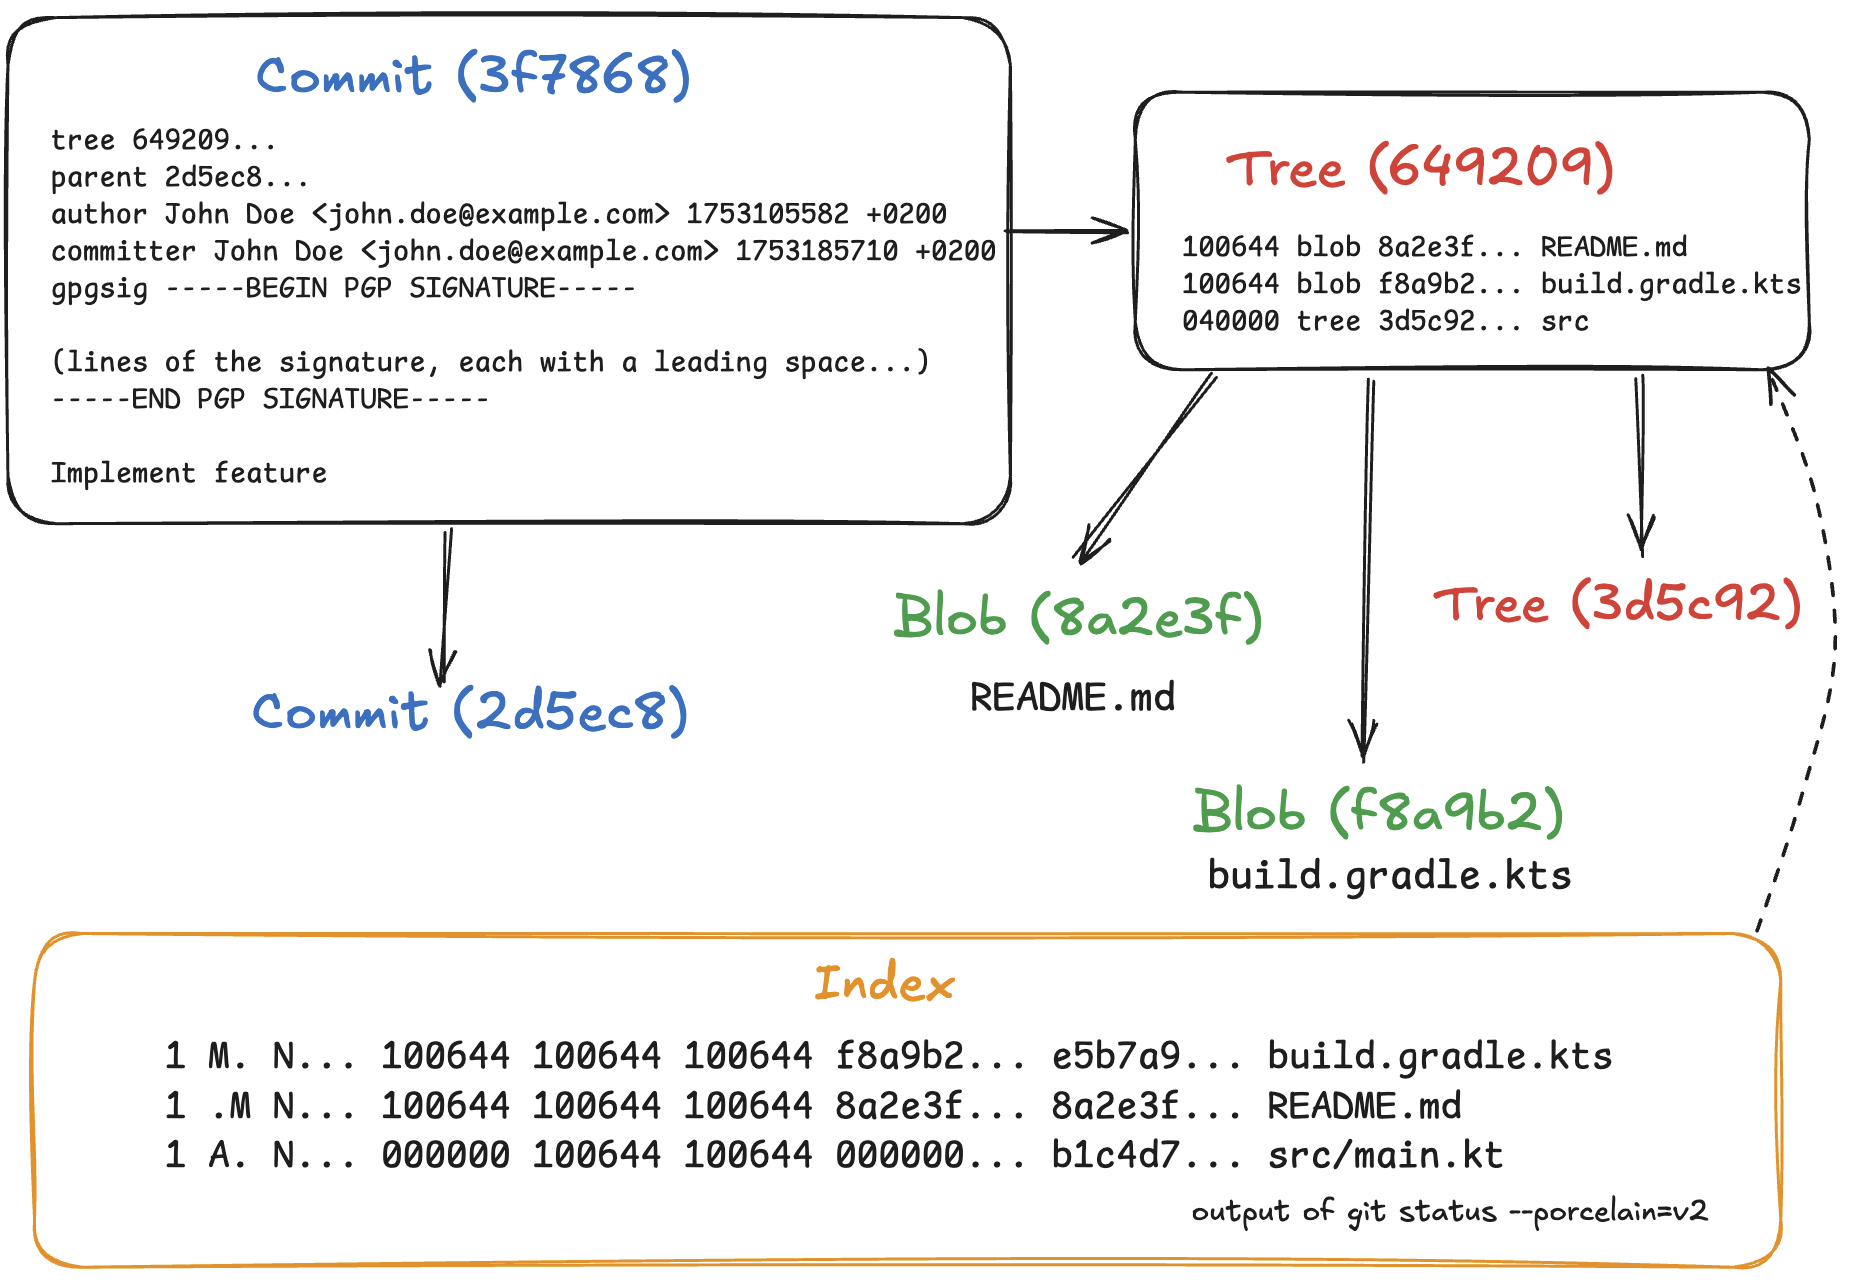
Internally, Git has three main kinds of objects, stored as files in the .git/objects directory: blobs, trees, and commits. Every object is identified by a unique 20-byte SHA-1 hash.
A blob simply contains the contents of a file.
A tree is a recursive object that corresponds to a directory. It can contain individual files, represented as an entry with a file name, mode, and the respective blob’s hash, as well as subdirectories, represented by the names and hashes of other trees. Because an object’s hash is unique, Git can reuse files and directories when they are identical.
A commit is essentially a tree with metadata. It contains the hash of its parent commit(s), author and committer information with timestamps, and a commit message. Each commit represents a snapshot of the entire directory; the diff between a commit and its parent is computed by comparing their two trees.
The index is a map linking file names to blob objects, sorted by file name. It acts as a scratchpad for Git operations. For example, during a merge, the index expands to hold three entries for a single conflicted file. It keeps these entries unmerged so that Git can create conflict markers in the working directory. After you resolve the conflicts, running git add marks the entries as merged. Following these operations, Git writes a new tree object from the current index using git write-tree.
Now, let’s consider how an interactive rebase is performed. To build a sequence of commits according to the git-rebase-todo file, Git checks them out sequentially, updates the working tree, and populates the index so that it can create a tree object from it. This can impact performance. However, in some scenarios, we can construct these trees without touching the index.
In-memory rebase optimization: How it works
The optimization for Edit Commit Message… is the simplest case. If you look at the sequence of commits from the selected one up to the top of the branch, the underlying tree hashes do not change during this operation. For the selected commit, we only need to change the commit message and committer information. Then, for every commit after that, we just rebuild the chain by updating the parent commit and computing a new hash.
Git provides low-level plumbing commands for managing Git objects. Using git cat-file, we can extract and parse the body of an object. We can create a new commit object by passing a tree hash and metadata to git commit-tree. Once the whole sequence has been rebuilt, we can use git update-ref to atomically update the branch reference.
The git merge-tree command can perform a three-way merge directly in memory. It takes the tree hashes and returns the resulting tree, failing if there is a merge conflict. So, for rebases that modify trees but do not cause conflicts, we can still avoid touching the working tree and index.
The same idea extends to a general interactive rebase. If we know the rebase plan, such as reordering, dropping, squashing, or renaming commits, we can build the new sequence in memory using the same commands.
That is the approach we implemented. When you perform commit-editing operations, the IDE first tries a fast in-memory path. If it runs into a merge conflict, it silently falls back to a regular Git rebase and stops so you can resolve the conflicts. Otherwise, it updates the branch reference atomically.
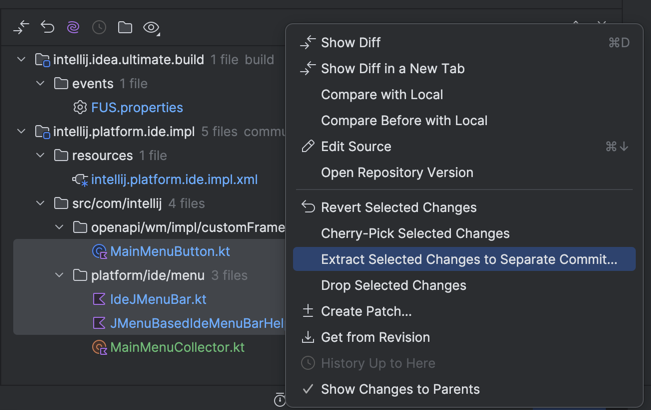
We applied the same optimization to other operations. For example, in the Git Log, when you select a commit, the Changed Files pane appears on the right. Here, you can select a subset of files and click Extract Selected Changes to Separate Commit… to split one commit into two and never cause a merge conflict. It works by recursively building a split tree in memory and omitting the changes at the specified paths.
Upstream Git is moving in a similar direction as well. The git replay command performs a fast in-memory rebase, but it is still experimental and does not support interactive rebase or GPG signing.
Results
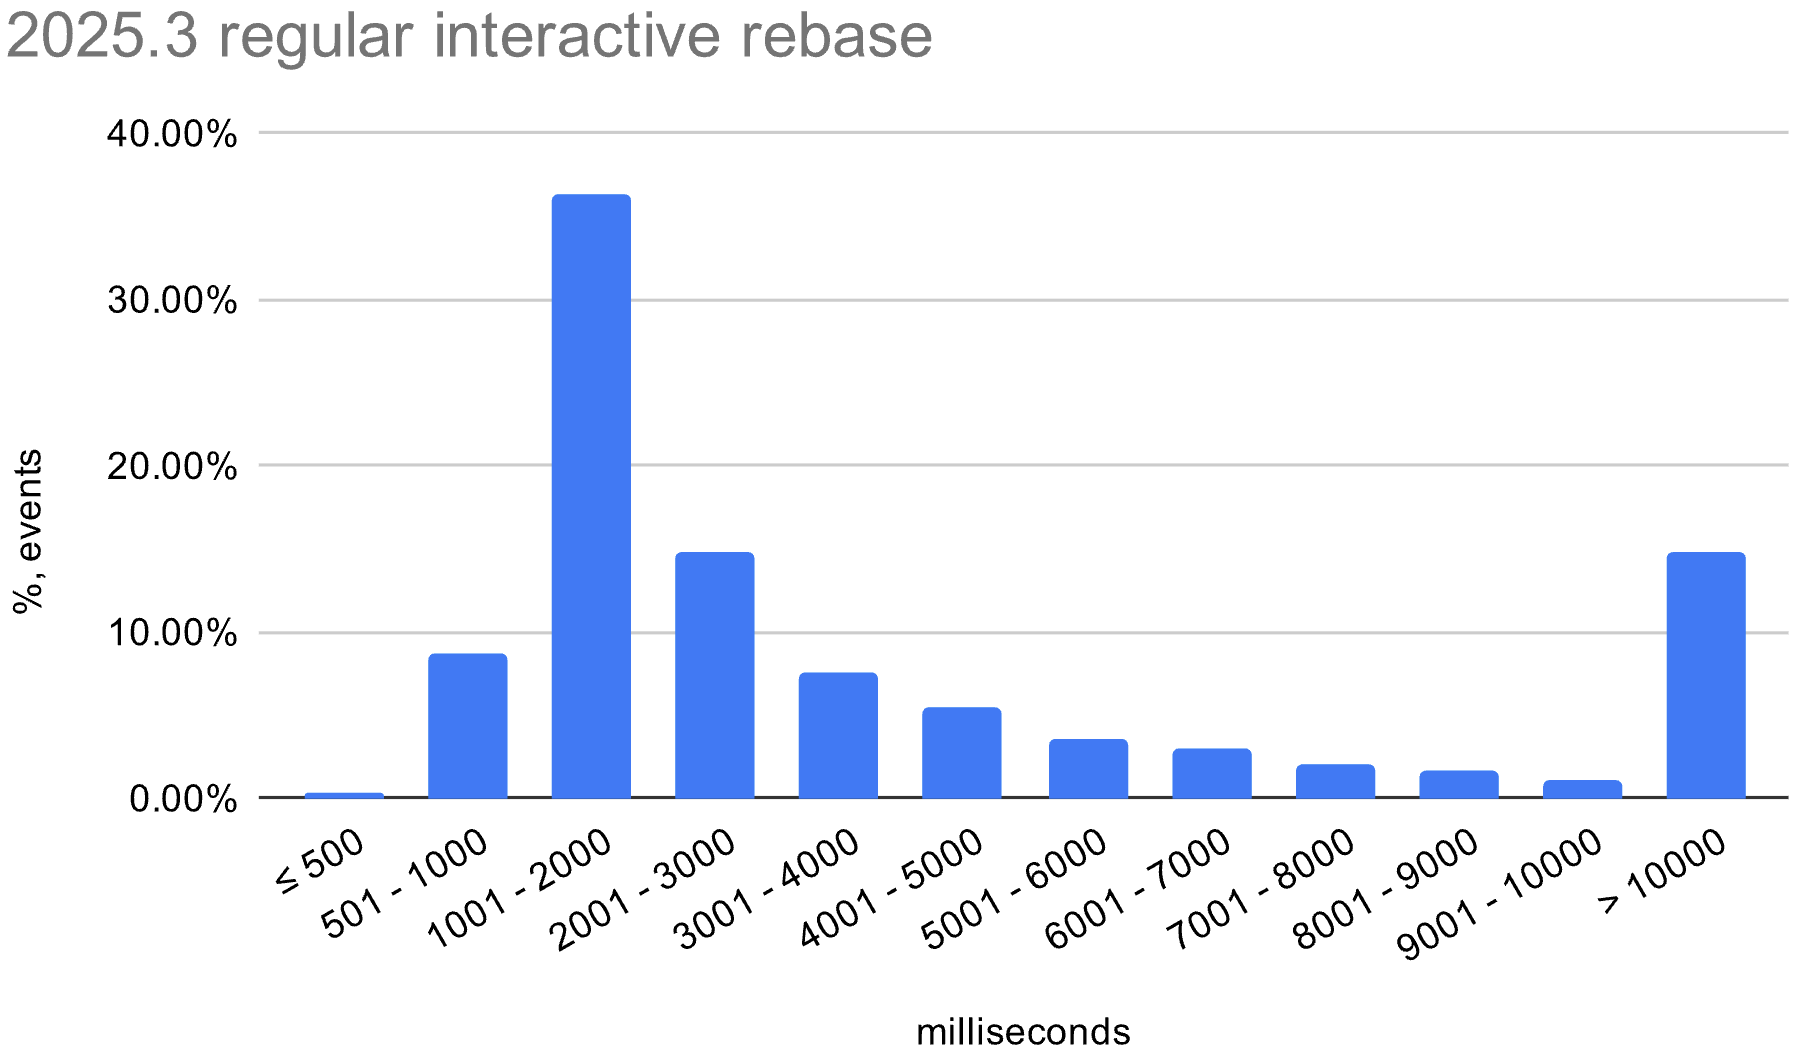
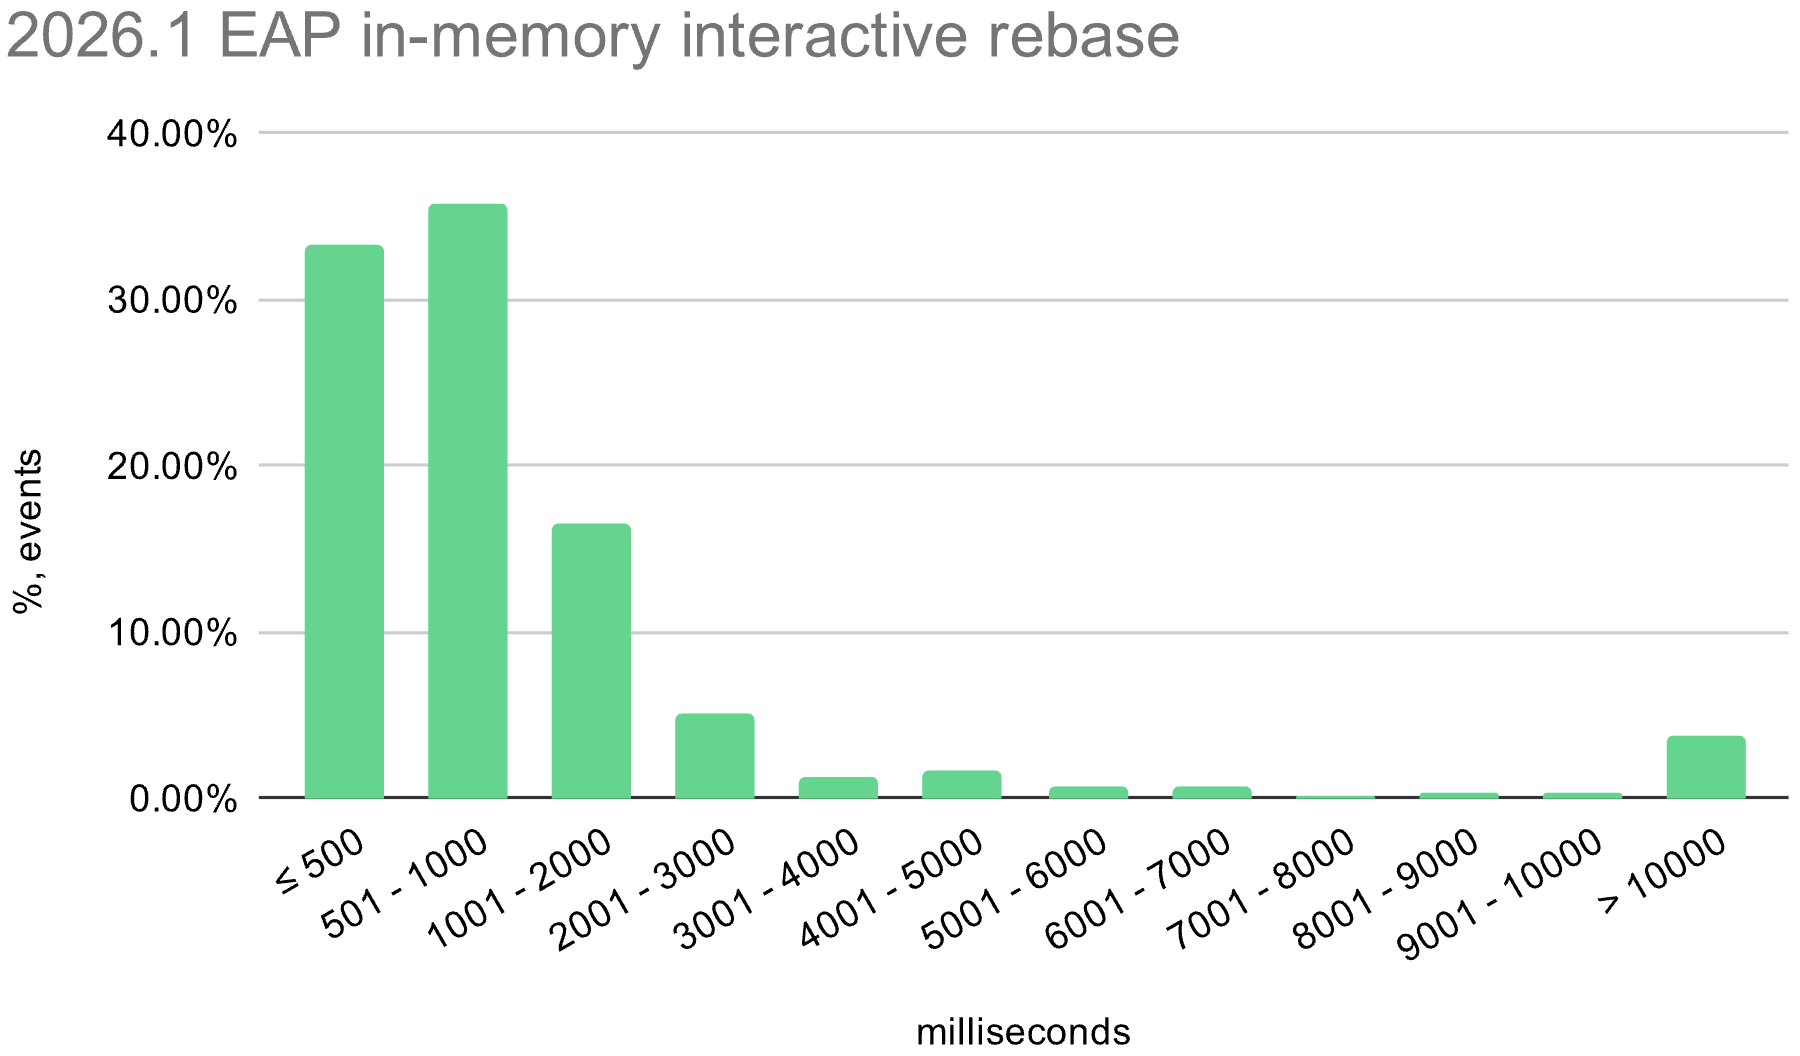
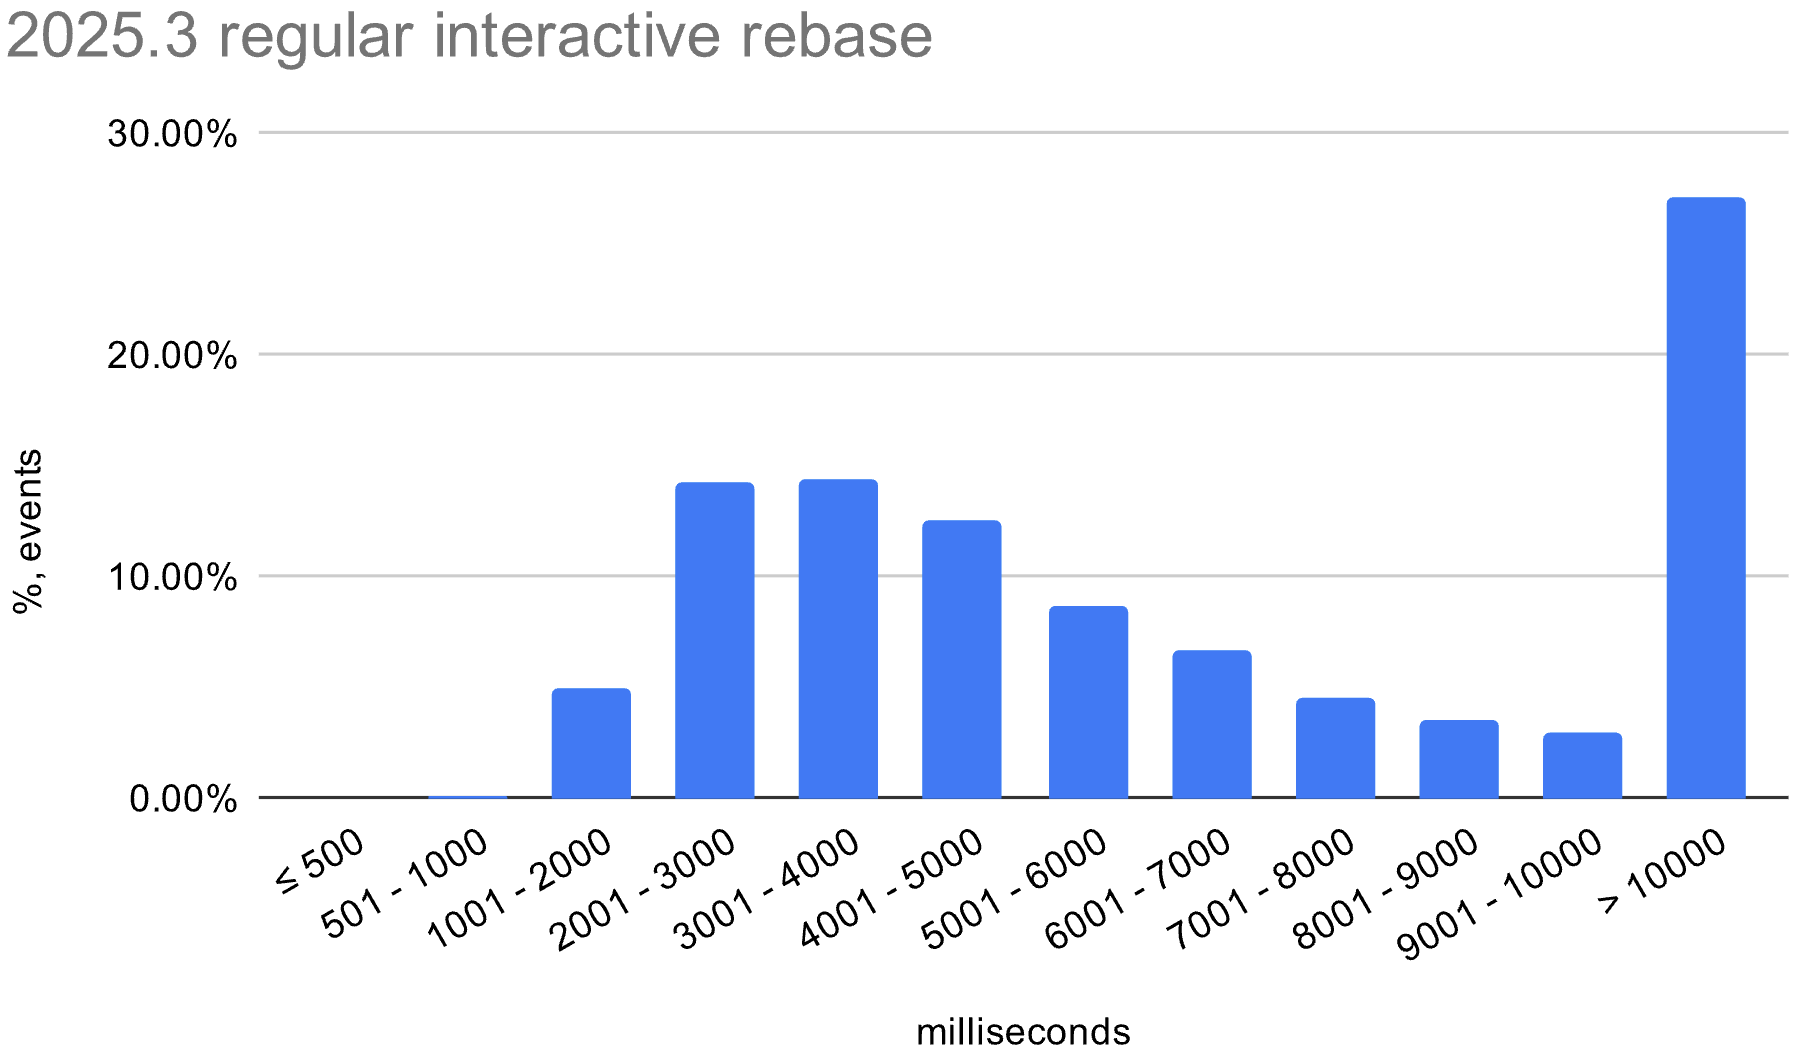
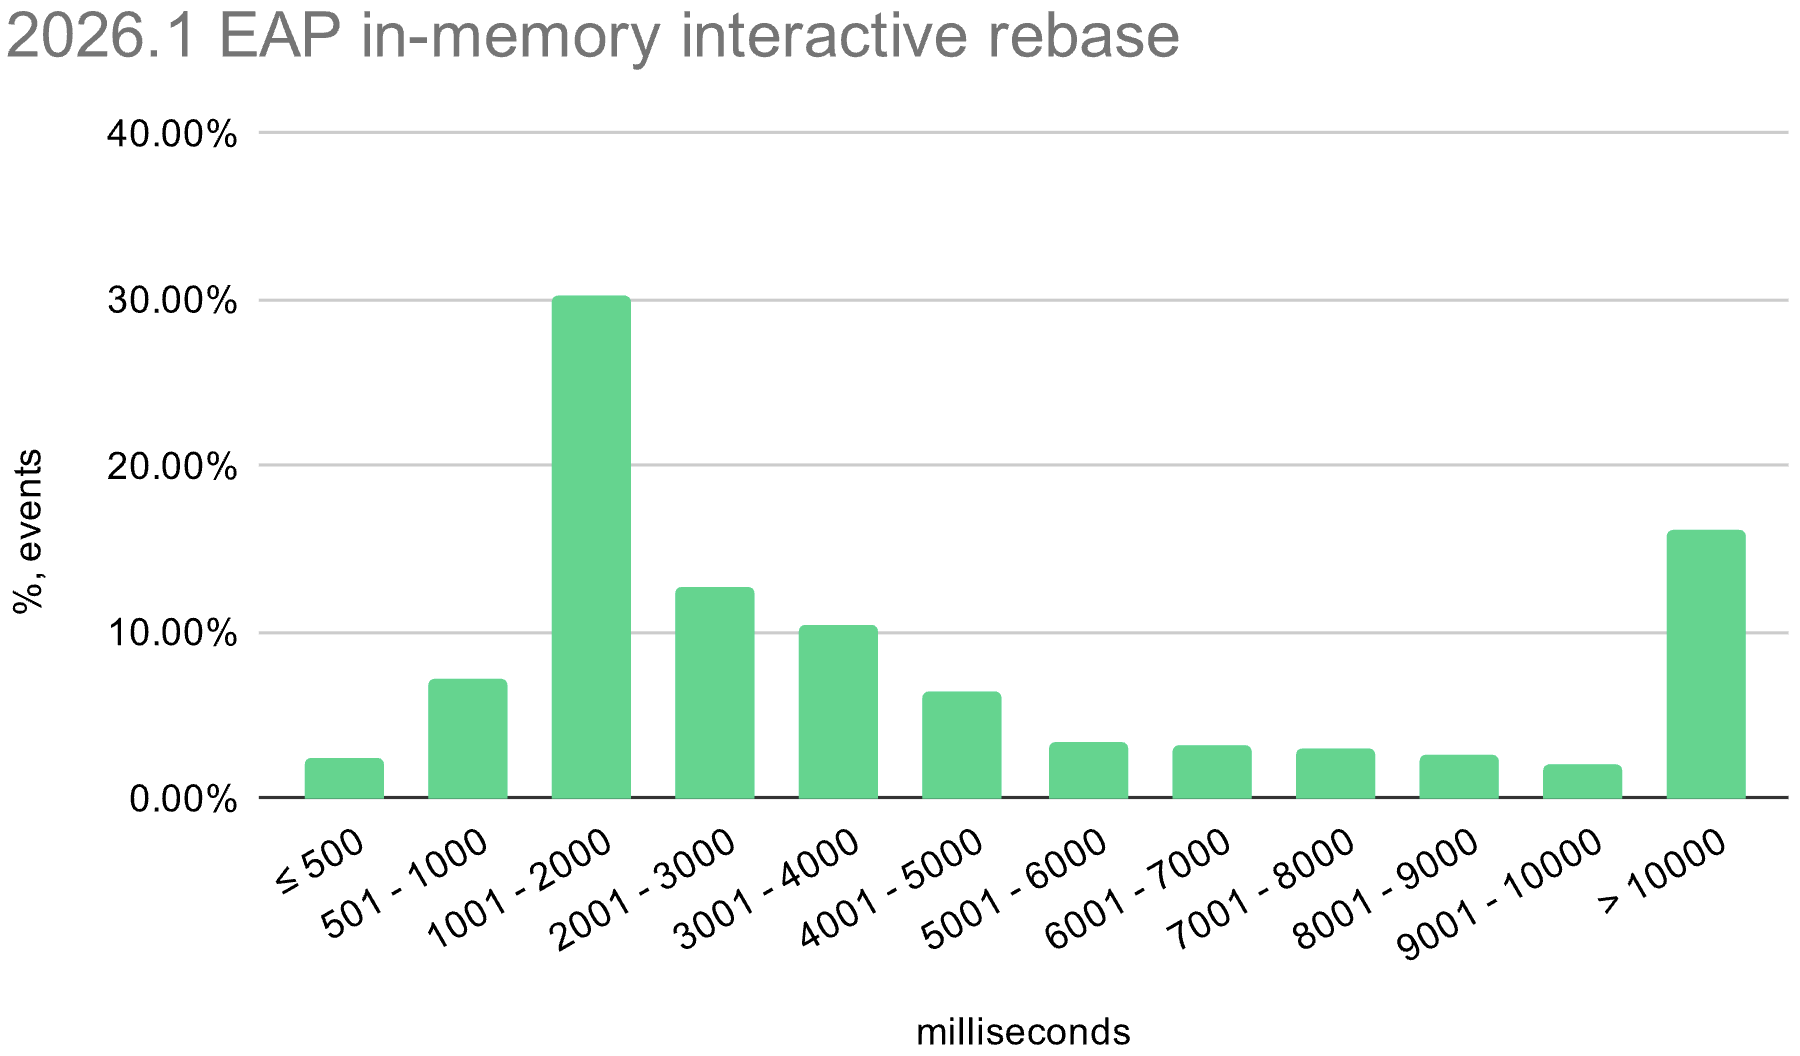
On the IntelliJ monorepo, the average execution time of interactive rebase dropped from tens of seconds to just a few seconds. The exact numbers varied across operating systems, but the overall improvement was consistent.
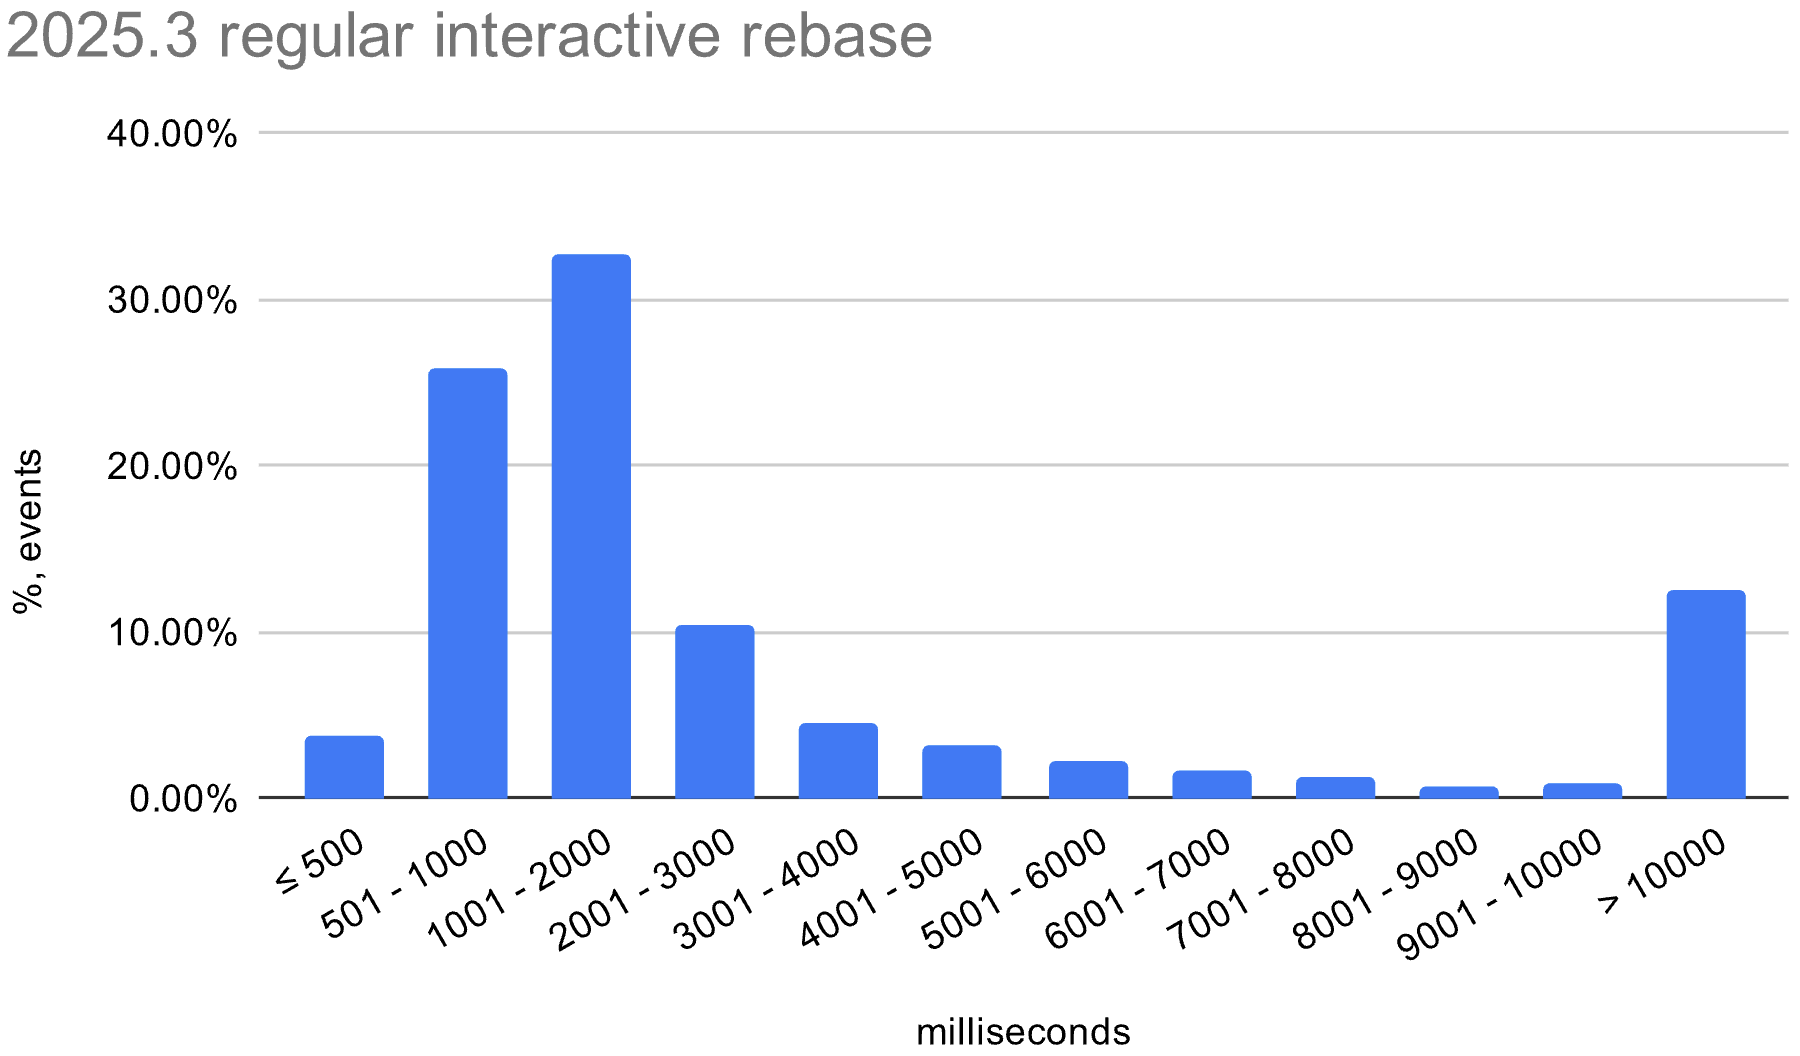
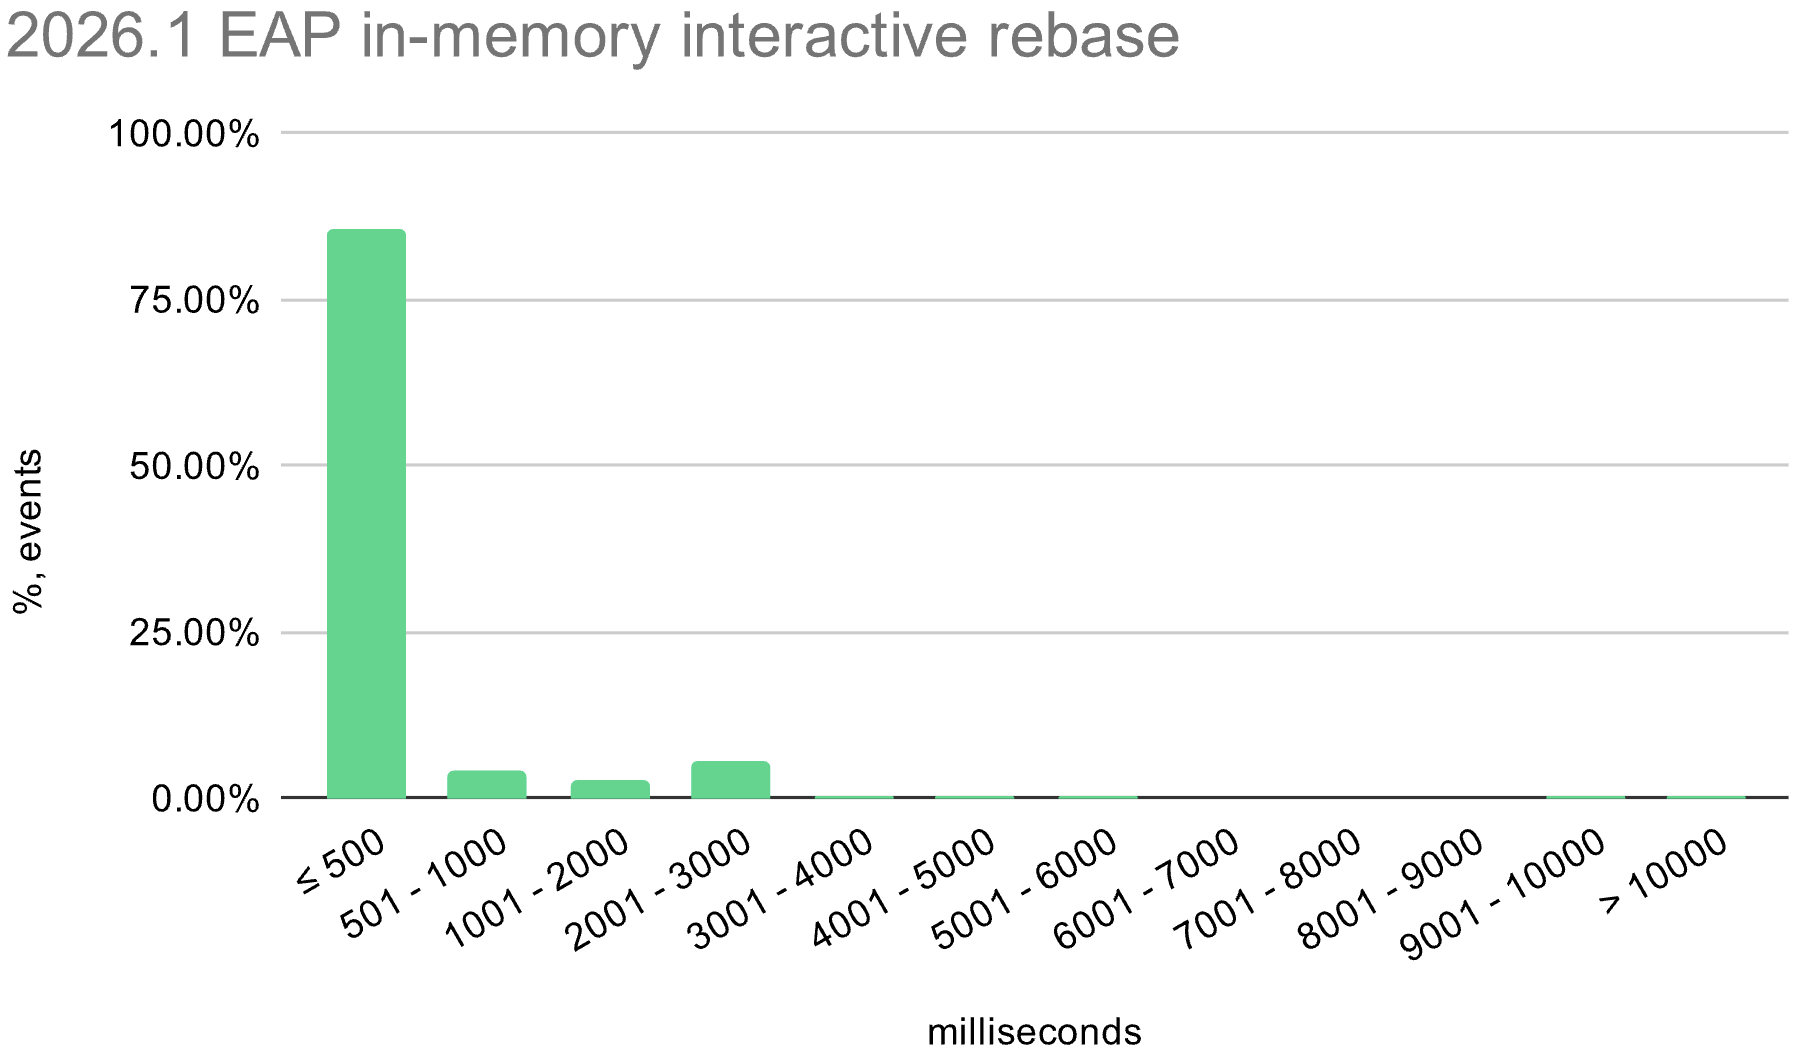
We also enabled the in-memory optimization in EAP builds during the 2026.1 release cycle. The histograms below show the distribution of interactive rebase execution times in data collected from EAP builds, compared with 2025.3.
macOS
Windows
Linux
Conflicts
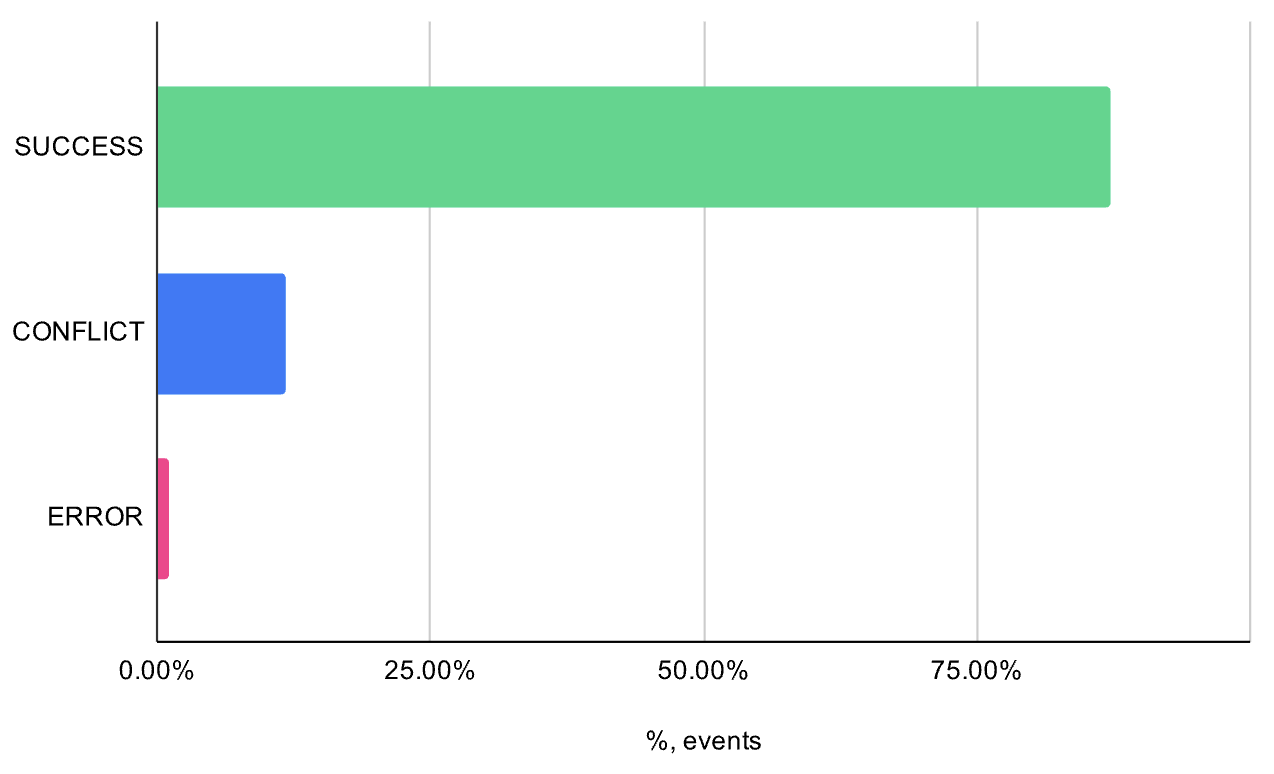
While collecting data on interactive rebase executions, we could also measure how often conflicts occurred. The data shows that around 12% of interactive rebases resulted in merge conflicts, and about 1% failed due to errors. In both cases, we fall back to the regular interactive rebase process.
The in-memory optimization reduces average execution time across all operating systems. There is still room for improvement, especially on Windows, where the worst-case time is still quite high.
After testing this optimization internally at JetBrains and in EAP builds, we decided to enable it by default in the upcoming 2026.1 release. This applies to standard interactive rebase and actions based on it, such as reword, drop, and squash, as well as extracting selected changes into a separate commit. We expect this to make commit-history editing faster and less disruptive.
Credits and further reading
The broader developer community was a huge help in shaping our implementation. We would like to acknowledge:
git-revise: The logic in this project was instrumental in guiding our in-memory rebase approach.
Waleed Khan’s blog post: An excellent read that explores this exact topic.
Jujutsu (jj) VCS Discussion #49: A discussion that sheds light on why the standard Git implementation can be slow in these scenarios.
Interested in the implementation details? Check out the solution in the IntelliJ Platform sources.
Any feedback is welcome! Please leave a comment or email us directly at vcs-team+ir@jetbrains.com.
You may have already seen other JetBrains tools in the Gartner Magic quadrant. Now Qodana is listed on Gartner Peer Insights too!
This is an important milestone for us as we continue to grow Qodana into a leading code quality platform for modern development teams. But more importantly, it’s an opportunity for our users to help shape how Qodana is perceived and improved.
Why this matters
Gartner Peer Insights is one of the most trusted platforms for evaluating software solutions, where real users share honest feedback about their experience. For teams evaluating code quality and static analysis tools, these reviews play a critical role in decision-making.
By leaving a review, you’re not just sharing feedback, you’re helping other developers, DevOps engineers, and engineering leaders understand how Qodana performs in real-world workflows.
Help us improve Qodana
We need to know what you think. Whether you’re using Qodana to automate code review, enforce quality gates in CI/CD, improve code consistency across teams, or monitor code health at scale – we want to hear from you.
We’re particularly interested in learning:
how Qodana fits into your development workflow
what’s working well
where we can improve
how it compares to other tools you’ve used
Review Qodana
What to expect
Leaving a review only takes a few minutes, however you will need to sign up if you don’t have a Gartner account. Your input will:
help us prioritise product improvements
guide future roadmap decisions
support other teams evaluating code quality platforms
Leave your review
If you’ve been using Qodana, we’d really appreciate your feedback. Your insights help us build a better product, and help other teams build better code.
Thank you for being part of the Qodana community 💙
There are several ways to connect an AI agent to your data. Each approach solves a different problem and comes with its own trade-offs, what you’re really choosing between is speed and reliability. In this post, we’ll explore how to balance the two to get the best results for your team and use case.
Today, many teams are looking to use AI agents to interact with their data through natural, conversational interfaces. Instead of writing queries or building dashboards, users can ask questions like “How did my week-2 conversion change compared to last week?” and get immediate, contextual answers.
Giving direct access: The faster but more fragile approach
The simplest setup is to connect an agent directly to your database. You give it access to your schema, provide it with some documentation, and let it write SQL on the fly. You can ask it a question in plain English, and it will generate a query or use an MCP server to give you an answer.
With this setup, you can be up and running in a few hours.
But the answers you receive are only as good as the agent’s interpretation of the data. It won’t really know your metrics and their specific definitions, so it will have to make an educated guess. Sometimes it will guess well, but often it won’t. The numbers might still look reasonable, though, and this problem could be solved by providing additional context via text files or tools like a Confluence MCP server. But without a single source of truth and predefined guardrails, there’s no guarantee that the agent will generate the right queries.
This is why these setups are typically limited to data teams, since someone will always need to double-check the results.
Building a formal semantic layer: The reliable, but slow to build approach
A more structured approach is to define a semantic layer. You model your metrics in tools like dbt or Cube. The agent no longer queries raw tables; it now works with predefined metrics. With query engines, SQL generation becomes more reliable because it follows predefined logic and metric definitions instead of making assumptions.
This alone improves many aspects of performance, since once the logic is encoded, answers become consistent, and the agent is no longer second-guessing what “revenue”, “churn”, or “subscriber growth” mean.
But in this case, the trade-off is time.
Building a proper semantic layer takes months. Every metric must be defined, reviewed by your data team, and maintained. As your business grows and your data evolves, new logic and metrics will inevitably be needed. A large part of your work will now be focused on maintaining and keeping your semantic layer up to date.
This approach yields more reliable answers because queries are based on predefined metrics. However, it requires ongoing effort to build and maintain the layer. Over time, data teams spend less time answering questions directly and more time maintaining these definitions.
The agent can’t do this work on its own, as it relies on humans updating the semantic layer to ensure it can answer questions consistently.
Building an automated semantic layer: Avoiding trade-offs
A third approach is to build an automated semantic layer that can learn and maintain itself as usage grows.
Instead of defining every metric upfront, the system will build it from your existing dbt projects and data sources. And every time someone asks a question, new metrics will be created on the fly in that semantic layer, generating new PRs in Git that data teams can then review and approve.
This way, the layer is generated from your existing data, helping you avoid the usual cold-start problem and the need to define all your metrics before anyone can use the system.
As questions come in, the agent proposes new metrics, which are in turn reviewed by your data team. This keeps the system aligned with real usage, while ensuring that definitions stay consistent and trusted. Business users can interact with the data earlier, and the metrics evolve based on actual needs.
Databao is built around this principle, bringing together automated semantic layer generation and human-in-the-loop validation so teams can scale usage without sacrificing consistency or trust.
What actually matters
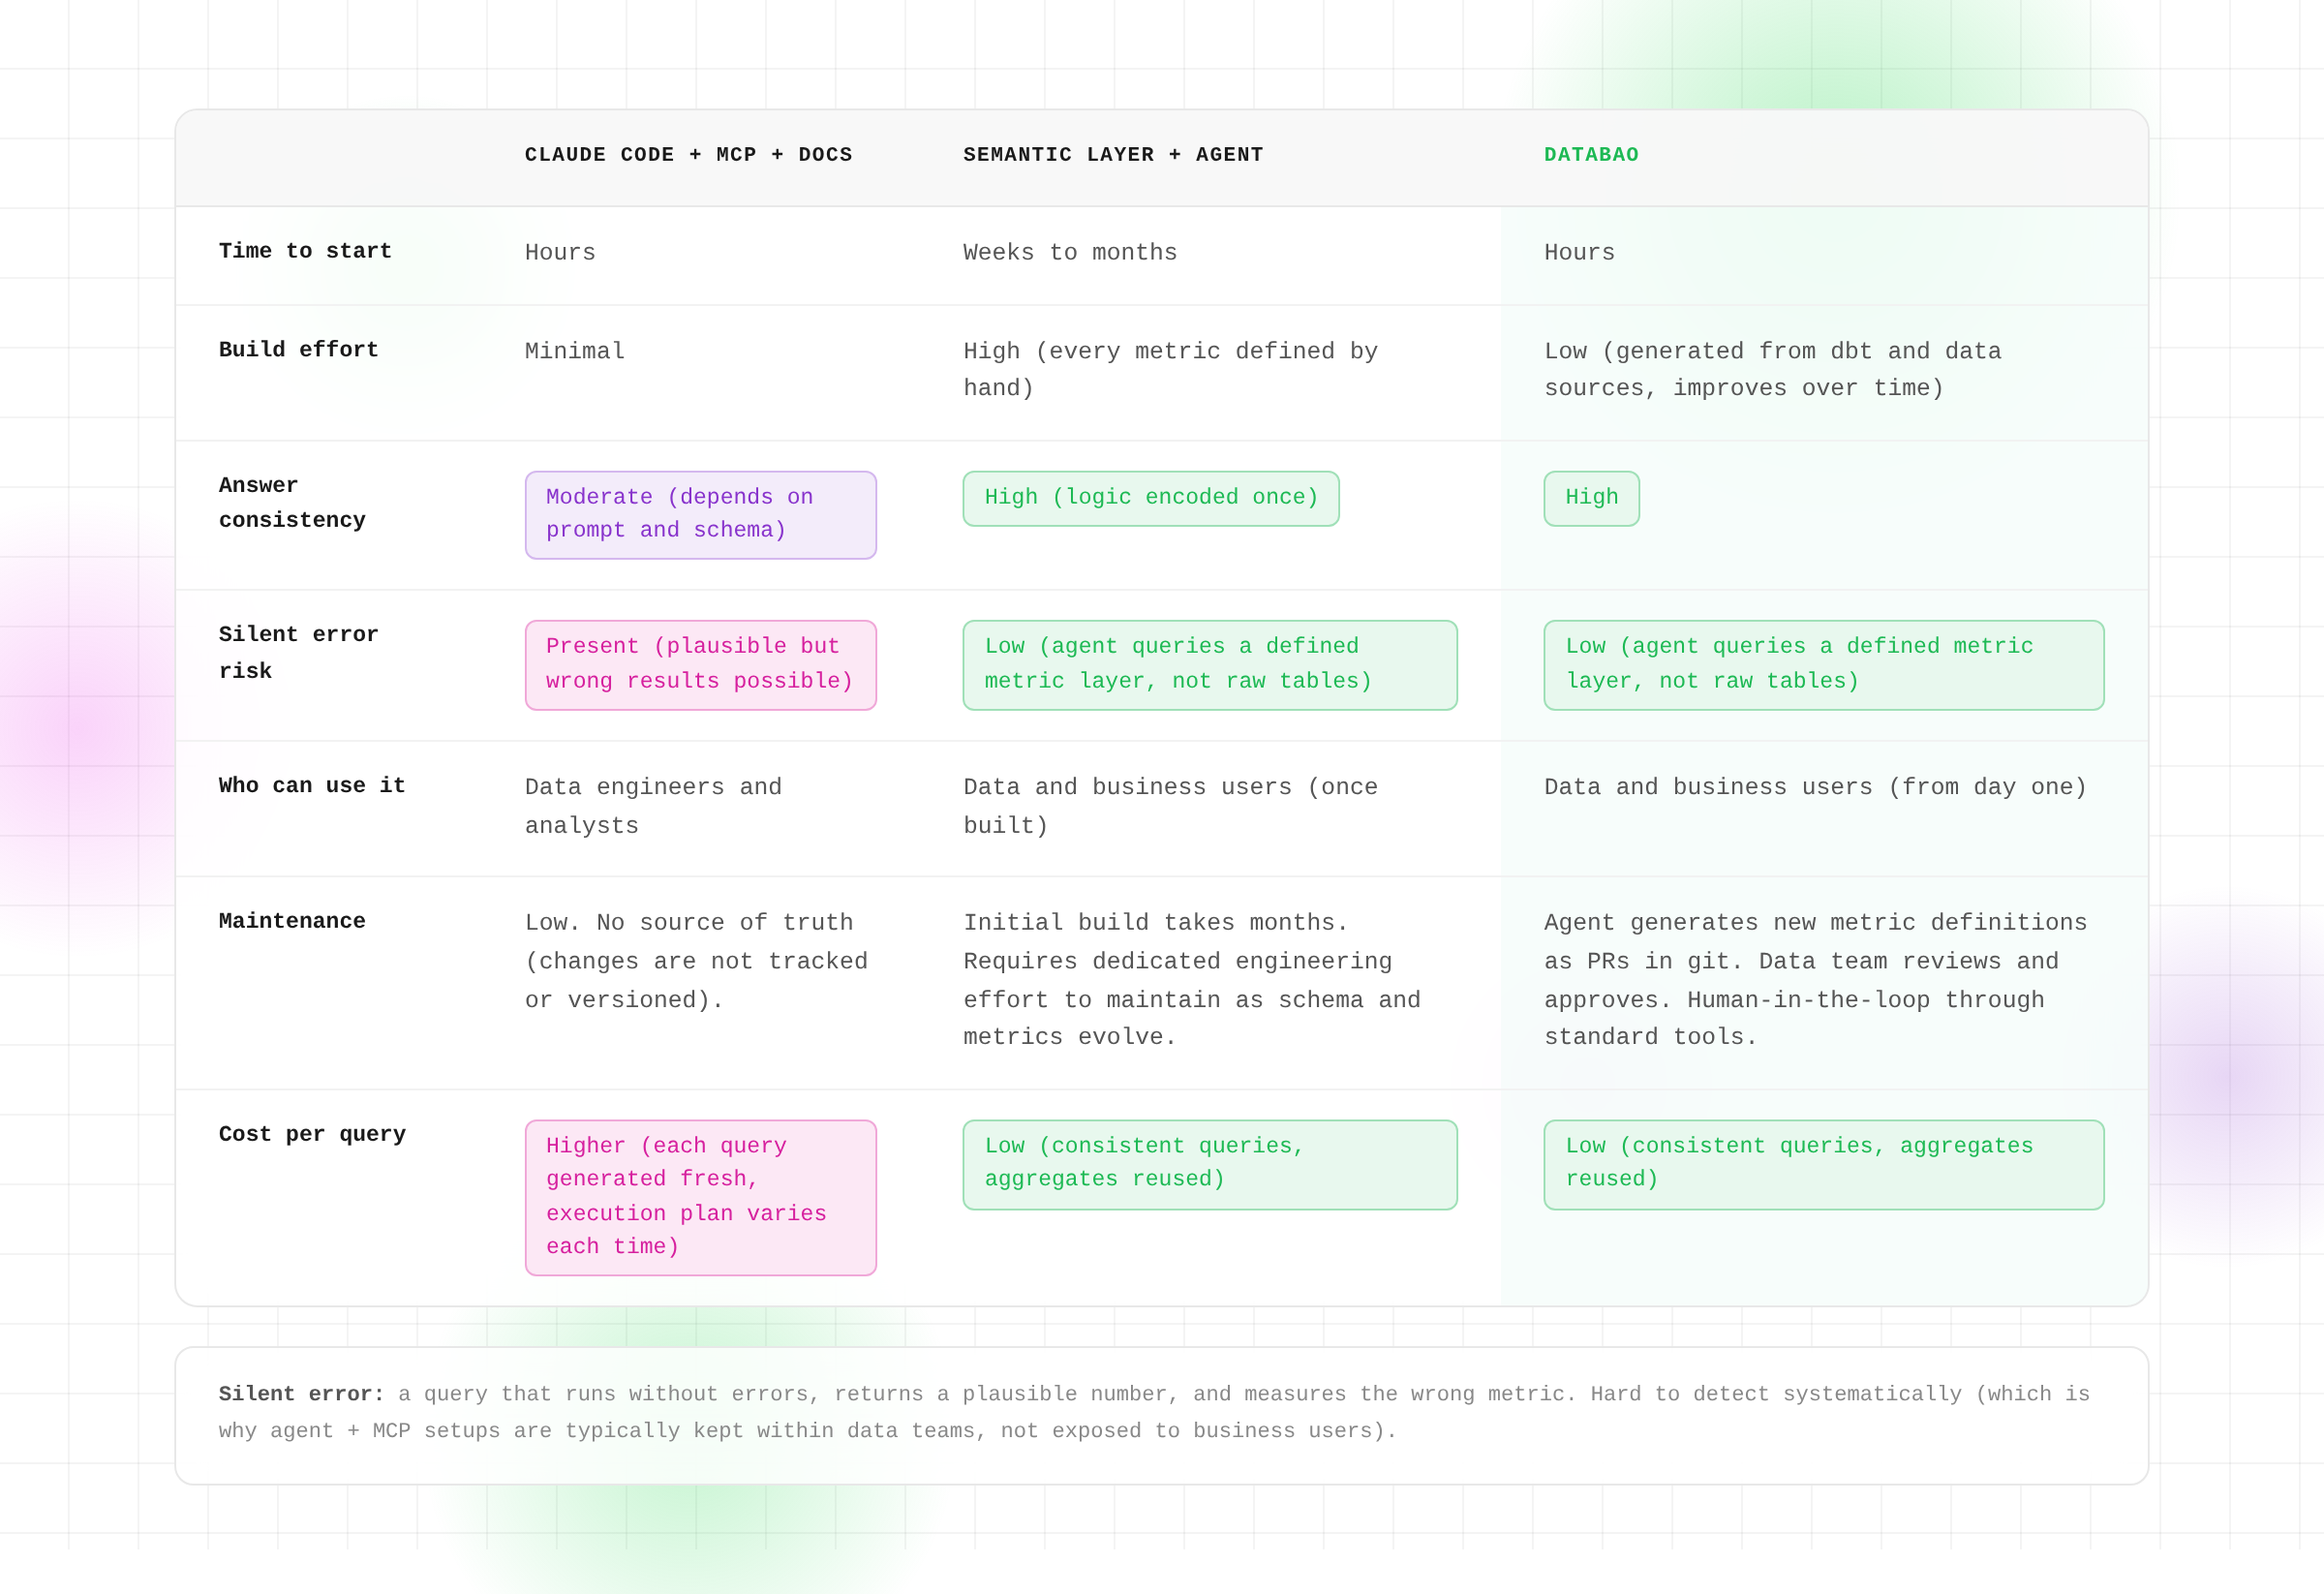
At a glance, all three approaches address a similar need: enabling business users to ask their data questions in natural language.
But the hard part is not generating answers – it’s making sure those can be trusted. Silent errors, when numbers look right but are based on the wrong definition, are the hardest to catch and can often prove to be the most damaging. That’s why the structure behind the agent matters more than the interface itself.
If we sum it all up:
Direct access is fast, but it requires constant verification.
A formal semantic layer is reliable but slow to build.
An automated layer tries to strike a balance between both, with built-in review processes that ensure the agent has context, without placing all the burden of providing it on humans.
There isn’t a perfect option, and the right choice depends on where you are in your data journey.
If you’re exploring, speed might matter more. But if you’re scaling usage across a company, consistency becomes critical.
About Databao
If you’d like to try enabling self-service analytics through an automated semantic layer, you can integrate Databao into your workflow and join us in building a proof of concept together. We’ll work with you to understand your use case, define a context-building process, and give the agent access to a select group of business users. Together, we’ll evaluate the quality of the responses and your overall satisfaction with the results.
Building a Voice-Controlled Local AI Agent: Architecture, Models & Lessons Learned
A deep-dive into wiring together Groq Whisper, Ollama, and Gradio into a fully working voice agent.
Why I Built This
The promise of a voice-controlled AI agent is compelling: speak naturally, and the machine understands, decides, and acts. But most tutorials skip the hardest part — how do you get from raw audio to a reliable tool execution, without things falling apart the moment the user says something unexpected?
This article walks through every layer of the system I built: the Speech-to-Text (STT) choice, the intent classification strategy, tool execution, and the UX patterns that make it feel robust rather than brittle.
Each stage has a single responsibility and fails gracefully with a user-visible error rather than a silent crash. Let me walk through each.
Stage 1: Audio Input
Two input modes are supported:
Live microphone — Gradio’s built-in gr.Audio(sources=["microphone"]) handles capture
File upload — accepts .wav, .mp3, and .m4a
The choice of Gradio here was deliberate. Streamlit requires workarounds for microphone access, and raw HTML/JS adds maintenance overhead. Gradio abstracts both input modes into a single audio_path string — making the rest of the pipeline input-agnostic.
Stage 2: Speech-to-Text
The local vs. cloud trade-off
My first instinct was to run Whisper locally. It preserves privacy and removes API dependency. But Whisper Large v3 — the most accurate open model — requires about 6 GB of VRAM to run at real-time speed. Most developer laptops (including mine) cannot meet this without significant latency.
The benchmarks told the story clearly:
Setup
Real-time factor
Notes
Whisper Large v3 (local, CPU)
~8×
8 seconds of audio takes ~64 s
Whisper Large v3 (local, GPU)
~0.8×
Requires ≥6 GB VRAM
Groq Whisper API
~0.3×
Cloud, free tier, ~0.3 s/s audio
OpenAI Whisper API
~0.5×
Paid, slightly slower
I chose Groq Whisper for three reasons:
Best latency on available hardware
Free tier (sufficient for a demo)
Identical model quality to local Whisper Large v3
For a fully air-gapped deployment, faster-whisper or whisper.cpp are solid alternatives.
One gotcha: Groq returns a plain string (not a dict) when response_format="text". Wrapping it in str() before .strip() avoids type errors.
Stage 3: Intent Classification
This is where most voice agent projects fall short. Naive approaches use keyword matching (“if ‘create’ in text: create_file”). This breaks instantly on real speech patterns.
My approach: ask the LLM to return structured JSON.
The system prompt
The key insight is to give the model a contract — a specific JSON schema — and validate the output programmatically:
Multiple intents in one utterance (compound commands)
Suggested filename (so the tool doesn’t have to guess)
Detected programming language
A confidence score for UI feedback
Fallback handling
LLMs occasionally return malformed JSON, especially with smaller models. The _safe_parse() function strips markdown fences, handles partial JSON, and always returns a valid dict — defaulting to general_chat if classification fails entirely.
Model choice: llama3 vs mistral vs phi3
I tested all three on a set of 20 representative voice commands:
Model
Accuracy (correct intent)
Latency (avg)
JSON validity
llama3 8B
94%
3.2s
96%
mistral 7B
89%
2.8s
94%
phi3-mini 3.8B
82%
1.6s
91%
llama3 wins on accuracy. phi3-mini is worth considering on machines with less than 8 GB RAM.
Stage 4: Tool Execution
Four tools, each isolated in tools.py:
create_file
Creates a blank file or directory in output/. All paths are sanitised to prevent traversal attacks:
Makes a second Ollama call — this time as a code-generation assistant. The system prompt instructs the model to return raw code only (no markdown fences). A regex strip handles the occasional fence anyway.
summarize
Also uses Ollama. If the compound intent includes create_file, the summary is additionally saved to a .md file. This is how compound commands work — the intent dict carries all context, and each tool reads what it needs.
general_chat
Passes the last 10 conversation turns as context. This is the session memory at work — the user can ask follow-up questions naturally.
Compound command routing
The dispatcher strips the meta-label “compound” and routes to each real intent:
This means “Summarize this text and save it to notes.md” correctly triggers both summarize and create_file — and the UI shows both results.
Stage 5: UI — Human-in-the-Loop
File operations are irreversible (at least without undo logic). A key UX decision: pause before executing file ops and ask the user to confirm.
This is toggled by a checkbox. When enabled, the pipeline returns early after intent classification, renders a confirmation panel, and waits. Approve → execute. Reject → cancel with explanation.
This pattern is sometimes called “human-in-the-loop” (HITL) and dramatically increases trust in autonomous agents.
Challenges & Lessons Learned
1. Ollama connection handling
Ollama must be running (ollama serve) before the app starts. If it isn’t, every Ollama call raises a ConnectionError. The fix: catch ConnectionError everywhere and surface a clear message: “Cannot connect to Ollama. Run: ollama serve“.
2. JSON from LLMs is unreliable
Even with "format": "json" in the Ollama API call, some models wrap the JSON in a markdown code block. Always strip fences before parsing, and always have a fallback.
3. Gradio state management
Gradio components don’t share Python global state cleanly across event handlers. The _pending dict for confirmation state works but isn’t production-safe for multi-user deployments. For production, use gr.State() — or a proper database.
4. Audio format diversity
Real users upload everything: .webm, .ogg, .m4a. Groq Whisper handles most formats natively. The only failure mode I encountered was with very low bitrate .ogg files — the workaround is to convert with ffmpeg before sending.
What I’d Do Differently
Streaming output: Ollama supports streaming tokens. Gradio supports streaming via generators. Wiring these together would make code generation feel much faster.
Local STT fallback: Package faster-whisper as a fallback for when Groq is unavailable.
Persistent memory: Replace in-process SessionMemory with SQLite so history survives app restarts.
Multi-user support: Move all state into gr.State() so multiple users can interact simultaneously.
Conclusion
Building this agent taught me that the hard part of voice AI isn’t any single component — it’s the seams between them. Structured JSON intent classification + graceful fallbacks + a sandboxed execution environment is the recipe that makes the whole thing feel reliable rather than brittle.
If you build on top of this, I’d love to see what you create.
GitHub: github.com/YOUR_USERNAME/voice-agent
Published as part of the Mem0 AI/ML Developer Intern assignment.
AVIF landed quietly in 2019 and spent years as the format nobody used. Then Chrome shipped native support. Then Firefox. Then Safari 16. By 2024, Can I Use reported 93% global browser coverage. And suddenly the question flipped from “can I use AVIF?” to “why aren’t I using AVIF?”
If you’re still serving JPEG and PNG on the web in 2026, you’re leaving performance on the table. Here’s what you need to know.
What AVIF actually is
AVIF (AV1 Image File Format) is a still-image format derived from the AV1 video codec, developed by the Alliance for Open Media; a consortium that includes Google, Apple, Microsoft, Mozilla, Netflix, and Amazon. It’s royalty-free, open-source, and designed to replace JPEG, PNG, and even WebP.
The key technical facts:
Lossy and lossless compression in a single format
10-bit and 12-bit color depth (vs JPEG’s 8-bit)
HDR and wide color gamut (BT.2020, PQ, HLG)
Alpha transparency (like PNG, unlike JPEG)
Film grain synthesis (stores grain parameters instead of actual noise)
Based on the HEIF container (ISO/IEC 23008-12)
The compression comes from AV1’s intra-frame coding tools: directional prediction, recursive partitioning (up to 128×128 superblocks), and the CDEF (Constrained Directional Enhancement Filter). These tools were designed for video but work remarkably well for still images.
The compression numbers
Let’s be specific. In independent tests by Netflix, Cloudflare, and Google, AVIF consistently outperforms:
Comparison
File size reduction
AVIF vs JPEG
30-50% smaller at same quality
AVIF vs PNG
50-70% smaller (lossy mode)
AVIF vs WebP
15-25% smaller at same quality
For a concrete example: a 500KB JPEG photograph typically compresses to ~250KB as AVIF with no visible quality difference. A 2MB PNG screenshot drops to ~400KB. These are not edge cases; they’re typical results across diverse image types.
Why AVIF matters for web performance
Images account for roughly 50% of the average web page’s total weight, according to HTTP Archive data. Cutting that by 30-50% has real consequences:
Core Web Vitals: Smaller images directly improve LCP (Largest Contentful Paint). Google has confirmed LCP is a ranking signal.
Bandwidth costs: A site serving 1 million page views/month with 500KB of images per page transfers ~500GB. Switching to AVIF cuts that to ~300GB. At CDN rates, that’s real money.
Mobile experience: On 3G connections (still common in emerging markets), a 500KB image takes ~4 seconds to load. A 250KB AVIF takes ~2 seconds. That’s the difference between a bounce and a conversion.
Carbon footprint: Less data transferred means less energy consumed. The Green Web Foundation estimates that data transfer accounts for ~0.06g CO2 per MB.
AVIF vs WebP vs JPEG vs PNG: when to use each
The format landscape isn’t “use AVIF for everything.” Each format still has its place:
Use case
Best format
Why
Photographs for the web
AVIF
Best compression, no visible quality loss
Transparent graphics
AVIF or WebP
Both support alpha; AVIF is smaller
Pixel-perfect screenshots
PNG
Lossless, universal compatibility
Email attachments
JPEG
Universal; every client supports it
Legacy system input
BMP/JPEG
Some systems can’t decode modern formats
Favicons
ICO
Required by browsers for tab icons
Scalable logos
SVG
Vector; infinitely scalable
HDR photography
AVIF
Only modern format with full HDR support
The practical advice: serve AVIF as your primary web format with JPEG/PNG fallbacks using the <picture> element or CDN-based content negotiation.
How to convert images to and from AVIF
You don’t need to install command-line tools or pay for cloud services. Kitmul provides free, browser-based AVIF converters that process everything locally; your images never leave your device.
Converting TO AVIF (reduce file sizes)
JPEG to AVIF Converter: The most common conversion. Shrink your photo library by 30-50%.
PNG to AVIF Converter: Perfect for screenshots and graphics with transparency.
WebP to AVIF Converter: Upgrade from WebP to the next generation; another 20% savings.
SVG to AVIF Converter: Rasterize vector graphics into compact AVIF files.
BMP to AVIF Converter: Compress raw bitmaps from legacy systems; 95%+ reduction.
PDF to AVIF Converter: Extract PDF pages as lightweight AVIF images.
ICO to AVIF Converter: Convert icon files for web galleries.
Converting FROM AVIF (for compatibility)
AVIF to JPEG Converter: When you need universal compatibility for email or print.
AVIF to PNG Converter: Lossless output with transparency for editing workflows.
AVIF to WebP Converter: WebP fallback for CDN pipelines.
AVIF to PDF Converter: Embed images in professional documents.
AVIF to GIF Converter: For email signatures and legacy platforms.
AVIF to BMP Converter: Raw pixel data for industrial systems.
AVIF to ICO Converter: Create favicons from AVIF source images.
The <picture> element: serving AVIF with fallbacks
The standard pattern for progressive format delivery on the web:
The browser picks the first format it supports. AVIF-capable browsers (93%+) get the smallest file. WebP serves as a fallback for the remaining ~7%. JPEG is the universal safety net.
Encoding speed: AVIF encodes 5-10x slower than JPEG. This matters for real-time processing but not for batch/build-time conversion.
Maximum dimensions: The AV1 spec limits individual tiles to 8192×4320 pixels. Larger images require tiling, which some tools don’t support.
Animation support: AVIF supports animated sequences (AVIS), but tooling is immature compared to GIF/WebP animation.
Older browsers: IE11 and pre-2020 browsers don’t support AVIF. Always include fallbacks.
Email clients: Most email clients don’t render AVIF. Use AVIF to JPEG for email content.
Print workflows: Print shops typically expect TIFF, PDF, or high-quality JPEG. Convert with AVIF to PDF before sending to print.
The bottom line
AVIF is the best general-purpose image format available in 2026. It delivers smaller files than any alternative at equivalent quality, supports features no other format offers (HDR, wide gamut, film grain synthesis), and has near-universal browser support.
The migration path is straightforward:
Convert your existing images to AVIF (use our free converters)
Serve AVIF with <picture> fallbacks
Keep JPEG/PNG originals for compatibility workflows
Every kilobyte you save loads faster, ranks better, and costs less. The format war is over. AVIF won.