How To Improve UX In Legacy Systems

Imagine that you need to improve the UX of a legacy system. A system that has been silently working in the background for almost a decade. It’s slow, half-broken, unreliable, and severely outdated — a sort of “black box” that everyone relies upon, but nobody really knows what’s happening under the hood.

Where would you even start? Legacy stories are often daunting, adventurous, and utterly confusing. They represent a mixture of fast-paced decisions, quick fixes, and accumulating UX debt.

There is no one-fits-all solution to tackle them, but there are ways to make progress, albeit slowly, while respecting the needs and concerns of users and stakeholders. Now, let’s see how we can do just that.

The Actual Challenges Of Legacy UX

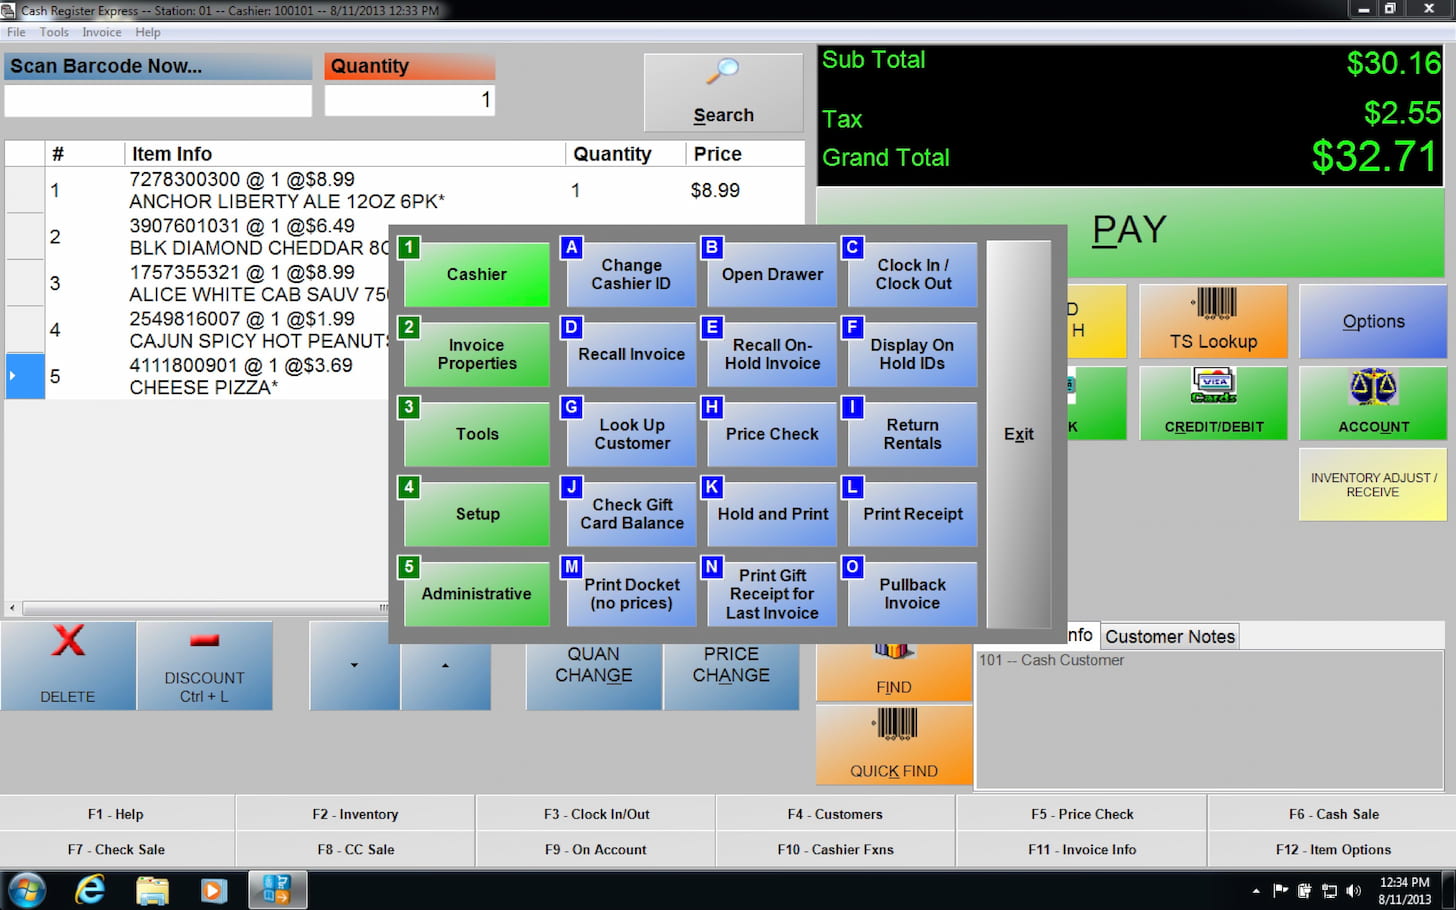
It might feel that legacy products are waiting to be deprecated at any moment. But in reality, they are often critical for daily operations. Many legacy systems are heavily customized for the needs of the organization, often built externally by a supplier and often without rigorous usability testing.

It’s common for enterprises to spend 40–60% of their time managing, maintaining, and fine-tuning legacy systems. They are essential, critical — but also very expensive to keep alive.

1. Legacy Must Co-Exist With Products Built Around Them

Running in a broken, decade-old ecosystem, legacy still works, yet nobody knows exactly how and why it still does. People who have set it up originally probably have left the company years ago, leaving a lot of unknowns and poorly documented work behind.

With them come fragmented and inconsistent design choices, stuck in old versions of old design tools that have long been discontinued.

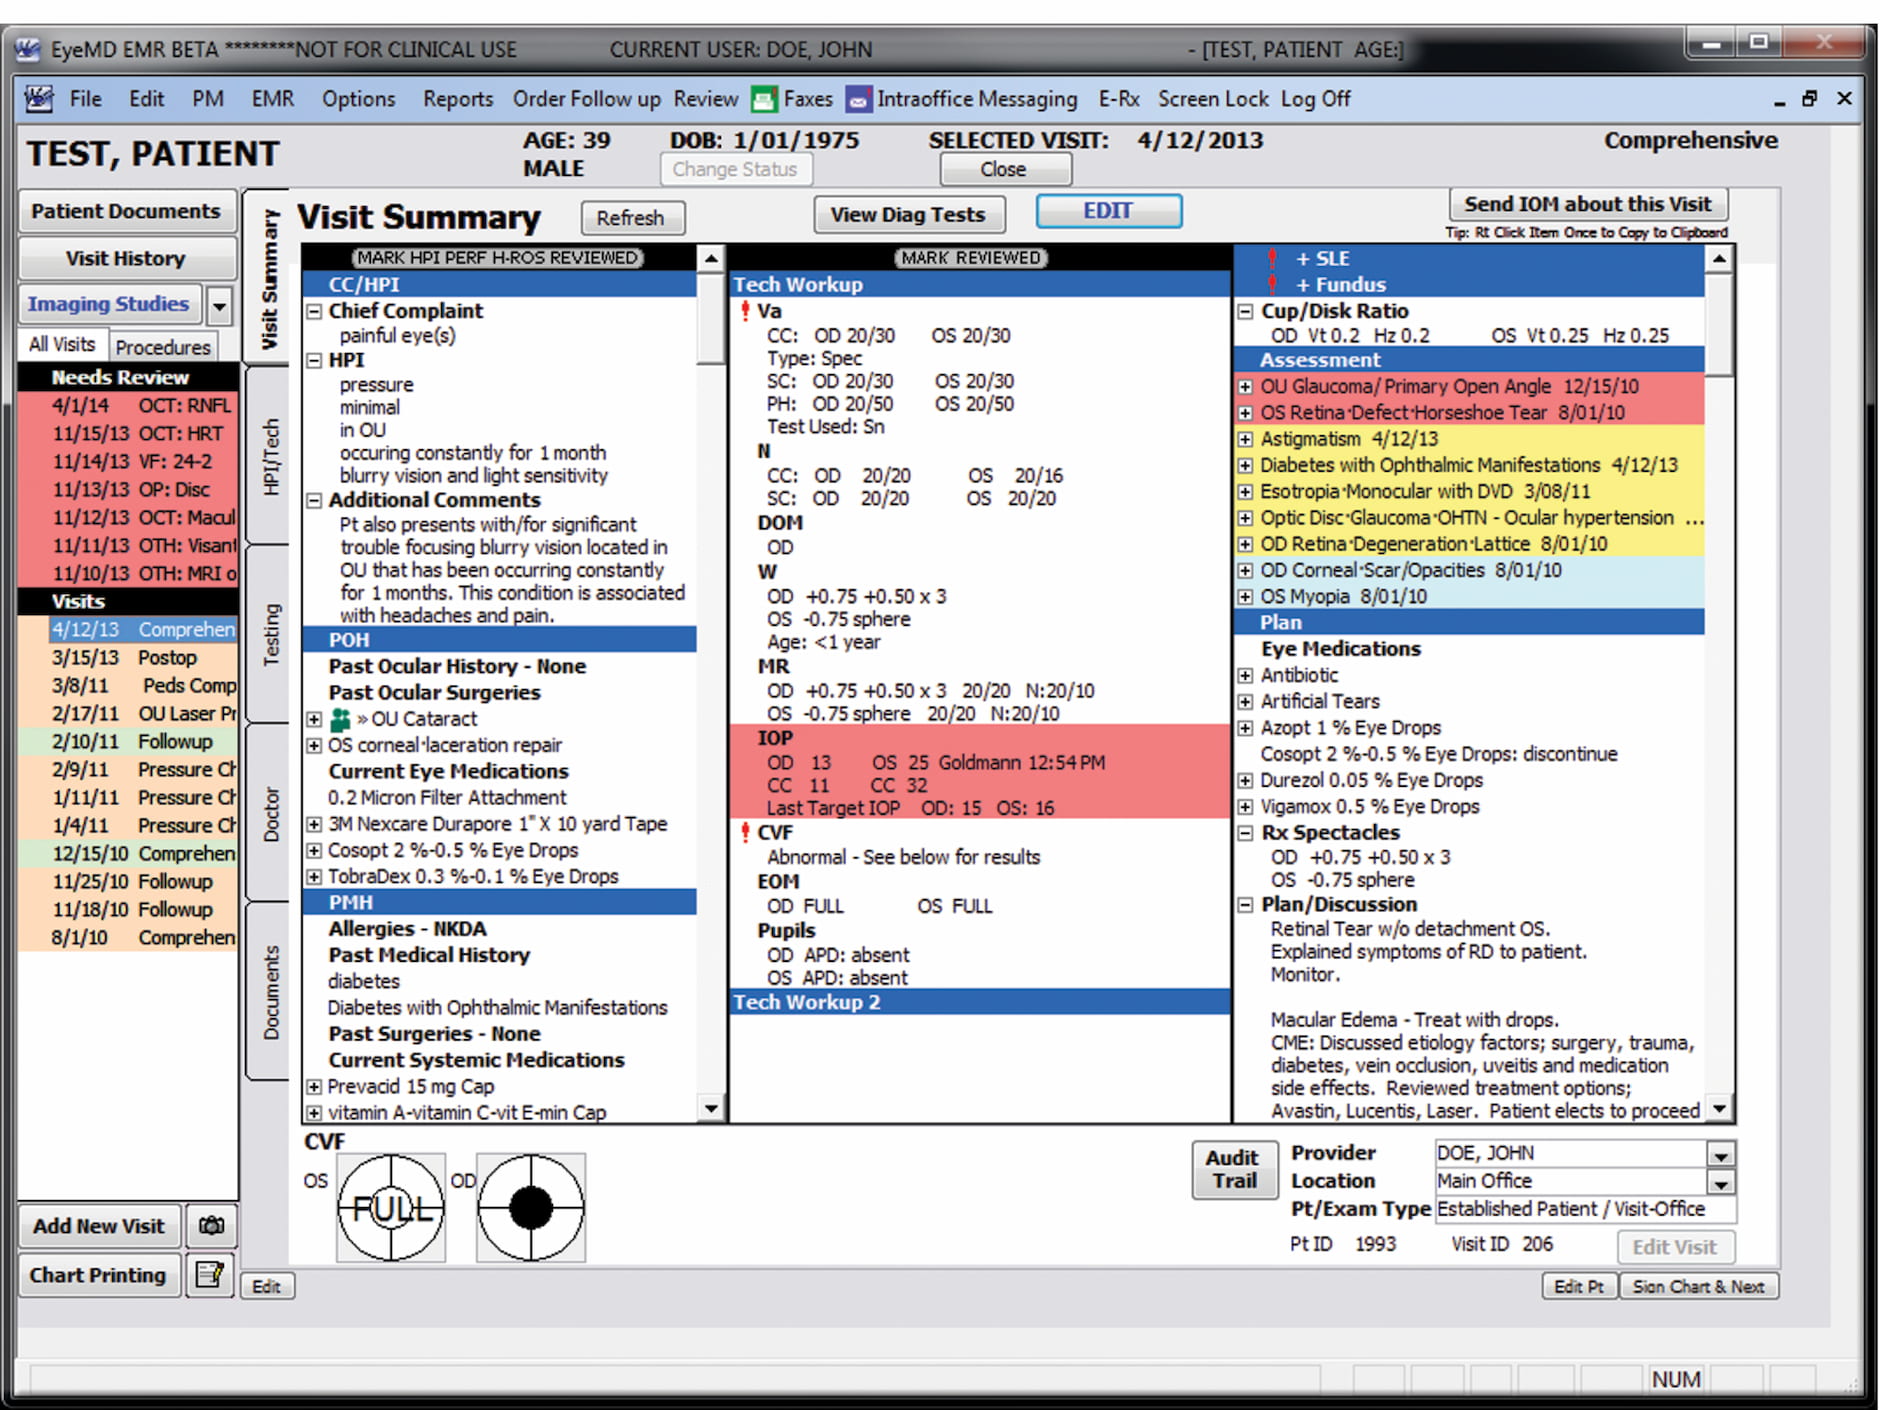
Still, legacy systems must neatly co-exist within modern digital products built around them. In many ways, the end result resembles a Frankenstein — many bits and pieces glued together, often a mixture of modern UIs and painfully slow and barely usable fragments here and there — especially when it comes to validation, error messages, or processing data.

2. Legacy Systems Make or Break UX

Once you sprinkle a little bit of quick bugfixing, unresolved business logic issues, and unresponsive layouts, you have a truly frustrating experience, despite the enormous effort put into the rest of the application.

If one single step in a complex user flow feels utterly broken and confusing, then the entire product appears to be broken as well, despite the incredible efforts the design teams have put together in the rest of the product.

Well, eventually, you’ll have to tackle legacy. And that’s where we need to consider available options for your UX roadmap.

UX Roadmap For Tackling Legacy Projects

Don’t Dismiss Legacy: Build on Existing Knowledge

Because legacy systems are often big unknowns that cause a lot of frustration to everyone, from stakeholders to designers to engineers to users. The initial thought might be to remove it entirely and redesign it from scratch, but in practice, that’s not always feasible. Big-bang-redesign is a remarkably expensive and very time-consuming endeavor.

Legacy systems hold valuable knowledge about the business practice, and they do work — and a new system must perfectly match years of knowledge and customization done behind the scenes. That’s why stakeholders and users (in B2B) are typically heavily attached to legacy systems, despite all their well-known drawbacks and pains.

To most people, because such systems are at the very heart of the business, operating on them seems to be extremely risky and will require a significant amount of caution and preparation. Corporate users don’t want big risks. So instead of dismissing legacy entirely, we might start by gathering existing knowledge first.

Map Existing Workflows and Dependencies

The best place to start is to understand how and where exactly legacy systems are in use. You might discover that some bits of the legacy systems are used all over the place — not only in your product, but also in business dashboards, by external agencies, and by other companies that integrate your product into their services.

Very often, legacy systems have dependencies on their own, integrating other legacy systems that might be much older and in a much worse state. Chances are high that you might not even consider them in the big-bang redesign — mostly because you don’t know just how many black boxes are in there.

Set up a board to document current workflows and dependencies to get a better idea of how everything works together. Include stakeholders, and involve heavy users in the conversation. You won’t be able to open the black box, but you can still shed some light on it from the perspectives of different people who may be relying on legacy for their work.

Once you’ve done that, set up a meeting to reflect to users and stakeholders what you have discovered. You will need to build confidence and trust that you aren’t missing anything important, and you need to visualize the dependencies that a legacy tool has to everyone involved.

Replacing a legacy system is never about legacy alone. It’s about the dependencies and workflows that rely on it, too.

Choose Your UX Migration Strategy

Once you have a big picture in front of you, you need to decide on what to do next. Big-bang relaunch or a small upgrade? Which approach would work best? You might consider the following options before you decide on how to proceed:
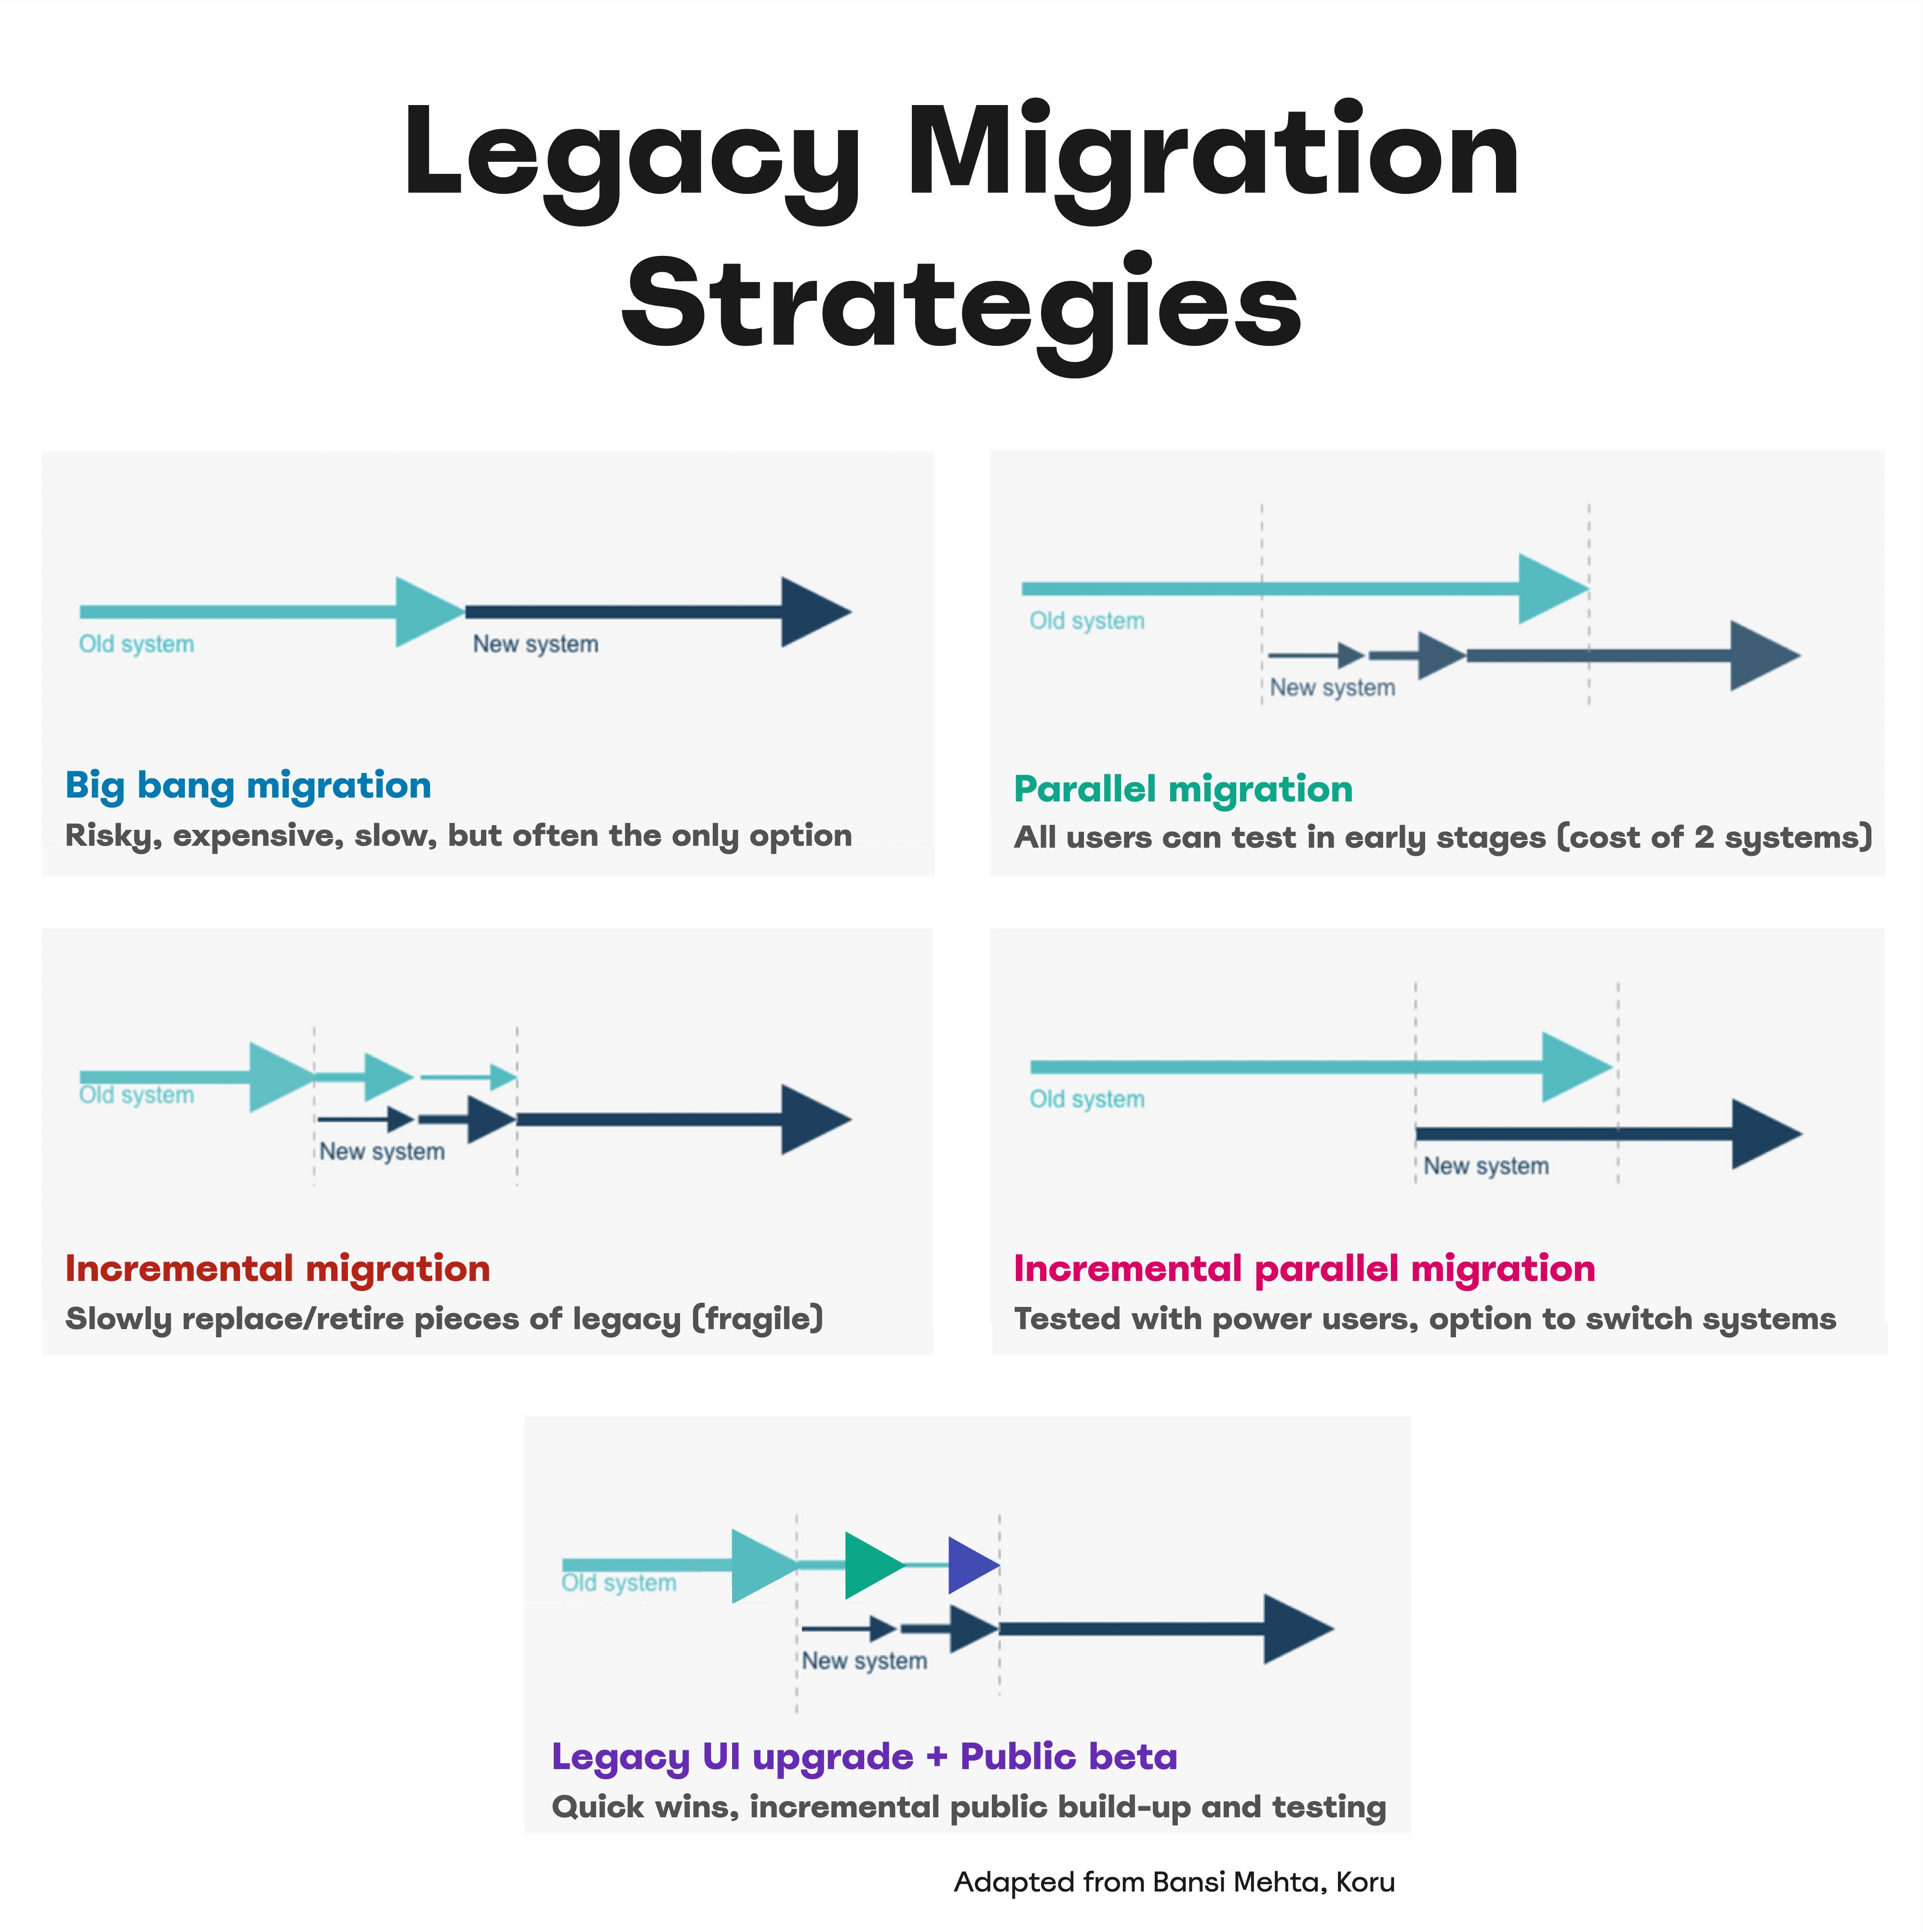
  • Big-bang relaunch.
    Sometimes the only available option, but it’s very risky, expensive, and can take years, without any improvements to the existing setup in the meantime.
  • Incremental migration.
    Slowly retire pieces of legacy by replacing small bits with new designs. This offers quicker wins in a Frankenstein style but can make the system unstable.
  • Parallel migration.
    Run a public beta of the replacement alongside the legacy system to involve users in shaping the new design. Retire the old system when the new one is stable, but be prepared for the cost of maintaining both.
  • Incremental parallel migration.
    List all business requirements the legacy system fulfills, then build a new product to meet them reliably, matching the old system from day one. Test early with power users, possibly offering an option to switch systems until the old one is fully retired.
  • Legacy UI upgrade + public beta.
    Perform low-risk fine-tuning on the legacy system to align UX, while incrementally building a new system with a public beta. This yields quicker and long-term wins, ideal for fast results.

Replacing a system that has been carefully refined and heavily customized for a decade is a monolithic task. You can’t just rebuild something from scratch within a few weeks that others have been working on for years.

So whenever possible, try to increment gradually, involving users and stakeholders and engineers along the way — and with enough buffer time and continuous feedback loops.

Wrapping Up

With legacy projects, failure is often not an option. You’re migrating not just components, but users and workflows. Because you operate on the very heart of the business, expect a lot of attention, skepticism, doubts, fears, and concerns. So build strong relationships with key stakeholders and key users and share ownership with them. You will need their support and their buy-in to bring your UX work in action.

Stakeholders will request old and new features. They will focus on edge cases, exceptions, and tiny tasks. They will question your decisions. They will send mixed signals and change their opinions. And they will expect the new system to run flawlessly from day one.

And the best thing you can do is to work with them throughout the entire design process, right from the very beginning. Run a successful pilot project to build trust. Report your progress repeatedly. And account for intense phases of rigorous testing with legacy users.

Revamping a legacy system is a tough challenge. But there is rarely any project that can have so much impact on such a scale. Roll up your sleeves and get through it successfully, and your team will be remembered, respected, and rewarded for years to come.

Meet “Measure UX & Design Impact”

Meet Measure UX & Design Impact, Vitaly’s practical guide for designers and UX leads on how to track and visualize the incredible impact of your UX work on business — with a live UX training later this year. Jump to details.


Meet Measure UX and Design Impact, a practical video course for designers and UX leads.

  • Video + UX Training
  • Video only

Video + UX Training

$ 495.00 $ 799.00

Get Video + UX Training

25 video lessons (8h) + Live UX Training.
100 days money-back-guarantee.

Video only

$ 250.00$ 350.00

Get the video course

25 video lessons (8h). Updated yearly.
Also available as a UX Bundle with 3 video courses.

Useful Resources

  • UX Migration Strategy For Legacy Apps, by Tamara Chehayeb Makarem
  • How To Improve Legacy Systems, by Christopher Wong
  • Designing With Legacy, by Peter Zalman
  • Redesigning A Large Legacy System, by Pawel Halicki
  • How To Manage Legacy Code, by Nicolas Carlo
  • How To Transform Legacy, by Bansi Mehta
  • Design Debt 101, by Alicja Suska
  • Practical Guide To Enterprise UX, by Yours Truly
  • Healthcare UX Design Playbook, by Yours Truly

Citation Needed: Structured data extraction workflows

In the previous article we explored how to generate and use structured data in a workflow. Now, let’s take it a step further.

We’ll build a workflow that checks whether an article provides evidence to support its claims (but not whether the evidence itself is valid). Rather than using this to fact check articles in the wild, this might be useful for critiquing your own writing before submission or checking generated text for hallucinations.

This task is impractical to automate without generative language models. Natural language processing pipelines might be able to extract or categorize entities and phrases from a text, but this task requires a degree of reading comprehension not available without larger language models.

Furthermore, while many language models are capable of performing individual steps, the overall process requires more rigor and discipline than they are trained for. Frontier models might handle moderately complex tasks, but verifying that they haven’t hallucinated the results requires additional work on par with this workflow.

What we can do instead is split the task into distinct steps: extracting claims then checking each of them. In this article we’ll look into the first part using our old friend the LLM › Structured node.

Claims Schema

In the Structured Generation tutorial we saw how to generate a single structured entry from scratch. LLMs are capable of handling much more complexity. This time we will ask the model to determine which phrases in a text are factual claims and place them into a list. Furthermore, we ask the model to rank the importance of each claim, holistically, when deciding whether to include it.

structured Like before, create a new workflow and swap out the normal Chat for a Structured node.

Create a Parse JSON node and connect it to the schema input of the Structured node. Fill it with this schema conveniently generated by an LLM:

{
  "$schema": "http://json-schema.org/draft-07/schema#",
  "title": "ClaimsList",
  "type": "object",
  "properties": {
    "claims": {
      "type": "array",
      "items": {
        "type": "string"
      },
      "minItems": 1,
      "maxItems": 5,
      "description": "A list of claim strings. The list must contain at least one and at most five items."
    }
  },
  "required": [
    "claims"
  ],
  "additionalProperties": false
}

📢 important
Technically, an array at the top-level would be a valid schema.

However, many models have trouble generating data with that format. To ensure compatibility between providers, wrap the array in an object. Then extract the list later using JSON transformations.

Instructions

In the previous example we combined instructions with dynamic data into the prompt. This time we’ll reserve the system message for instructions and inject the data in a separate step.

instructions

By partitioning the instructions and the data it becomes much easier to reuse the workflow on new inputs. We can use the system message field of the Agent node for instructions:

Follow these instructions exactly.
Do not respond directly to the user.
Do not hallucinate the final answer.

## Instructions

Extract the key factual claims in the user's statement and format them into a list (5 items or fewer).
Ensure that each claim can stand alone without additional context to make sense of it.

💡 tip
You should experiment with variations on the instructions, particularly the preamble to optimize it for your preferred language model. I find this combination effective with the nemotron family and various other open models.

The system message is sent once at the beginning of each request. Theoretically, the LLM should pay special attention to it. Regardless, this avoids sending repeat instructions with every prompt of a conversation, even when the entire conversation is sent with every request. 1

Input Document

The input document for a workflow will typically be supplied by the runner. While developing a workflow, however, it’s convenient to create a node for a predefined text to take advantage of iterative execution. In the final version of the workflow we can delete this node and connect to the input of the Start node.

input doc

Create a Value › Plain Text node to hold the article content.

Connect it to the prompt input of the Structured node.

Paste the contents of an article into the text field. I’m using a Wikipedia article about apiaries (artificial beehives).

Claim Checking

We now have a workflow that generates a list of claims from a text. Our eventual goal is to have each claim checked individually against the original text, which will be supplied to the language model in a context document.

However, before learning how to check every item, we should first explore how to check a single item.

list indexing

First, let’s pull a single claim out of the structured generation using JSON › Transform JSON. This node uses a jq filter to manipulate JSON.

The filter .claims[1] tells it to access the “claims” field and return the second element (0-indexed).

💡 tip
Ask your favorite frontier LLM for help writing jq filters from sample data.

Add a second Agent node with these instructions:

Follow these instructions exactly.
Do not respond directly to the user.
Do not hallucinate the final answer.

## Instructions

Help the user analyze the article in the context file.
The user is examining individual claims that the article makes.

Determine whether the context provides supporting evidence for the claim stated by the user.
List the reference or citation provided by the article.

DO NOT interpret the article as evidence for a claim made by the user.
The user is simply examining a claim made by the article.

context documents

How can we provide the article as context for the LLM? There are several ways:

  • Inject it into the system message using templating
  • Provide it as a user message in the conversation
  • Use a LLM › Context node

The third option is cleanest since it provides a clear demarcation between instructions, context and prompt. The Context node sits between the agent and a chat node, augmenting the agent by injecting its contents into requests made by the agent.

Connect the Plain Text node containing the article to the context input. In the final version of the workflow, this should be connected to the input pin of the Start node.

unstructured check

We can use a simple Chat node to do a quick spot check on how the context affects the language model response. However, to facilitate checking the entire collection, the responses for each item should be structured.

Structured Check

Replace the Chat node with a Structured node, connecting it to the Context and Transform nodes.

Use this schema for the claims checking Structured node:

{
  "$schema": "https://json-schema.org/draft/2020-12/schema",
  "description": "A factual claim with evidence from citations or references",
  "type": "object",
  "required": [
    "claim",
    "grounding"
  ],
  "properties": {
    "claim": {
      "type": "string",
      "description": "the original claim made by the article"
    },
    "grounding": {
      "enum": [
        "not a claim",
        "unsupported",
        "fully supported"
      ],
      "description": "The level of support for the claim provided by citations and references. If the provided text is actually a definition or something other than a claim, then "not a claim""
    },
    "evidence": {
      "type": "array",
      "items": {
        "type": "string"
      },
      "description": "The citations and references that support the claim. Empty if the claim is not supported."
    }
  }
}

structured check

Connect the unwrapped claim to the prompt and run.

By changing the claim index we can see how it handles different claims and statements.

Conclusion

In this tutorial we’ve explored using language models to extract structured data from plain text, then transforming data for further processing. The workflow is still incomplete since we’ve only checked one claim.

Before we can go any further, we’ll need to learn about iterating over lists using subgraphs. This will allow us to check every claim individually, then draw a conclusion by combining all results.

  1. Some LLM providers support caching portions of the request. However, since this behavior isn’t standardized across providers yet, aerie does not support it. ↩

How (Not) to Learn Python

While listening to Mark Smith’s inspirational talk for Python Unplugged on PyTV about How to Learn Python, what caught my attention was that Mark suggested turning off some of PyCharm’s AI features to help you learn Python more effectively.

As a PyCharm user myself, I’ve found the AI-powered features beneficial in my day-to-day work; however, I never considered that I could turn certain features on or off to customize my experience. This can be done from the settings menu under Editor | General | Code Completion | Inline.

While we are at it, let’s have a look at these features and investigate in more detail why they are great for professional developers but may not be ideal for learners.

Local full line code completion suggestions

JetBrains AI credits are not consumed when you use local line completion. The completion prediction is performed using a built-in local deep learning model. To use this feature, make sure the box for Enable inline completion using language models is checked, and choose either Local or Cloud and local in the options. To show the complete results using the local model alone, we will look at the predictions when only Local is selected.

When it’s selected, you see that the only code completion available out of the box in PyCharm is for Python. To make suggestions available for CSS or HTML, you need to download additional models.

When you are writing code, you will see suggestions pop up in grey with a hint for you to use Tab to complete the line. 

After completing that line, you can press Enter to go to the next one, where there may be a new suggestion that you can again use Tab to complete. As you see, this can be very convenient for developers in their daily coding, as it saves time that would otherwise be spent typing obvious lines of code that follow the flow naturally. 

However, for beginners, mindlessly hitting Tab and letting the model complete lines may discourage them from learning how to use the functions correctly. An alternative is to use the hint provided by PyCharm to help you choose an appropriate method from the available list, determine which parameters are needed, check the documentation if necessary, and write the code yourself. Here is what the hint looks like when code completion is turned off:

Cloud-based completion suggestions

Let’s have a look at cloud-based completion in contrast to local completion. When using cloud-based completion, next-edit suggestions are also available (which we will look at in more detail in the next section).

Cloud-based completion comes with support for multiple languages by default, and you can switch it on or off for each language individually.

Cloud-based completion provides more functionality than local model completion, but you need a JetBrains AI subscription to use it.

You may also connect to a third-party AI provider for your cloud-based completion. Since this support is still in Beta in PyCharm 2026.1, it is highly recommended to keep your JetBrains AI subscription active as a backup to ensure all features are available.

After switching to cloud-based completion, one of the differences I noticed was that it is better at multiple-line completion, which can be more convenient. However, I have also encountered situations where the completion provided too much for me, and I had to jump in to make my own modifications after accepting the suggestions.

For learners of Python, again, you may want to disable this functionality or have to audit all the suggestions in detail yourself. In addition to the danger of relying too heavily on code completion, which removes opportunities to learn, cloud code completion poses another risk for learners. Because larger suggestions require active review from the developer, learners may not be equipped to fully audit the wholesale suggestions they are accepting. Disabling this feature for learners not only encourages learning, but it can also help prevent mistakes.

Next edit suggestions

In addition to cloud-based completion, JetBrains AI Pro, Ultimate, and Enterprise users are able to take advantage of next edit suggestions.

When they are enabled, every time you make changes to your code, for example, renaming a variable, you will be given suggestions about other places that need to be changed.

And when you press Tab, the changes will be made automatically. You can also customize this behavior so you can see previews of the changes and jump continuously to the next edit until no more are suggested.

This is, no doubt, a very handy feature. It can help you avoid some careless mistakes, like forgetting to refactor your code when you make changes. However, for learners, thinking about what needs to be done is a valuable thought exercise, and using this feature can deprive them of some good learning opportunities.

Conclusion

PyCharm offers a lot of useful features to smooth out your day-to-day development workflow. However, these features may be too powerful, and even too convenient, for those who have just started working with Python and need to learn by making mistakes. It is good to use AI features to improve our work, but we also need to double-check the results and make sure that we want what the AI suggests.

To learn more about how to level up your Python skills, I highly recommend watching Mark’s talk on PyTV and checking out all the AI features that JetBrains AI has to offer. I hope you will find the perfect way to integrate them into your work while remaining ready to turn them off when you plan to learn something new.