Postman Ends Free Team Plans in March 2026. Here Is The Free Alternative I Switched To

Recently, news from Postman has caused quite a stir in the developer community. According to their official blog and emails sent to users, Postman’s pricing and product plans are undergoing a major overhaul effective March 1, 2026.

Postman Ends Free Team Plans in March 2026. Here Is The Free Alternative I Switched To

The most critical change is to the Free plan, which currently supports team collaboration. It will be adjusted to single-user only. This means that if your team relies on the free version of Postman for collaborative API development and testing, you will soon be forced to upgrade to a paid Team plan.

For many small teams with limited budgets, open-source contributors, and learners, this is an issue that cannot be ignored. When a familiar tool no longer offers free collaboration, finding a suitable alternative becomes urgent.

What Do the Changes to Postman Mean?

Before discussing alternatives, it’s necessary to clearly understand the specific impact of Postman’s adjustments. This change isn’t just a simple feature reduction; it’s a strategic shift in product positioning that directly affects how free users operate.

Core Restrictions of the Free Plan

According to Postman, starting March 1, 2026, the new Free plan will be strictly limited to a single user.

This means the workflow of inviting multiple members to a Workspace, sharing API Collections, and synchronizing development progress—features we’ve taken for granted—will no longer exist in the free version. Any scenario requiring collaboration between two or more people will require migration to a paid plan.

For users accustomed to collaborating within Postman, this presents a direct challenge. Either the entire team pays for collaboration features, or you regress to a primitive state where everyone manages APIs locally on their own machines—a move that undoubtedly kills development efficiency and consistency.

Why You Need an Alternative

Postman’s new plans introduce many powerful features, such as native AI capabilities, deeper integration with Git workflows, and a brand-new API Catalog. These are indeed attractive for large enterprises or teams pursuing extreme efficiency.

However, for many developers and smaller teams, the most basic and core requirement is simply stable and free team collaboration. When this fundamental need becomes a paid feature, cost becomes an unavoidable factor.

Therefore, finding a tool that satisfies core functions like API design, debugging, and testing, while also providing complete team collaboration capabilities on a free tier, is the most practical choice.

Enter Apidog, an all-in-one API collaboration platform that combines API design, development, and testing. With its robust free team collaboration capabilities, it has become a top contender for developers looking to migrate.

Try it

Postman Ends Free Team Plans in March 2026. Here Is The Free Alternative I Switched To

Why Choose Apidog?

Among the myriad of API tools available, Apidog has a very clear positioning: an all-in-one API platform built for team collaboration. It is not just an API request tool; it spans the entire API lifecycle from design and documentation to development, testing, and release.

Most importantly, Apidog’s core team collaboration features are generous for free users, making it the ideal choice to counter Postman’s policy changes.

Here is a simple comparison to visualize Apidog’s advantages in team collaboration:

Feature

Postman (Free Plan after March 2026)

Apidog (Free Plan)

Team Size

Limited to 1 User

Up to 4 Users

Collaboration

Not supported (Upgrade required)

Real-time data sync, interface comments, permission management

API Design & Docs

Manual writing supported

Visual design support with auto-generated, shareable documentation

Mock Server

Supported, with limits

Powerful advanced Mock features with custom rules

Auto Testing

Supported, with limits

Support for test case orchestration, assertions, and test reports

Core Positioning

Individual Developer Tool

Team Collaborative API Platform

As shown in the table, while Postman’s free version retreats to being a personal tool, Apidog continues to champion team collaboration as a core value. It doesn’t just solve the problem of “can we collaborate?”; it offers richer functionality in the depth and breadth of that collaboration.

Migrating from Postman to Apidog

Moving from a familiar tool to a new one often brings anxiety about data loss and learning curves. Fortunately, Apidog provides a seamless Postman data import feature, making the entire migration process smooth and painless.

The process consists of two main steps: exporting data from Postman and importing it into Apidog.

1. Exporting Postman Data

In Postman, your core assets are usually Collections and Environments.

A Collection is a set of all your saved API requests, including URLs, methods, headers, bodies, etc. An Environment stores variables for different contexts, such as API_HOST for development versus production.

First, you need to export this data to files.

  1. Open the Postman client and find the Collection you want to export in the left navigation bar.

Postman Ends Free Team Plans in March 2026. Here Is The Free Alternative I Switched To

  1. Click the three dots (...) icon next to the Collection and select Export.

  2. In the popup window, choose the recommended Collection v2.1 format and save the JSON file to your local machine.

Postman Ends Free Team Plans in March 2026. Here Is The Free Alternative I Switched To

Next, export your environments in the same way. Click the Environments tab on the left, find the environment you need, click the three dots (...), select Export, and save it as a JSON file.

Postman Ends Free Team Plans in March 2026. Here Is The Free Alternative I Switched To

2. Importing Data into Apidog

Once you have your JSON files, you can import them into Apidog.

  1. Open Apidog and enter your project.

  2. Click “Settings” (usually a gear icon) in the left sidebar.

  3. Select “Import Data” and choose the “Postman” option.

Postman Ends Free Team Plans in March 2026. Here Is The Free Alternative I Switched To

Apidog will present an upload interface. You can drag and drop your exported Collection and Environment JSON files directly into the upload area. Apidog supports uploading multiple files at once and will automatically recognize and process them.

After uploading, Apidog parses the file content, seamlessly converting Postman requests, directory structures, and environment variables into Apidog’s interfaces and environments. Once the import is successful, you’ll see all your familiar API requests ready to go in the Apidog interface.

Postman Ends Free Team Plans in March 2026. Here Is The Free Alternative I Switched To

Start Collaborating in Apidog

With data migration complete, you can now truly experience the collaborative benefits of Apidog.

Invite Team Members

The first step in collaboration is building your team. In Apidog, inviting colleagues is straightforward.

  1. Click on “Settings” or “Members/Permissions” in your project or team dashboard.

  2. Invite new members via a shareable link or email invitation.

Postman Ends Free Team Plans in March 2026. Here Is The Free Alternative I Switched To

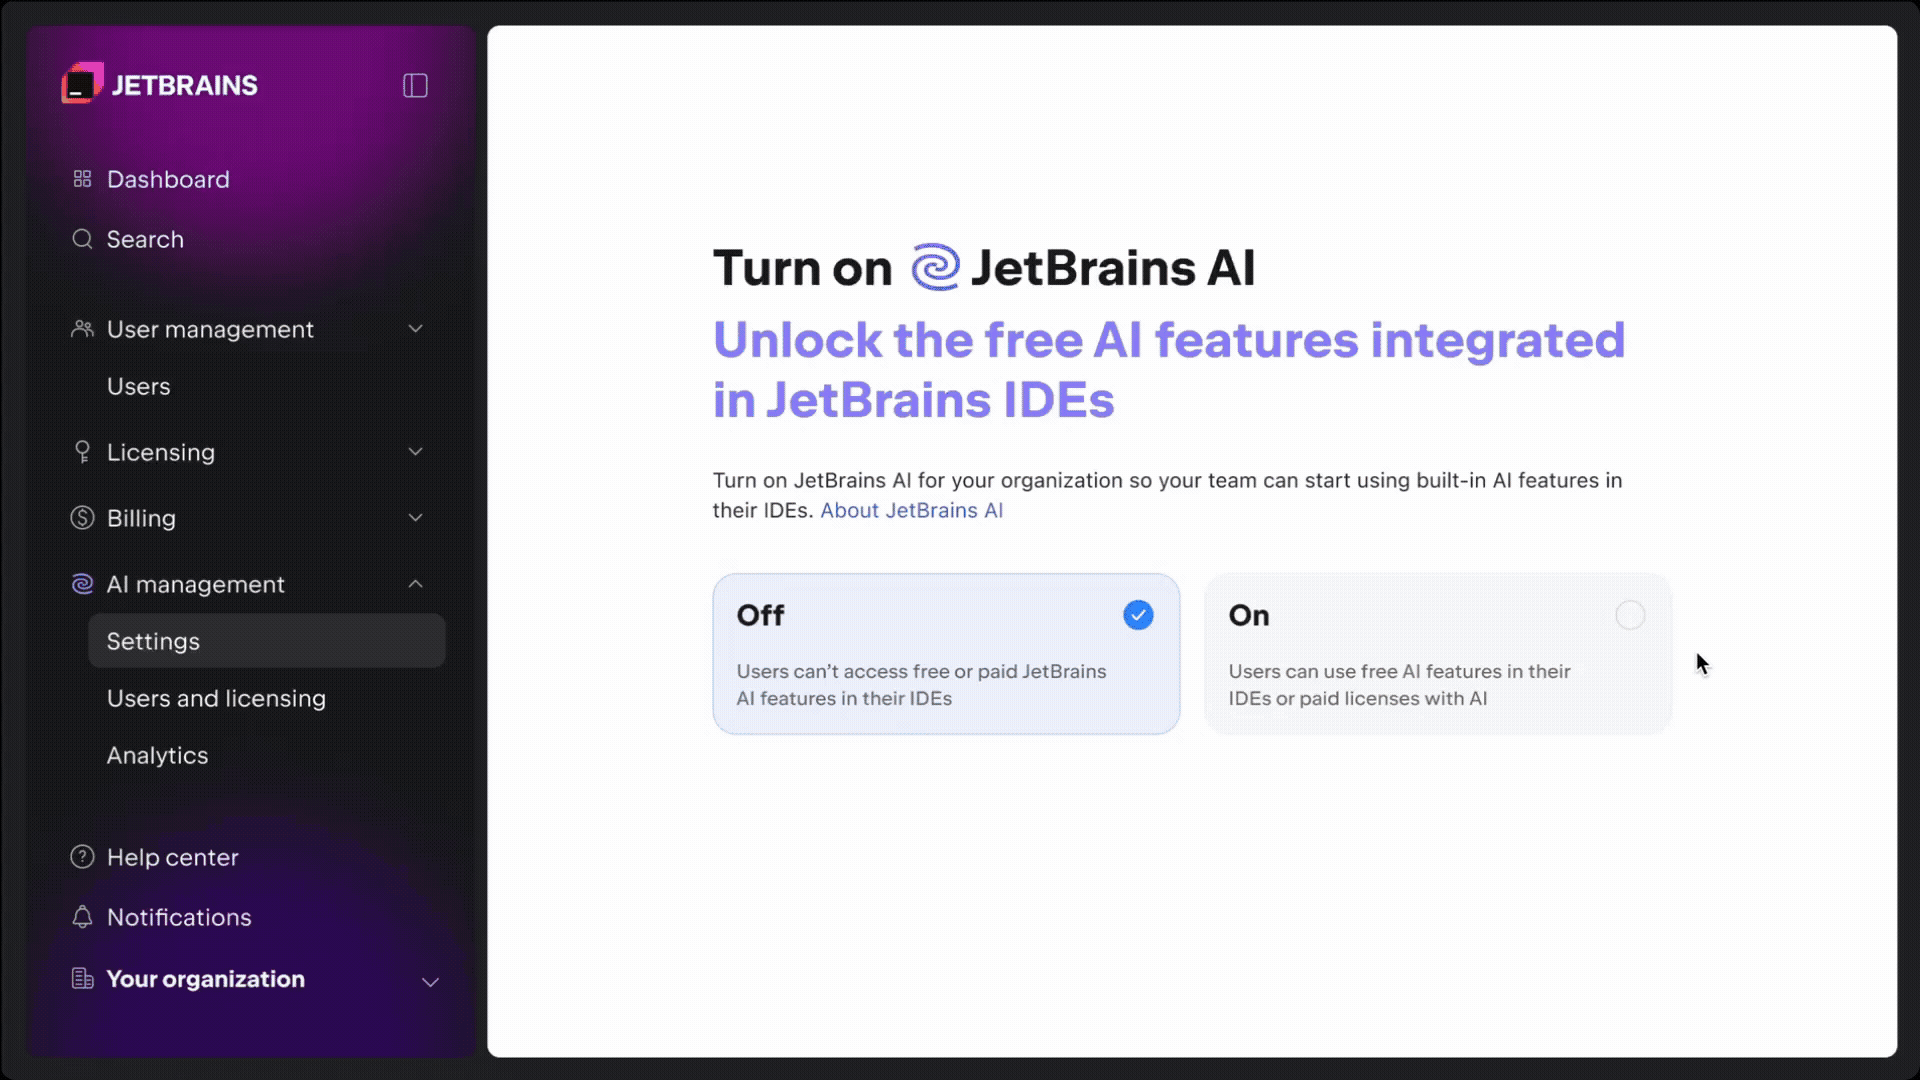
Unlike Postman’s upcoming single-user limit, Apidog allows you to add up to 4 team members for free. It also offers a flexible permission management system, allowing you to assign different roles (Admin, Editor, Read-only, etc.) to ensure project data security.

Experience the All-in-One Workflow

Apidog’s strength lies in its “All-in-One” design philosophy. It’s not just a Postman replacement; it’s a platform that covers the full API lifecycle.

  • Design First: Collaboration often starts with API design. You can define paths, parameters, request bodies, and response structures visually directly on the platform.

  • Auto-Generated Docs: Once the API is designed, professional and beautiful API documentation is generated automatically. You can share this online with frontend colleagues or third-party partners, who can view and debug directly in their browser without installing software.

  • Smart Mocks: For frontend developers, Apidog’s Mock function is a game-changer. Based on your API design, Apidog automatically generates realistic Mock data. This means frontend work doesn’t need to wait for the backend interface to be finished—you can develop and integrate based on Mock data immediately, significantly boosting parallel development efficiency.

  • Automated Testing: When the backend interface is ready, team members can perform debugging and automated testing within Apidog. You can combine multiple requests into a test case, set assertions to verify results, and run all tests with one click to generate detailed reports.

Conclusion

Facing Postman’s free tier adjustments, there’s no need to panic. The tech ecosystem is constantly evolving. While Postman’s choice is part of their business strategy, for the vast majority of developers and teams, this is an opportunity to discover and embrace tools like Apidog—tools designed for modern team collaboration that are more integrated, efficient, and generous with their free tiers.

Shipping a Location-Based App in NYC: Subway Dead Zones, Urban Canyons, and What Actually Works

If you have ever tested a location feature in New York City, you know the moment.
Your pin looks fine in Brooklyn. Your ETA is steady on a wide avenue. Then you get into Midtown, or you duck into the subway, and suddenly the map jumps across blocks, the user “teleports,” and support tickets start sounding personal.
NYC is a stress test for anything location-based. It is also a great forcing function. If you can make your location UX feel reliable here, it will usually feel solid everywhere else.
This is a practical playbook for building location features that do not fall apart in NYC, with an emphasis on product behavior, offline strategy, map matching, and the unglamorous stuff that actually ships.

Why NYC breaks “normal” location features

NYC has three recurring failure modes:

Subway dead zones

Connectivity drops, then returns in bursts.
Apps that assume a constant stream of updates will show stale data or thrash.

Urban canyon GPS drift

Tall buildings cause multipath and bad fixes.
You get jittery pins, sudden direction flips, and “wrong side of the street” issues that wreck pickup and routing.

Background reality

OS background limits mean “real-time” is a budget, not a promise.
If you oversample, you burn battery and get killed by the OS.
The fix is not “get better GPS.” The fix is designing the system so the user experience stays believable when the data gets messy.

Start with the product goal: reliable UX, not perfect accuracy

Before you touch code, decide what “good enough” means for each feature:
ETA can tolerate small drift if it updates predictably.
Nearby results need stability more than precision (nobody wants results reshuffling every second).
Geofences need clear thresholds and debouncing.
Pickup / meet point needs the highest confidence and the most conservative rules.
A simple approach that works well:
Define an acceptable error band per feature (example: 30m for “nearby,” 10m for “pickup,” 100m for “city-level”).
If the location fix is outside the band, do not pretend. Show a degraded experience (more on that below).

Build a location confidence score (and gate your UI with it)

Raw latitude and longitude are not enough. You need a quality signal that you can use to decide what to show.
At minimum, track:
accuracy (meters)
speed
heading
provider / source (when available)
timestamp
Then compute a basic confidence level.
Here is a lightweight pattern that keeps you honest:
if accuracy_m <= 10 and age_s <= 5:
confidence = “high”
elif accuracy_m <= 30 and age_s <= 15:
confidence = “medium”
else:
confidence = “low”

Now you can make product decisions that feel human:
High: show precise pin, enable “confirm pickup,” update ETA normally.
Medium: show pin but reduce animation, avoid snapping hard, keep UI stable.
Low: show “last known” state, widen search radius, pause certain actions, ask for confirmation.
This is the single biggest shift. It stops your app from acting overconfident.

Surviving subway dead zones: offline-first, outbox, and “stale but honest” UI

When the network drops, the system should not panic. It should behave predictably.

Use an outbox pattern for events

If you have location events, pings, check-ins, or status updates, store them locally first, then sync when possible.
onLocationEvent(e):
saveToOutbox(e)
trySync()

trySync():
if networkAvailable:
sendBatch(outbox)
markSentOnSuccess()

Key details:
Batch sends when reconnecting (avoid a flood).
Make sends idempotent (same event twice should not create chaos).
Keep a cap and a retention window (do not store forever).

Design for staleness

Users can handle stale data. What they hate is false freshness.
Use simple UI cues:
“Updated 2m ago”
a subtle stale indicator
a fallback state: “Reconnecting…”
And importantly: do not animate a pin if you have not received a meaningful update.

Taming urban canyon drift: smoothing + map matching without “teleporting”

Two mistakes show up all the time:
trusting every fix equally
snapping too aggressively and making the user jump
A better approach is two-stage:
Local smoothing (cheap, fast, reduces jitter)
Selective snapping (only when it helps and only when confidence supports it)

Stage 1: simple smoothing

You do not need fancy math to get a win.
Reject fixes with terrible accuracy.
Apply a moving average to the last N points.
Use speed and heading to ignore obvious spikes.
if new.accuracy_m > 50:
ignore
else:
points.add(new)
smoothed = average(points.last(5))

Stage 2: snap with guardrails

Snapping is useful for vehicles on roads. It is dangerous for pedestrians, parks, plazas, and dense blocks.
Guardrails that prevent the worst behavior:
snap only when confidence is high
snap only if the snap delta is within a threshold (example: <= 20m)
never snap if it causes a backward jump relative to recent movement
If you do snap, animate it gently and do it consistently. Random snapping feels like bugs.

Background and battery: treat updates like a budget

If your app “updates constantly,” the OS will eventually disagree.
Good patterns:
event-driven updates when possible
dynamic throttling (faster updates when actively navigating, slower when idle)
a clear “active tracking” mode vs passive mode
Example rule set:
foreground navigation: 1–2s
active but not navigating: 5–10s
background: 15–60s (depending on platform allowances)
Also: keep your UI stable. A slightly delayed update that looks smooth is better than high-frequency chaos.

NYC testing checklist (the part most teams skip)

Do not call it done until you test NYC-like conditions. Not just a quick walk around the block.
Routes that uncover real problems:
Midtown avenues (tall building canyon)
a bridge approach and crossing (GPS + speed edge cases)
a park segment (snapping mistakes show up fast)
subway segment with a reconnect burst
What to measure during tests:
% of updates with high/medium/low confidence
average accuracy and age
snap delta distribution (how far you are snapping)
“teleport” events (large jump in short time)
ETA error drift over time
If you need real NYC field testing and production-grade location reliability, partnering with experienced mobile app developers in New York can save weeks of guesswork.

What to log so you can actually fix it

If you cannot see it, you cannot fix it.
At minimum, log these with user consent and clear retention rules:
accuracy_m, age_s, provider
speed, heading
background vs foreground state
confidence level
snap delta (if snapping)
network state (online / offline)
Then build a simple incident playbook:
If teleport events spike, check accuracy filtering and snap thresholds.
If confidence is mostly low in Midtown, your UX should degrade instead of pretending.
If battery complaints rise, check background sampling and “always on” behavior.

The bottom line

NYC will expose every shortcut you take with location.
If you build with confidence gating, offline-first thinking, smoothing before snapping, and a realistic background budget, your app stops feeling fragile.
You will still get messy data. You will just stop letting messy data control the user experience.

I Implemented Every Sorting Algorithm in Python — And Python’s Built-in Sort Crushed Them All

Last month, I went down a rabbit hole: I implemented six classic sorting algorithms from scratch in pure Python (Bubble, Selection, Insertion, Merge, Quick, Heap) and benchmarked them properly on CPython.

I expected the usual Big-O story. What I got was a reality check: Python’s interpreter overhead changes everything.

Textbooks say Quick/Merge/Heap are fast. In Python? They’re okay… but sorted() (Timsort) beats them by 5–150×. Here’s why — and when you should never write your own sort.

The Surprise Results (Real Benchmarks)

I tested on random, nearly-sorted, reversed, and duplicate-heavy data using timeit with warm-ups, median timing, and GC controls.

Algorithm 100 elements 1,000 elements 5,000 elements Practical Limit
Bubble Sort 0.001s 0.15s 3.2s ~500 elements
Selection Sort 0.001s 0.13s 2.8s ~500 elements
Insertion Sort 0.0005s 0.08s 1.9s ~1,000 (great on nearly-sorted!)
Merge Sort 0.002s 0.025s 0.14s Usable but slow
Quick Sort 0.002s 0.021s 0.11s Usable but recursion hurts
Heap Sort 0.002s 0.029s 0.16s Reliable but never wins
sorted() 0.0003s 0.0045s 0.025s Use this always

Key shocks:

  • Insertion sort beats Merge/Quick on <100 elements (low overhead wins).
  • Bubble sort dies at ~1,000 elements due to expensive comparisons.
  • Timsort (built-in) exploits real-world patterns and runs in C — untouchable.

Why Hand-Written Sorts Lose in Python

  1. Comparisons are expensive: a > b → method dispatch, type checks (not one CPU instruction).
  2. Recursion overhead: Quick sort’s function calls are costly.
  3. Memory allocations: Merge sort creates thousands of temporary lists → GC pauses.
  4. Timsort is a hybrid genius: Detects runs, uses insertion sort for small chunks, merges adaptively — all in optimized C.

Example: Insertion sort (often the small-data winner):

def insertion_sort(arr):
    arr = arr.copy()
    for i in range(1, len(arr)):
        key = arr[i]
        j = i - 1
        while j >= 0 and arr[j] > key:
            arr[j + 1] = arr[j]
            j -= 1
        arr[j + 1] = key
    return arr

The Verdict

Never implement your own sort in production Python.

Use sorted() or .sort() — they’re faster, stable, and battle-tested.

Do it only for learning purposes or rare edge cases.

Want the full deep dive?

  • Detailed explanations
  • All source code
  • Benchmark script
  • Raw benchmark data

👉 Read the complete post on my blog:

https://emitechlogic.com/sorting-algorithm-in-python/

Run the benchmarks yourself

  • GitHub Repository:
    https://github.com/Emmimal/python-sorting-benchmarks

What surprised you most about Python’s sorting performance?

Drop a comment — curious to hear your take.

At Some Point, Your Code Stops Being Enough

Why senior engineers need visibility, not vanity

There’s a phase in almost every engineering career where growth slows — not technically, but professionally.

You’re shipping solid systems.
You’re mentoring others.
You’re solving harder, more ambiguous problems.

Yet opportunities don’t scale the same way.

This isn’t a skill issue.
It’s a signal issue.

The silent plateau

Many mid-level and senior engineers fall into a quiet trap:

“My work should speak for itself.”

Inside your company, it often does.
Outside it, no one hears it.

When your resume reaches a hiring manager, they don’t just skim bullets. They Google you. They open GitHub. They scan LinkedIn. They look for context.

What they find — or don’t find — shapes the conversation before the first interview.

Silence is rarely interpreted as humility.
More often, it’s interpreted as absence.

Visibility ≠ self-promotion

Visibility is frequently misunderstood.

It does not mean:

  • Becoming a full-time content creator
  • Posting daily threads
  • Building a loud personal brand persona

Real visibility is quieter and far more technical.

It means:

  • Making your thinking discoverable
  • Leaving artifacts others can learn from
  • Creating public proof of how you reason

Good engineers already do this work internally — in design docs, RFCs, postmortems, and code reviews.

The only difference is where it lives.

What worked for me

My career trajectory changed when I started treating public platforms as extensions of my engineering workflow.

  • GitHub became an architectural diary — not just code dumps
  • Blogs became postmortems and reflections, not tutorials for beginners
  • Talks and mentoring became public learning, not performances

None of this was optimized for reach or virality.
It was optimized for clarity.

Over time, those artifacts quietly led to:

  • Open-source recognition (recognized as a GitHub Star)
  • Speaking opportunities (spoken at many tech meetups)
  • Roles I never formally applied for

Not because I marketed myself — but because my thinking was visible.

What senior engineers often underestimate

At senior levels, how you think matters more than what you know.

Two engineers may know the same tools.
What differentiates them is judgment.

But judgment only compounds when it’s observable.

That’s why:

  • Design documents
  • Write-ups
  • Architecture explainers

are not distractions from “real work.”

They are career assets.

They show how you break down ambiguity, make trade-offs, and communicate decisions — the exact skills companies struggle to assess in interviews.

A calm approach that actually scales

This doesn’t require a lifestyle change.

You don’t need to do everything.

👉 One solid repository per quarter
👉 One thoughtful article every few months
👉 Occasional sharing of learnings

That’s enough.

A senior engineer with public clarity has asymmetric leverage — not because they’re louder, but because they’re easier to trust.

Closing reflection

These patterns became clearer to me while reflecting on my own journey — from building widely used developer tools to leading engineering teams. Those reflections eventually came together as Digital Footprint for Software Engineers, not as a guide to self-promotion, but as a practical way to think about visibility as engineering signal.

Because at some point, your code really does stop being enough — and that’s not a failure. It’s a transition.

Start building your digital footprint today. I hope my recently launched book helps you take that first step.

Beyond the Vibes: Vibe Coding Changed Who Can Build, Not How Software Should Be Built

In the last few years, vibe coding has taken center stage by changing who can build software, but not what it takes to build it well. It is a development style defined by natural language prompts, rapid iteration, and an emphasis on getting things working fast.

Powered by AI-assisted tools and accessible platforms, vibe coding has genuinely democratized building . Startups, solo devs, and even non-technical founders can now create prototypes in hours, not months. That’s worth celebrating.

But as the hype grows, an important distinction is getting lost in the noise.

We’re starting to confuse vibe coding with software engineering.

And while they both involve code, they serve very different purposes and come with very different risks.

Where Vibe Coding Shines

Vibe coding works best when you’re:

  • Testing an idea
  • Prototyping fast
  • Building internal tools
  • Exploring creatively

It accelerates iteration and lowers the cost of experimentation. It’s a massive enabler for innovation, especially in early-stage product work.

The market agrees. According to Roots Analysis, the global vibe coding market is expected to grow from $2.96B in 2025 to $325B by 2040 – a 36.79% CAGR.

But the faster something grows, the more important it becomes to ask:
Is this still the right tool for the job?

The Foundations Vibe Coding Often Skips

What vibe coding often skips, and what experienced developers obsess over, are the foundations that keep systems standing:

  • Clear, stable requirements
  • Non-functional constraints (scale, security, latency)
  • Architectural boundaries
  • Testing strategies
  • Maintainability
  • Long-term risk

The Most Expensive Problems Don’t Show Up in Demos

In vibe coding, it’s easy to build something that feels finished, but ultimately collapses when it’s time to expose it to real users, real load, or when it’s time to scale. We’ve seen projects that look great on the surface but require complete rewrites just to support users, integrate with systems, or handle basic growth.

It’s not a failure of intent but a misunderstanding of complexity.

Traditional Engineering Brings Weight

Professional software development brings structure and, with it, intentional weight:

  • It’s more expensive
  • It takes longer
  • It often requires external talent (agencies, architects, senior engineers)
  • And it can feel heavy for early-stage work

But when the goal is durability, this is the discipline that delivers it. You’re building something to last. You need it to handle change, load, integration, regulation – things that don’t show up in a prototype demo.

Still, this is where many builders get stuck: cost and speed.

That’s where many builders hit a wall.

A New Middle Ground: Orchestrated Multi-Agent Systems

So, what comes next?

We believe the next evolution isn’t about choosing between speed or structure, it’s about deliberately combining both.

Enter multi-agent systems (MAS). Autonomous agents that specialize in different aspects of the software lifecycle (planning, architecture, coding, testing, optimization).

Without Orchestration, AI Just Scales Chaos

Crucially, the breakthrough isn’t the agents themselves. It’s in the orchestration layer.

Without orchestration, agents operate in silos.
With orchestration, they act like a coordinated engineering team.

What MAS Orchestration Enables:

  • Sequenced collaboration across AI agents (e.g. planner → coder → reviewer → tester)
  • Integrated workflows across tools, platforms, and services
  • Parallel execution to reduce latency and speed up delivery
  • Maintainability through modular agent updates without breaking the system
  • Smarter fallback and reliability mechanisms (e.g. retries, circuit breakers, role reassignment)

In short: orchestration turns “vibe” into “system”.

We Use This Because We Want To Ship

At Brunelly, we didn’t adopt orchestration as a theory. We use it because we have to ship real systems. Our CTO refers to LLMs as “a slightly messier version of me.” And that is impressive.

If you want to read more about Brunelly’s orchestration, check out our CTO’s Guy Powell’s Substack.

Or if you prefer to test it out for yourself, feel free it’s live!

Three Phases of Modern Software Building

As we move into 2026, here’s the shift we see:

You Don’t Need Extremes. You Need Intent.

You don’t need to abandon vibe coding or overinvest in full-stack teams before you’re ready.

But if you’re trying to build something credible and scalable, and you’re looking for that elusive balance between speed and structure, multi-agent orchestration may offer a smarter third path.

Final Thought: Speed Is Optional. Clarity Isn’t.

The real question isn’t whether vibe coding is “good” or “bad.”
The question is: What are you building, and what will it take to get it there?

If you’re testing the waters, move fast and explore.
If you’re building the backbone of a product or company, slow down, think deeply, and choose the right system.

And 2026 is going to reward the teams who can do both intelligently.

Enhanced AI Management and Analytics for Organizations

Today, we’re introducing the JetBrains Console, which provides enhanced AI management and analytics for organizations, including new capabilities to manage, observe, and control AI usage and costs across teams.

AI is no longer an experiment for most development teams. It’s becoming part of the core toolchain. As usage increases, so does the need for clarity. Leaders need to understand how AI is used, how it affects day-to-day work, and how to manage it responsibly in an organization.

As a first step, these new capabilities are designed to provide that clarity, with governance and observability built in from the start. We will continue to further develop AI governance functionalities to provide even greater transparency.

Centralized AI governance across teams

Organizations can now use the JetBrains Console to manage AI usage and costs at the company or team level. In the AI settings section, you can:

  • Enable AI on the organization or team level.
  • Control access to AI tools and agents, including Junie, Claude Agent, and OpenAI Codex.
  • Manage a shared pool of AI Credits.
  • Set default and per-user credit limits.
  • Configure data collection options.

Once enabled, AI capabilities are available directly inside developers’ JetBrains IDEs, with no additional setup or workflow changes required. This makes it possible to roll out AI incrementally and avoid ungoverned usage.

Managing AI Credits and licenses

As AI usage grows, visibility into licenses and consumption becomes critical.

The Users and licensing tab in the AI management section provides a single view of:

  • License availability and assignment throughout the organization.
  • Included AI Credit usage.
  • Remaining top-up credits.

Admins can assign licenses that include AI Credits, such as AI Pro, AI Ultimate, All Products Pack, and dotUltimate, to individual users. Access can be granted or restricted as needed, with changes taking effect immediately.

For teams or individuals with higher usage needs, additional AI Credit limits can be configured per user or applied in bulk. This allows organizations to support power AI users without removing default values in the company.

Observability into AI usage and adoption

AI adoption rarely looks the same across teams. Some developers integrate it deeply into their workflow, while others use it occasionally or not at all.

The console provides clear visibility into how AI is used throughout the organization, helping you understand adoption patterns and plan budgets better.

Track AI adoption and engagement over time

The Active AI users chart shows how many developers actively use AI, making it easier to understand adoption trends and engagement levels across teams. You can find more details on how we calculate these metrics here.

Monitor AI Credit consumption

AI Credit usage can be analyzed over any time period, both for credits included in your AI license and top-up credits. This data supports more informed planning around budgets and usage limits.

Spot when developers reach their AI Credit limits

The console also shows how frequently users reach their monthly AI Credit limits. This makes it easier to identify friction points and adjust limits where needed, whether at the team or individual level.

Understanding how AI influences development work

Beyond usage and cost, the console provides early insights into how AI is used and received by developers. The AI activity and impact charts are intended to support comparison and informed decisions. 

In upcoming releases, we will introduce more advanced metrics and API access to help organizations assess the impact of AI on engineering and business outcomes.

Acceptance of AI-generated code

The AI-generated code and acceptance rate charts show how often AI-generated code is accepted by developers and act as indicators of quality and relevance.

You can use this data to compare the tools or agents you have integrated into AI Assistant (Junie, Claude Code, OpenAI Codex, and others that will be supported in the future). This helps you identify where suggestions consistently fall short of expectations and decide where configuration, enablement, or tool choice should be revisited.

You can find more details on how we calculate these metrics here.

AI-modified code

The AI-modified code charts highlight the relative footprint of different AI tools and features within the codebase.

This helps teams understand exactly where AI is making meaningful contributions to development.

AI feature activity

The AI feature activity chart shows how developers interact with AI inside the IDE, including chat usage and suggestion volume.

These insights help distinguish experimentation from sustained use and identify mismatches between enabled capabilities and actual developer behavior.

Get started

AI management and analytics are now available at no additional cost to all commercial customers with AI licenses via the JetBrains Console. Access is role-based, allowing organizations to define who can manage AI settings, view usage and adoption data, and assign licenses. 

To get started, open the AI management section in the JetBrains Console. For more details, refer to the documentation or visit the AI for Business page.

Explore JetBrains Console now

We’re working to further enhance AI management and governance capabilities for organizations. Upcoming features include:

  • Centralized Bring Your Own Key (BYOK) management for AI providers.
  • MCP management for your organization.
  • Centralized codebase indexing (RAG).
  • AI guardrails and AI audit.
  • More advanced usage analytics dashboards and API access.

Want to stay updated on what’s next? Subscribe to the JetBrains AI newsletter below.

Wayland By Default in 2026.1 EAP

Starting from version 2026.1, IntelliJ-based IDEs will run natively on Wayland in supported desktop configurations. This follows Wayland’s ascendance to the position of primary display server across contemporary Linux distributions.

By making this change in our EAP releases first, we hope to be able to give more Linux users the opportunity to try the native Wayland mode in their IDE, gather their feedback, and prepare more comprehensively for the general rollout in one of the upcoming major versions.

What changes?

Instead of running as X applications, IntelliJ-based IDEs will now automatically enable native Wayland support in a Wayland-capable desktop environment.

Since the last preview in 2024.2, we have enhanced stability across several Wayland server implementations, added drag-and-drop functionality and input methods (IMs) support, and made a significant step towards native-looking window decorations.

Wayland differs profoundly from X11 in several technical ways. As a result, even though the user interface should largely look and feel the same, these underlying distinctions may be noticeable:

  • Some windows and dialogs, e.g. Project Structure and Alerts, may not be centered on the screen or keep their previous location. This is due to the window manager having total control over windows’ locations in Wayland, which it is not always possible to override on the application side.
  • The splash screen on IDE startup will not appear as it cannot be reliably centered on the screen.
  • Some popups, such as Search Everywhere and Recent Locations, may not be moved outside of the main frame.
  • Window decorations (such as the title bar, window control buttons, shadows, and rounded corners), where present, may not fully adhere to the current desktop theme.

Some of these distinctions affect many Wayland users across other applications, and the Wayland community is actively addressing them. It is possible that they will be resolved in future versions of Wayland implementations and IntelliJ-based IDEs.

X11 is still supported

In a Linux desktop environment that does not support Wayland, IntelliJ-based IDEs will continue to work as X applications. It is also possible to switch to using X11 on any Wayland desktop because an X.Org implementation called XWayland is always available for compatibility with older applications. To do that, add -Dawt.toolkit.name=XToolkit to the VM options list (Help | Edit Custom VM Options…) and restart the IDE.

Is my IDE running in X11 or Wayland mode?

If you are curious about which mode your IntelliJ-based IDE is currently running in, you can find out by going to the About dialog (Help | About) and checking which toolkit is in use. Click on the Copy and Close button, and you’ll then see the toolkit’s name towards the top of the copied text:

Toolkit: sun.awt.wl.WLToolkit

This information is also available in idea.log; for example:

INFO - #c.i.p.i.b.AppStarter - toolkit: sun.awt.wl.WLToolkit

Configurations supported in the future

Wayland support for Remote Development mode is currently a work in progress. In the meantime, Remote Development mode will continue to operate as before and not enable native Wayland support automatically.

Technical details

Native Wayland support is mostly concentrated in one subsystem called WLToolkit. If you were one of the early adopters of this mode, you had to specify the -Dawt.toolkit.name=WLToolkit VM option manually. This will continue to work, but it is no longer necessary.

The launcher will supply a new option to the IDE: -Dawt.toolkit.name=auto. The “auto” option will be resolved into either WLToolkit or XToolkit based on the following rule:

  • If wl_display_connect() succeeds, “auto” is replaced with WLToolkit, and therefore the application is launched in the native Wayland mode.
  • Otherwise, “auto” is replaced with XToolkit, and the application is launched in X11 mode.

Like every other aspect of JetBrains Runtime, the platform that powers IntelliJ-based IDEs, WLToolkit is fully open-source. JetBrains is also a key contributor to the OpenJDK project Wakefield, which is dedicated to ensuring that all Java applications execute natively on Wayland. New features and fixes are regularly published to the project’s GitHub repository. 

Feedback

We are very grateful for the dedication and valuable input from our users who participated in the Wayland Preview program. The time and effort you invested in reporting issues were instrumental, not only in identifying critical bugs but also in helping us accurately prioritize the roadmap for improvements and the implementation of key features.

We are pleased to announce that the upcoming version 2026.1 incorporates fixes for a substantial number of the reported problems. These fixes address a wide range of stability, performance, and desktop integration issues, marking a major milestone in the maturity of our Wayland support.

This major platform transition is a work in progress. We are actively investigating and developing fixes, prioritizing core areas like rendering, popups, window management, input methods (IMs), and desktop integration. Please subscribe to and vote for relevant issues for updates. Your patience and feedback are crucial as we work toward a stable, performant, modern, and feature-complete experience.