Recently, I was asked a question that really made me take a step back. “With all these AI tools, aren’t they just to give users what you would write about anyways, so who are you writing for?”
Yes, AI can generate content faster than ever before. It can summarize, rephrase, and expand on our content. It can also write test cases, code snippets, documentation, and even write articles.
So why am I writing? Why am I spending time sitting here typing this out for the world to read when it may not even be read by a human and will just be another “piece of learning material” for AI.
The Human Element
I believe, firmly, that the accessibility content I write about is helping to teach the other part of AI that nobody is talking about. The human aspect. The person on the other side of the prompts, on the other side of the outcome from the content created.
I write because I still believe, stubbornly, that accessible development isn’t something you can fully automated. I know, I know says the guy who’s been writing about automation for years.
Accessible development, when done correctly, is about intent. It’s about understanding the impact of what you build. It’s about caring enough to check, to question, to learn, and improve. Even if that caring is knowing that when you say “make me an accordion that has XYZ” adding in “make me an ACCESSIBLE accordion that has XYZ”
Knowledge is Still Power
The speed at which AI can help build out code is unbelievable! The scary part is how accurate it can be as well in building out content. However, there is still an aspect of knowledge needed to understand accessibility and know if there are features missing. Let me give an example.
You just built a modal component. The modal is your standard looking modal with a title, text content and a close button. As part of your development process, you use a prompt that says “make me test cases for this component”
AI will generate a test case for your modal, in whatever framework you choose. More than likely, you will get a whole suite of tests that will check that it opens, the background content is grayed out, and that the buttons work to open and close the modal.
The big question though, will it include accessibility checks by default? Validating focus management, keyboard focus trap, and ensuring all actions work with keyboard.
This is the human and education element with development. If they don’t know to include accessibility tests, the tools they use may not include them. If they don’t know how to evaluate the output, they won’t know what’s missing.
Bringing it Home
So who am I writing for?
The developer who wants to build accessible components but doesn’t know where to start. The tester who wants to understand what good focus management actually looks like. The teams who care about the content create, but need guidance and want to learn.
Writing and knowledge sharing is how we keep accessibility human, and accessibility has always been about people. It is people with real needs, real frustrations, real barriers, real experiences.
AI has changed the development game forever. It can help us build applications faster and more efficient than ever before.
So why do I still write? Writing is how we pass on the knowledge that AI can’t invent. It’s how we teach the next person to ask better questions. Writing is how we keep accessibility grounded in real people, and that is my mission. Making developers give a damn about the impact of the work they build, and to care about the human on the other side of the screen.
Related: The Browser Main Thread and Rendering Pipeline explains the full rendering pipeline that critical CSS inlining is optimizing for.
Lighthouse flags “eliminate render-blocking resources” and most developers look at their CSS files with mild confusion. The file is small. It is on a CDN. How can 15KB of CSS be blocking the render of a page that otherwise looks fast? The answer is in the word “render-blocking” itself, which is more precise than it sounds. The browser will not draw a single pixel to the screen until it has read every CSS file in the document head. Not because it is slow, but because it is correct.
What this covers: Why all CSS is render-blocking by specification, what the browser is actually waiting for before painting, how critical CSS inlining removes the wait, and how to extract and inline it without manually editing stylesheets.
Why the browser blocks on CSS
The browser builds two trees before painting: the DOM (Document Object Model) from your HTML, and the CSSOM (CSS Object Model) from your CSS. Rendering requires both. The render tree is built by combining DOM and CSSOM, and nothing is painted until the render tree exists.
This means CSS is blocking by design. The browser cannot make progress on rendering while waiting for an external CSS file because it literally does not know how to style any element until all CSS is parsed. An element that appears red in the DOM might be styled to be invisible in CSS. The browser has no way to know until it reads the CSS.
When the browser encounters a <link rel="stylesheet"> tag in the HTML, it:
Pauses HTML parsing to prioritize fetching the CSS file (CSS is a high-priority resource)
Starts a network request for the CSS file
Waits for the full file to download
Parses the CSS and builds the CSSOM
Resumes HTML parsing
Proceeds to build the render tree and paint
That network request in step 2 is the problem. On a typical server with a 100ms round trip time, a CSS file adds at minimum 100ms to the time before the first pixel appears. With a slower connection or a server that is geographically distant, this can be 300 to 500ms. The CSS file can be completely empty and the delay still happens because the browser does not know that until it receives the empty file.
What critical CSS is
Not all CSS needs to block the render. The CSS needed to render the visible content on the initial viewport (above the fold) blocks the render of something the user cares about. The CSS for a modal that appears three screens down, the CSS for the footer, the CSS for components the user has not scrolled to yet: these block rendering but the user does not see the result of that rendering anyway.
Critical CSS is the subset of your CSS that applies to elements visible in the initial viewport without scrolling. It is the minimum CSS needed to make the above-the-fold content look correct.
For a typical landing page, critical CSS might include:
Body and base typographic styles
Navigation bar styles
Hero section layout and colors
Above-fold image styles
Any font-face declarations for above-fold text
Everything else is non-critical: sidebar styles, footer, modal, article content styles, form styles for components below the fold.
How inlining fixes the problem
Instead of loading critical CSS from an external file, you embed it directly in the HTML document inside a <style> tag in the <head>.
<!DOCTYPE html><html><head><!-- Critical CSS: embedded directly, no network request needed --><style>body{margin:0;font-family:system-ui,sans-serif;}.nav{height:60px;background:#fff;border-bottom:1pxsolid#eee;}.nav__logo{font-size:1.25rem;font-weight:600;}.hero{padding:80px24px;max-width:800px;margin:0auto;}.hero__title{font-size:2.5rem;line-height:1.2;}/* ... rest of above-fold CSS ... */</style><!-- Non-critical CSS: loaded asynchronously, does not block paint --><linkrel="preload"href="/styles/main.css"as="style"onload="this.onload=null;this.rel='stylesheet'"/><noscript><linkrel="stylesheet"href="/styles/main.css"/></noscript></head>
The critical CSS is available immediately: the browser reads the HTML, finds the <style> tag, parses the CSS inline, and builds the CSSOM without a network round trip. It can begin rendering above-fold content immediately.
The full stylesheet loads asynchronously using the rel="preload" trick (preload the file with as="style", then switch rel to stylesheet when loaded). Below-fold content that depends on the full stylesheet renders when it loads, but by that time the above-fold content is already visible and the user has started reading.
The <noscript> fallback handles the case where JavaScript is disabled, which would prevent the onload from firing. In that scenario, the stylesheet loads normally as a blocking resource.
Why manually maintaining critical CSS is impractical
Manually identifying which CSS applies above the fold and which does not is not feasible at any scale. Layouts change. Viewports vary. The above-fold content on a 375px phone is different from the above-fold content on a 1440px monitor.
The standard approach is to automate extraction with a tool that renders the page in a headless browser, identifies all elements visible in the initial viewport, and extracts the CSS rules that apply to those elements.
Critters is a plugin for webpack and Vite that does this at build time:
// vite.config.tsplugins:[critters()],};
After building, Critters:
Renders each HTML page in a headless environment
Identifies which CSS rules apply to above-fold elements
Inlines those rules in <style> tags
Changes the <link> to load asynchronously
No manual work required. The build output has correct inlined critical CSS for each page.
Next.js has had critical CSS extraction built in since v10 through its integration with Critters. If you are using Next.js, this optimization is applied automatically to pages using the App Router.
Critical is a standalone Node.js package for extraction:
awaitcritical.generate({base:'dist/',src:'index.html',target:{html:'index-critical.html',css:'critical.css',},width:1300,height:900,// Also generate for mobile viewportdimensions:[{width:375,height:812},{width:1300,height:900},],});
The dimensions option is important: critical CSS should cover the most common viewport sizes, not just one. A rule that is critical on mobile (because it styles content visible at 375px width) might be non-critical on desktop (where the content is below the fold), and vice versa.
The tradeoffs to understand
HTML file size increases. Inlining critical CSS means the CSS is embedded in every HTML response rather than being fetched once and cached. For pages with substantial critical CSS (say, 20KB), this adds 20KB to every HTML response. Weigh this against the round-trip savings.
CSS is duplicated. Critical CSS rules appear both in the <style> tag and in the full external stylesheet. When the external stylesheet loads, the browser parses the same rules again. This is harmless (CSS parsing is fast) but worth knowing.
Dynamic content complicates extraction. If your page uses client-side rendering to insert above-fold content after the initial HTML load, the extraction tool cannot see that content. The critical CSS it extracts will be incomplete because the above-fold elements did not exist when the headless renderer checked.
For server-side rendered pages, extraction works accurately. For heavily client-side rendered pages, you may need to either use renderBefore options to delay extraction until after React hydrates, or limit critical CSS to truly static above-fold elements like the navigation.
The Lighthouse connection
When Lighthouse reports “Eliminate render-blocking resources” and lists CSS files, it is measuring the time between when the page starts loading and when the first paint occurs. Every external CSS file in <head> adds to this time.
After inlining critical CSS and loading the full stylesheet asynchronously, Lighthouse will no longer flag the CSS file as render-blocking because it is loaded asynchronously and does not delay the initial paint.
The metric that typically improves most is First Contentful Paint, because above-fold content can now paint as soon as the HTML is received rather than waiting for an external CSS round trip. Depending on the server response time and connection speed, the FCP improvement can range from 100ms on fast connections to over 500ms on slow mobile connections.
A mental model for understanding render-blocking
Think of the browser as a factory. The HTML is the blueprint, the CSS is the paint colors and finishes specification, and the factory cannot start production until it has both documents. If the paint colors arrive one minute late, the entire factory sits idle for one minute regardless of how fast the machines are.
Critical CSS inlining is equivalent to printing the paint colors for the first section of the product directly on the blueprint. The factory can start producing the visible parts immediately and wait for the full paint specification to arrive for the parts it will produce later.
The external stylesheet still arrives and the rest of the page still gets fully styled. But the user sees the first screenful of content without waiting for a network round trip that was never about content the user could see on arrival.
Read the original article on Renderlog.in:
https://renderlog.in/blog/critical-css-inlining-render-blocking-explained/
If you found this helpful, I’ve also built some free tools for developers and everyday users. Feel free to try them once:
JSON Tools: https://json.renderlog.in
Text Tools: https://text.renderlog.in
QR Tools: https://qr.renderlog.in
All tests run on an 8-year-old MacBook Air.
All results from shipping 7 Mac apps as a solo developer. No sponsored opinion.
Tauri v2 uses Tokio under the hood. That sounds simple. In practice, async Rust in a Tauri app has specific patterns that took me too long to figure out.
Here’s what actually tripped me up.
The cannot be sent between threads wall
The most common async error in Tauri development: MutexGuard<T> cannot be sent between threads safely
This happens when you hold a lock across an .await point. Tauri commands run on Tokio, which may switch threads at await points. A MutexGuard from std::sync::Mutex is not Send.
The fix: use tokio::sync::Mutex instead of std::sync::Mutex for state that needs to be held across await points. Or restructure to drop the guard before awaiting.
rust// Wrong — holds MutexGuard across await
async fn bad(state: State<‘_, Mutex>) {
let guard = state.lock().unwrap();
some_async_call().await; // MutexGuard still held here
guard.do_something();
}
// Right — drop guard before await
async fn good(state: State<‘_, Mutex>) {
let value = {
let guard = state.lock().unwrap();
guard.get_value()
}; // guard dropped here
some_async_call().await;
use_value(value);
}
Blocking calls in async commands
rusqlite, file I/O, and other synchronous operations block the current thread. In an async context, this blocks the Tokio thread pool.
For short operations (sub-millisecond), blocking is fine. For anything longer:
rustlet result = tokio::task::spawn_blocking(|| {
// blocking operation here
do_something_slow()
}).await??;
spawn_blocking offloads to a dedicated thread pool. The async runtime stays responsive.
Long-running tasks and progress updates
For operations that take seconds — file sync, large transfers — you want progress updates to the frontend. Use Tauri’s event system:
rust#[tauri::command]
async fn sync_files(handle: AppHandle) -> Result<(), AppError> {
for (i, file) in files.iter().enumerate() {
process_file(file).await?;
handle.emit(“sync-progress”, i).ok();
}
Ok(())
}
Frontend listens with listen(‘sync-progress’, …). Clean separation between the async work and the UI update.
The abort pattern for cancellable tasks
Users cancel operations. Build cancellation in from the start:
rustlet (tx, rx) = tokio::sync::oneshot::channel::<()>();
// Store tx somewhere, send to cancel
Retrofitting cancellation into a long-running task that wasn’t designed for it is painful. Design for it early.
The verdict
Async Rust in Tauri is manageable once you internalize the Send + Sync rules and know which Mutex to reach for. The compiler errors are specific enough to guide you.
The patterns above cover 90% of what you’ll hit shipping a real Tauri app.
If this was useful, a ❤️ helps more than you’d think — thanks!
Hiyoko PDF Vault → https://hiyokoko.gumroad.com/l/HiyokoPDFVault
X → @hiyoyok
Handling sensitive data like Electronic Health Records (EHR) is a nightmare for privacy compliance. Whether it’s HIPAA in the US or GDPR in Europe, sending a patient’s medical history to a cloud-based LLM often triggers a cascade of security audits and potential liabilities.
But what if the data never left the user’s computer?
In this tutorial, we are diving deep into Edge AI and Privacy-preserving AI by building a local EHR parser. Using WebLLM, WebGPU acceleration, and React, we will transform raw medical text into structured JSON entirely within the browser sandbox. No servers, no APIs, and zero data leakage.
The Architecture: Why WebLLM?
Traditionally, local LLMs required a heavy Python environment (Ollama, LocalAI). With the advent of WebGPU, the browser can now access the local GPU’s power directly. WebLLM (powered by TVM.js) allows us to run models like Llama 3 or Mistral directly in the browser’s memory.
Data Flow Overview
graph TD
    A[User: Upload Medical PDF/Text] --> B[Browser Sandbox]
    B --> C{WebGPU Available?}
    C -- Yes --> D[Initialize WebLLM Engine]
    C -- No --> E[Fallback: CPU/Wasm]
    D --> F[Load Quantized Model - e.g., Llama-3-8B-q4f16]
    F --> G[Process EHR Text via Prompt Template]
    G --> H[Output Structured JSON]
    H --> I[React UI Display]
    subgraph Privacy Zone
    B
    D
    G
    end
Prerequisites
To follow along, ensure you have:
A browser with WebGPU support (Chrome 113+ or Edge).
Node.js and a React environment.
The tech_stack: @mlc-ai/web-llm, react, and pdfjs-dist.
Step 1: Setting Up the WebLLM Engine
First, we need to initialize the engine. This is the “brain” that will live in your browser’s worker thread.
// useWebLLM.tsimport{useState,useEffect}from'react';import*aswebllmfrom"@mlc-ai/web-llm";exportfunctionuseWebLLM(){const[engine,setEngine]=useState<webllm.MLCEngine|null>(null);const[progress,setProgress]=useState(0);constinitEngine=async ()=>{constmodelId="Llama-3-8B-Instruct-v0.1-q4f16_1-MLC";// Quantized for browserconstengine=awaitwebllm.CreateMLCEngine(modelId,{initProgressCallback:(report)=>{setProgress(Math.round(report.progress*100));console.log(report.text);},});setEngine(engine);};return{engine,progress,initEngine};}
Step 2: Extracting Text and Prompt Engineering
Medical records are messy. We need to feed the LLM a clean prompt to ensure it returns valid JSON. This is crucial for Edge AI applications where prompt tokens are “free” (no API cost) but constrained by local VRAM.
constEHR_PROMPT_TEMPLATE=(rawText:string)=>`
You are a medical data extraction assistant.
Extract the following fields from the medical record provided:
- Patient Name
- Primary Diagnosis
- Prescribed Medications (List)
- Recommended Follow-up
Format the output strictly as JSON.
Record:
"""
${rawText}
"""
`;constparseMedicalRecord=async (engine:any,text:string)=>{constmessages=[{role:"system",content:"You are a helpful assistant that outputs only JSON."},{role:"user",content:EHR_PROMPT_TEMPLATE(text)}];constreply=awaitengine.chat.completions.create({messages,temperature:0.0,// Keep it deterministic});returnJSON.parse(reply.choices[0].message.content);};
Step 3: The React UI
We want a clean interface where users can paste text or upload a document and see the “Processing locally” indicator.
importReact,{useState}from'react';import{useWebLLM}from'./hooks/useWebLLM';constEHRParser=()=>{const{engine,progress,initEngine}=useWebLLM();const[input,setInput]=useState("");const[result,setResult]=useState(null);return (<divclassName="p-8 max-w-2xl mx-auto"><h2className="text-2xl font-bold mb-4">Local EHR Parser 🩺</h2>{!engine?(<buttononClick={initEngine}className="bg-blue-600 text-white px-4 py-2 rounded">
Load Local AI Model ({progress}%)
</button>):(<divclassName="space-y-4"><textareaclassName="w-full h-40 border p-2"placeholder="Paste medical notes here..."onChange={(e)=>setInput(e.target.value)}/><buttononClick={async ()=>{constdata=awaitparseMedicalRecord(engine,input);setResult(data);}}className="bg-green-600 text-white px-4 py-2 rounded">
Parse Locally
</button></div>)}{result&&(<preclassName="mt-8 bg-gray-100 p-4 rounded text-sm">{JSON.stringify(result,null,2)}</pre>)}</div>);};
The “Official” Way: Leveling Up Your AI Architecture
While running LLMs in the browser is a game-changer for privacy, orchestrating these models in a production environment requires a deeper understanding of memory management and model sharding.
For more advanced patterns on Edge AI deployment, optimizing WebGPU kernels, and building production-ready Local-first AI applications, I highly recommend exploring the deep-dive articles at the WellAlly Tech Blog. It’s a goldmine for developers who want to move beyond “Hello World” and into scalable, high-performance engineering.
Why This Matters
Zero Latency: Once the model is loaded (cached in the browser’s IndexedDB), inference is lightning fast because there’s no network round-trip.
Cost Efficiency: You aren’t paying $0.01 per 1k tokens to OpenAI. The user provides the compute.
Ultimate Privacy: In the context of EHR, this is the gold standard. The data never exists on a server disk or in a log file.
Challenges to Consider
Initial Load: The first time a user visits, they might need to download 2-5GB of model weights.
VRAM Constraints: Low-end devices might struggle with Llama-3-8B. Always provide a “Small Model” fallback like Phi-3 or TinyLlama.
Conclusion
The web is no longer just for displaying data; it’s for processing it intelligently. By combining WebLLM and WebGPU, we can build tools that respect user privacy while offering the power of modern Generative AI.
What are you building with Edge AI? Let me know in the comments! 👇
The Early Access Program (EAP) for the next major PhpStorm 2026.2 release is now open!
PhpStorm’s EAP builds are a great opportunity to try upcoming features for free in your real workflows and share feedback with the PhpStorm team. Your input directly influences what makes it into the final release.
This release, our main areas of focus are:
Native mode for remote development scenarios, as we aim to significantly improve interaction with the projects located on WSL 2 and in Dev Containers.
Ongoing enhancements in PhpStorm’s understanding of PHPDoc-based generics.
Overall performance and stability improvements, including reduced startup time, indexing time, and freezes.
Download PhpStorm 2026.2 EAP
Getting started with the EAP
If you’re not familiar with how our Early Access Program (EAP) works, here’s a quick overview:
We release new EAP builds weekly, giving you a sneak peek at upcoming features.
EAP builds are completely free to use and do not require a license.
You can install the EAP version alongside your stable PhpStorm installation, so there’s no need to uninstall your current version.
The most convenient way to access EAP builds and keep both your stable and EAP versions up-to-date is by using our Toolbox App.
Alternatively, you can download EAP builds from the EAP page or set up your IDE to automatically receive updates by selecting Check IDE Updates for the Early Access Program under Settings/Preferences | Appearance & Behavior | System Settings | Updates.
En el artículo anterior vimos el problema N+1: queries dentro de loops que se multiplican con los datos. La solución que aprendiste fue usar Include para cargar las relaciones en una sola query.
Eso es correcto. Hasta que tienes más de una colección relacionada en el mismo nivel.
El escenario: un Include razonable que se vuelve un problema
Tienes pedidos. Cada pedido tiene un cliente, una lista de productos y una lista de pagos. Quieres cargar todo en una sola operación para evitar el N+1:
Tres Include. Se ve limpio, se ve correcto. EF Core lo acepta sin quejarse.
Pero el SQL que genera no es lo que imaginas.
Lo que EF Core hace por debajo
El problema aparece específicamente cuando incluyes múltiples colecciones “hermanas” en el mismo nivel del grafo de navegación. Es importante distinguirlo de ThenInclude, que normalmente no genera este problema:
// Caso problemático: dos colecciones en el mismo nivel.Include(p=>p.Productos).Include(p=>p.Pagos)// Normalmente no problemático: navegación en profundidad.Include(p=>p.Productos).ThenInclude(pr=>pr.Categoria)
Cuando EF Core genera un JOIN para cada colección hermana, el resultado no produce una fila por pedido — produce una fila por cada combinación posible entre los registros relacionados.
Si un pedido tiene 5 productos y 3 pagos, el resultado del JOIN tiene 15 filas para ese pedido. EF Core las lee todas y reconstruye el objeto en memoria, pero la base de datos procesó y transfirió 15 filas donde conceptualmente había 1.
El crecimiento es cartesiano: cada colección multiplica las filas del resultado. Con 100 pedidos, cada uno con 10 productos y 5 pagos, el resultado no son 100 filas — son 5,000 filas que viajan de la base de datos a tu servidor para que EF Core las reduzca de vuelta a 100 objetos.
Eso es la explosión cartesiana.
Cómo detectarlo
El warning de EF Core
Cuando EF Core detecta este patrón, emite un warning en los logs:
Compiling a query which loads related collections for more than
one collection navigation, either via 'Include' or through
projection. Please review the generated SQL and inspect whether
the cartesian explosion might negatively impact performance.
Si ves este mensaje en tus logs y lo ignoraste, es probable que ya tengas este problema en alguna query.
Una sola query, pero 847ms. Con pocos datos en dev tal vez son 12ms y nadie lo cuestiona. Con datos reales de producción el tiempo empieza a crecer de forma que no tiene proporción con el número de registros que devuelve el endpoint.
A diferencia del N+1, aquí solo hay una query. Si solo cuentas queries, todo parece correcto. Lo que tienes que mirar es cuántas filas devuelve esa query.
La solución: AsSplitQuery
EF Core 5 introdujo AsSplitQuery precisamente para este caso. En lugar de un solo JOIN que produce el producto cartesiano, EF Core ejecuta una query separada por cada Include y ensambla los resultados en memoria:
-- Query 1: los pedidos con el clienteSELECTp.Id,p.Total,p.FechaCreacion,c.Id,c.NombreFROMPedidospLEFTJOINClientescONp.ClienteId=c.IdWHEREp.FechaCreacion>='2025-02-14'-- Query 2: los productos de esos pedidosSELECTpr.Id,pr.Nombre,pr.Precio,pr.PedidoIdFROMPedidoProductosprWHEREpr.PedidoIdIN(1,2,3,...)-- Query 3: los pagos de esos pedidosSELECTpa.Id,pa.Monto,pa.FechaPago,pa.PedidoIdFROMPagospaWHEREpa.PedidoIdIN(1,2,3,...)
Tres queries en lugar de una, pero cada una devuelve exactamente las filas que necesita. Sin producto cartesiano, sin filas duplicadas.
AsSplitQuery no es siempre la respuesta
Vale la pena entender cuándo usarlo y cuándo no:
Úsalo cuando:
Tienes múltiples Include de colecciones hermanas
Los tiempos de query son desproporcionados respecto al número de registros que devuelves
El warning de EF Core aparece en tus logs
No lo uses cuando:
Solo tienes un Include — el producto cartesiano no ocurre con una sola colección
Necesitas consistencia transaccional estricta — las queries de AsSplitQuery se ejecutan por separado y en teoría otro proceso podría modificar datos entre una y otra
El conjunto de datos es pequeño — el overhead de múltiples queries puede ser mayor que el beneficio
Una advertencia sobre paginación: si usas AsSplitQuery junto con Skip/Take, asegúrate de tener un OrderBy estable y con un campo único. Sin eso, los resultados entre las queries separadas pueden ser inconsistentes.
El Include que no hace nada
Antes de cerrar, vale la pena mencionar un hábito relacionado que ocurre con frecuencia.
Muchos developers agregan Include de forma defensiva — para asegurarse de que las propiedades de navegación no sean null. Tiene sentido cuando materializas la entidad completa. Pero cuando proyectas a un DTO con Select, EF Core ignora completamente los Include:
// ❌ Los Include son ignorados — EF Core no materializa Pedidovarpedidos=awaitcontext.Pedidos.Include(p=>p.Cliente)// ignorado.Include(p=>p.Productos)// ignorado.Include(p=>p.Pagos)// ignorado.Where(p=>p.FechaCreacion>=hace30Dias).Select(p=>newPedidoDetalleDto{Cliente=p.Cliente.Nombre,Total=p.Total,Productos=p.Productos.Select(pr=>pr.Nombre).ToList(),TotalPagado=p.Pagos.Sum(pa=>pa.Monto)}).ToListAsync();
EF Core resuelve los JOINs necesarios directamente desde la proyección del Select. Los Include no aportan nada — ni errores, ni beneficios, ni SQL adicional. Lo mismo aplica para AsSplitQuery: si proyectas a un DTO, no hay entidades que materializar, así que tampoco tiene efecto.
El código funciona igual con o sin ellos. El problema es que quien lo lee después asume que son necesarios, y esa confusión se acumula.
La proyección con Select como alternativa
Cuando no necesitas materializar la entidad completa, la proyección con Select puede ser más eficiente que AsSplitQuery. En muchos casos permite a EF Core generar SQL mucho más eficiente y evitar la materialización completa de relaciones:
// ✅ Sin Include, sin AsSplitQueryvarpedidos=awaitcontext.Pedidos.Where(p=>p.FechaCreacion>=hace30Dias).Select(p=>newPedidoDetalleDto{Cliente=p.Cliente.Nombre,Total=p.Total,Productos=p.Productos.Select(pr=>pr.Nombre).ToList(),TotalPagado=p.Pagos.Sum(pa=>pa.Monto)}).ToListAsync();
La regla general: usa Include cuando materialices la entidad. Usa Select cuando trabajes con DTOs.
Resumen
Problema
Síntoma
Solución
ToList() prematuro
SELECT * sin WHERE, todo en memoria
Mantener IQueryable hasta el final
SELECT * silencioso
Proyección ignorada, columnas de más
Expresiones traducibles en Select
N+1
Una query por cada registro del loop
Include o proyección con Select
Explosión cartesiana
Una query lenta con filas multiplicadas
AsSplitQuery o proyección con Select
Si no ves el SQL que EF Core genera, no sabes lo que está pasando. Los logs son la herramienta más simple y más ignorada para detectar estos problemas antes de que lleguen a producción.
¿Has tenido que resolver una explosión cartesiana en producción? ¿Cómo lo detectaste? Cuéntame en los comentarios.
¿Qué sigue?
En el próximo artículo vamos a hablar de algo que EF Core hace en todas tus consultas sin que lo hayas pedido: rastrear cada entidad que lees para detectar cambios. En pantallas de solo lectura estás pagando ese costo en memoria y CPU sin obtener nada a cambio — y con suficientes datos, se nota.
TL;DR: TeamCity 2026.1 is out and packed with helpful features. We’re introducing the TeamCity CLI and MCP support, as well as Pipelines enhancements to make configuring TeamCity more convenient and powerful. As of this release, AI Assistant is available in Enterprise trial accounts, and the SAML authentication plugin comes bundled with TeamCity.
For the full list of what’s new in 2026.1, make sure to check out our documentation.
Let’s take a closer look at what’s new.
Important security announcement
A high-severity post-authentication security vulnerability has been identified in TeamCity On-Premises. If exploited, this flaw may allow any authenticated user to expose some parts of the TeamCity server API to unauthorized users.
All versions of TeamCity On-Premises are affected, while TeamCity Cloud is not affected and requires no action. We have verified that TeamCity Cloud environments were not impacted by this issue.
This vulnerability has been assigned the Common Vulnerabilities and Exposures (CVE) identifier CVE-2026-44413. A fix for it has been introduced in version 2026.1. We have also released a security patch plugin for 2017.1+ so that customers who are unable to upgrade can still patch their environments.
We strongly recommend upgrading to TeamCity 2026.1 or installing the security patch plugin.
Read more about the vulnerability in the dedicated blog post.
TeamCity 2026.1 livestream
On May 12, 2026, we’ll be hosting a livestream dedicated to the TeamCity 2026.1 livestream. During a 1-hour online event, we’ll walk you through all the new features and share our development plans for 2026. Join us!
Register for the livestream
Introducing the TeamCity CLI
The TeamCity CLI is a free, lightweight, open-source tool that brings the power of TeamCity to your terminal and your AI agents. With the CLI, you can investigate failed builds, apply fixes, configure your Pipeline, and retrigger builds directly from the command line.
The TeamCity CLI also includes an agent skill for AI coding agents, enabling them to check build status, analyze failures, and interact with your Pipeline. Both you and your AI agent can follow updates in real time in the terminal, including build state changes, step progress, and streaming logs.
Currently, the TeamCity CLI includes over 60 commands, and we’re planning to expand the list. You can install the tool and connect locally using the following commands:
# macOS / Linux
brew install jetbrains/utils/teamcity

# via a bash script
curl -fsSL https://jb.gg/tc/install | bash

# Windows
winget install JetBrains.TeamCityCLI

# via a powershell script
irm https://jb.gg/tc/install.ps1 | iex

# Cross-platform via npm
npm install -g @jetbrains/teamcity-cli

# Log in to your server
teamcity auth login --server https://example.teamcity.com/
If you want to learn more about the TeamCity CLI, here’s a dedicated blog post.
MCP for AI agents
In addition to the TeamCity CLI, we’re also introducing support for the Model Context Protocol (MCP) to enable third-party integrations with AI tooling.
The Model Context Protocol is an open-source standard for connecting AI applications to external systems. Your external AI solution uses an authorized request to the specific endpoint and retrieves a list of ready-to-use tools for working with this resource.
MCP is useful when working with TeamCity from external AI-powered tools like JetBrains IDEs or Cursor. It is designed to give AI agents the ability to analyze, explain, and help fix build failures. By default, MCP allows starting remote runs, as well as accessing build logs and related data for troubleshooting.
You can get more context on the TeamCity MCP from our documentation.
AI Assistant is now available in trial Enterprise licenses
TeamCity AI Assistant is a built-in tool that understands the page you’re viewing and helps you find relevant information faster, right from the TeamCity interface. It’s connected to the TeamCity documentation and is great for answering quick questions about TeamCity, onboarding, and inspecting a selected build or project.
AI Assistant is available with the TeamCity Enterprise license – now also during the trial period.
Pipelines enhancements
Pipelines introduce a powerful new way to configure builds in TeamCity. Built on YAML and designed with full branching support, they align seamlessly with modern software development lifecycle practices. Changes to a Pipeline stay safely within a feature branch, allowing teams to iterate, review, and refine before merging into the main branch.
At the same time, TeamCity doesn’t force you into a single approach. While YAML is the primary format, you can also define Pipelines using the power of the Kotlin DSL, making it easy for enterprise teams to manage the most complicated setups.
For added convenience, TeamCity provides a Visual Editor that works hand in hand with YAML, offering an intuitive way to configure Pipelines without sacrificing control. You can seamlessly switch between visual and YAML-based configuration, so that you don’t need to learn yet another YAML schema.
We introduced Pipelines last year. Starting from 2025.07, they are available via the Early Access Program on TeamCity Servers.
We constantly improve Pipelines and keep expanding what users can do with them. Here are some highlights of what we’ve added in 2026.1:
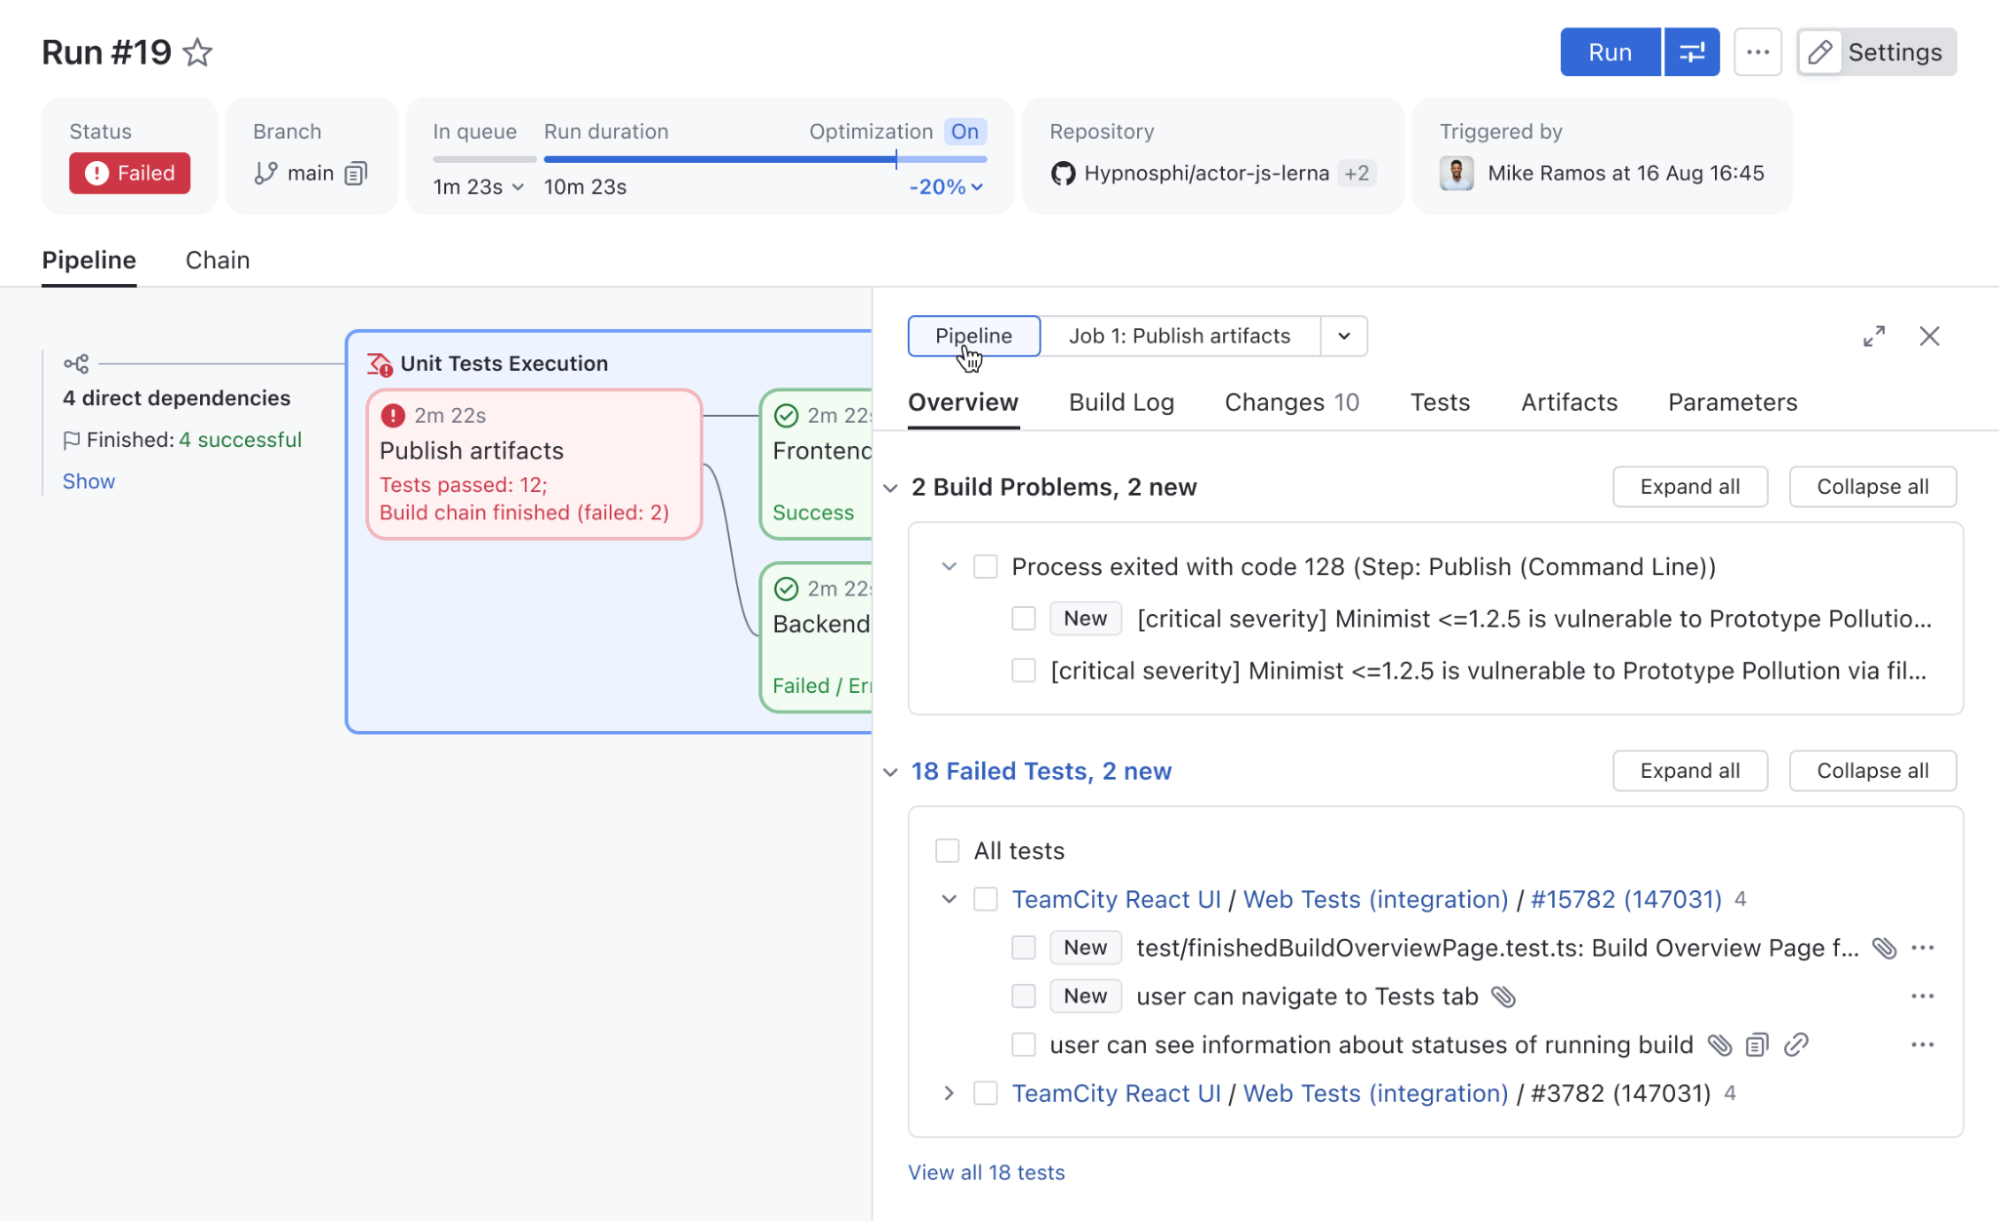
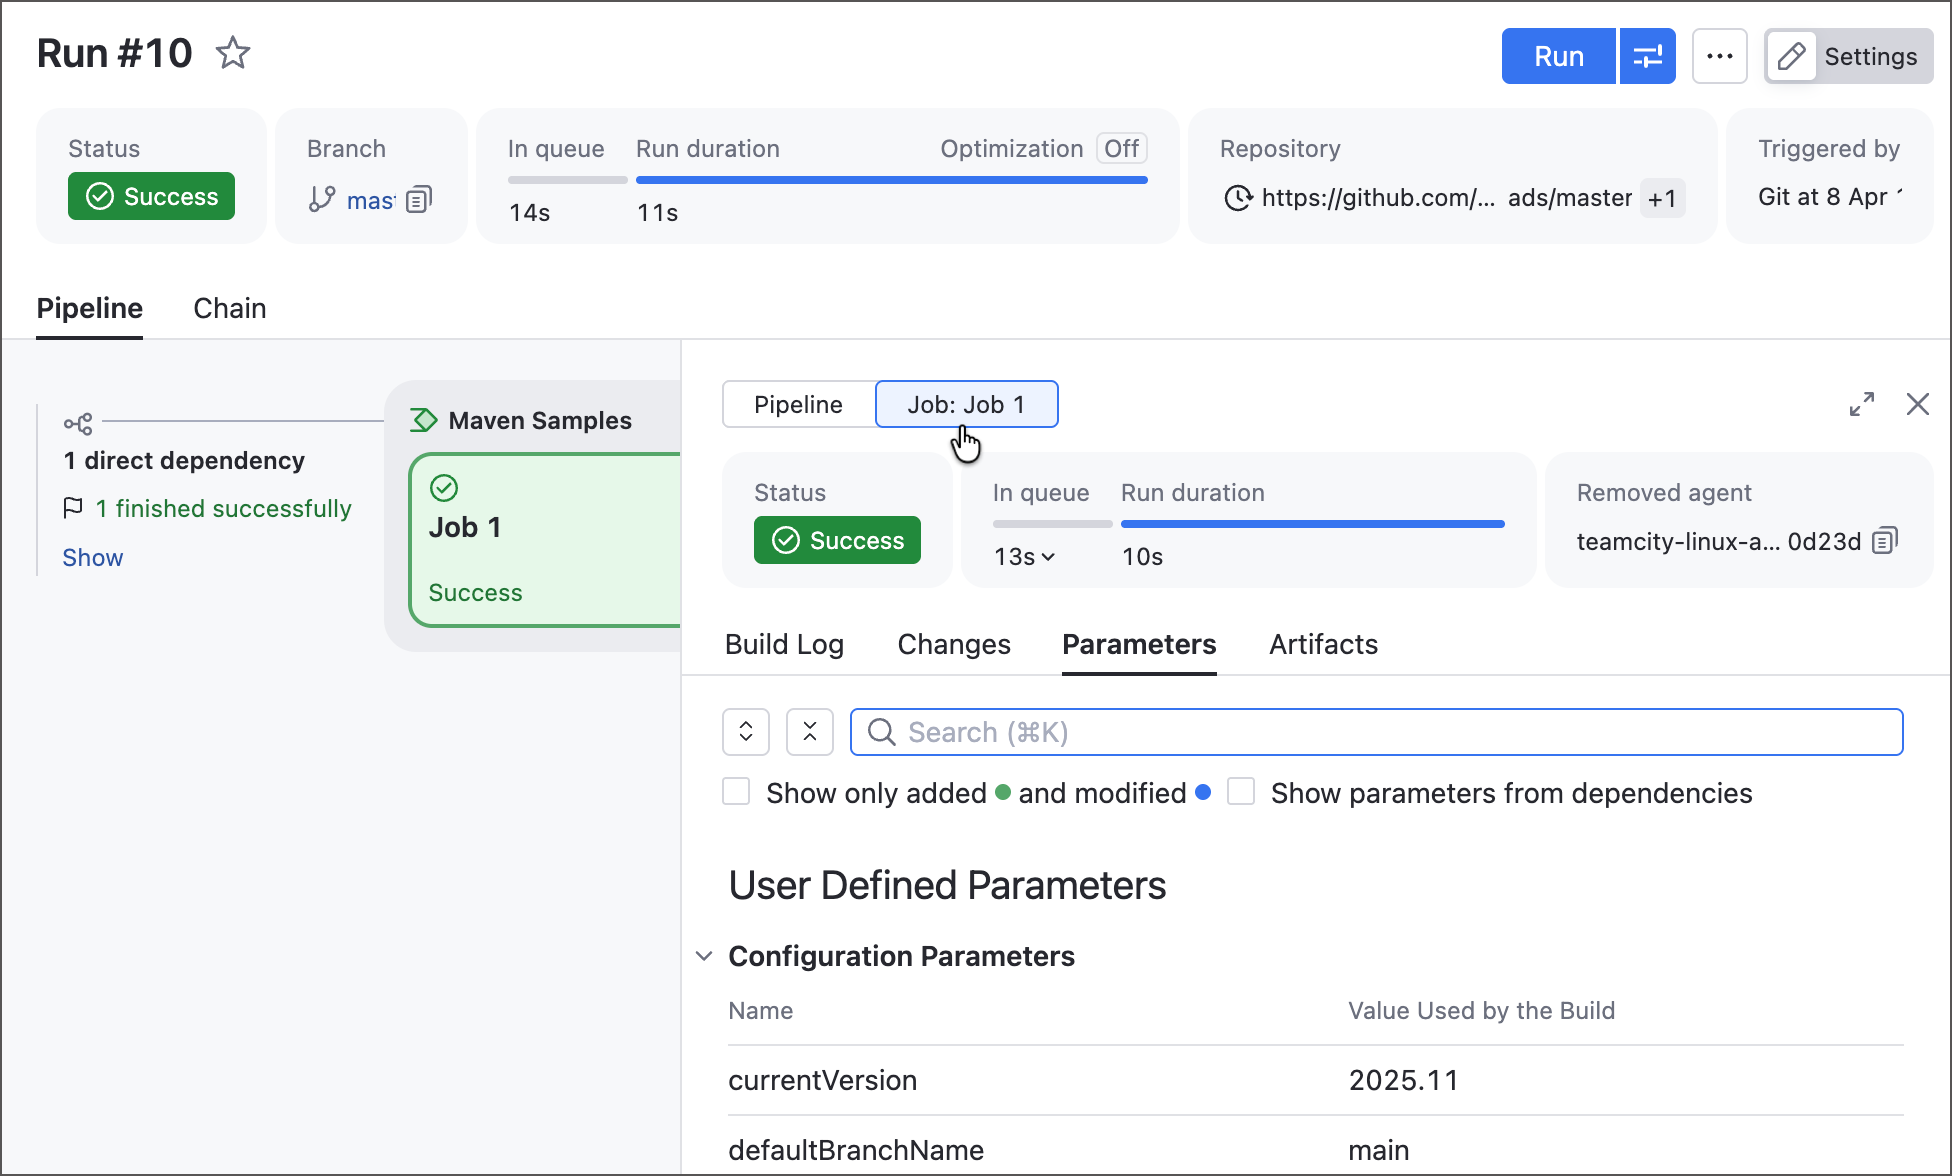
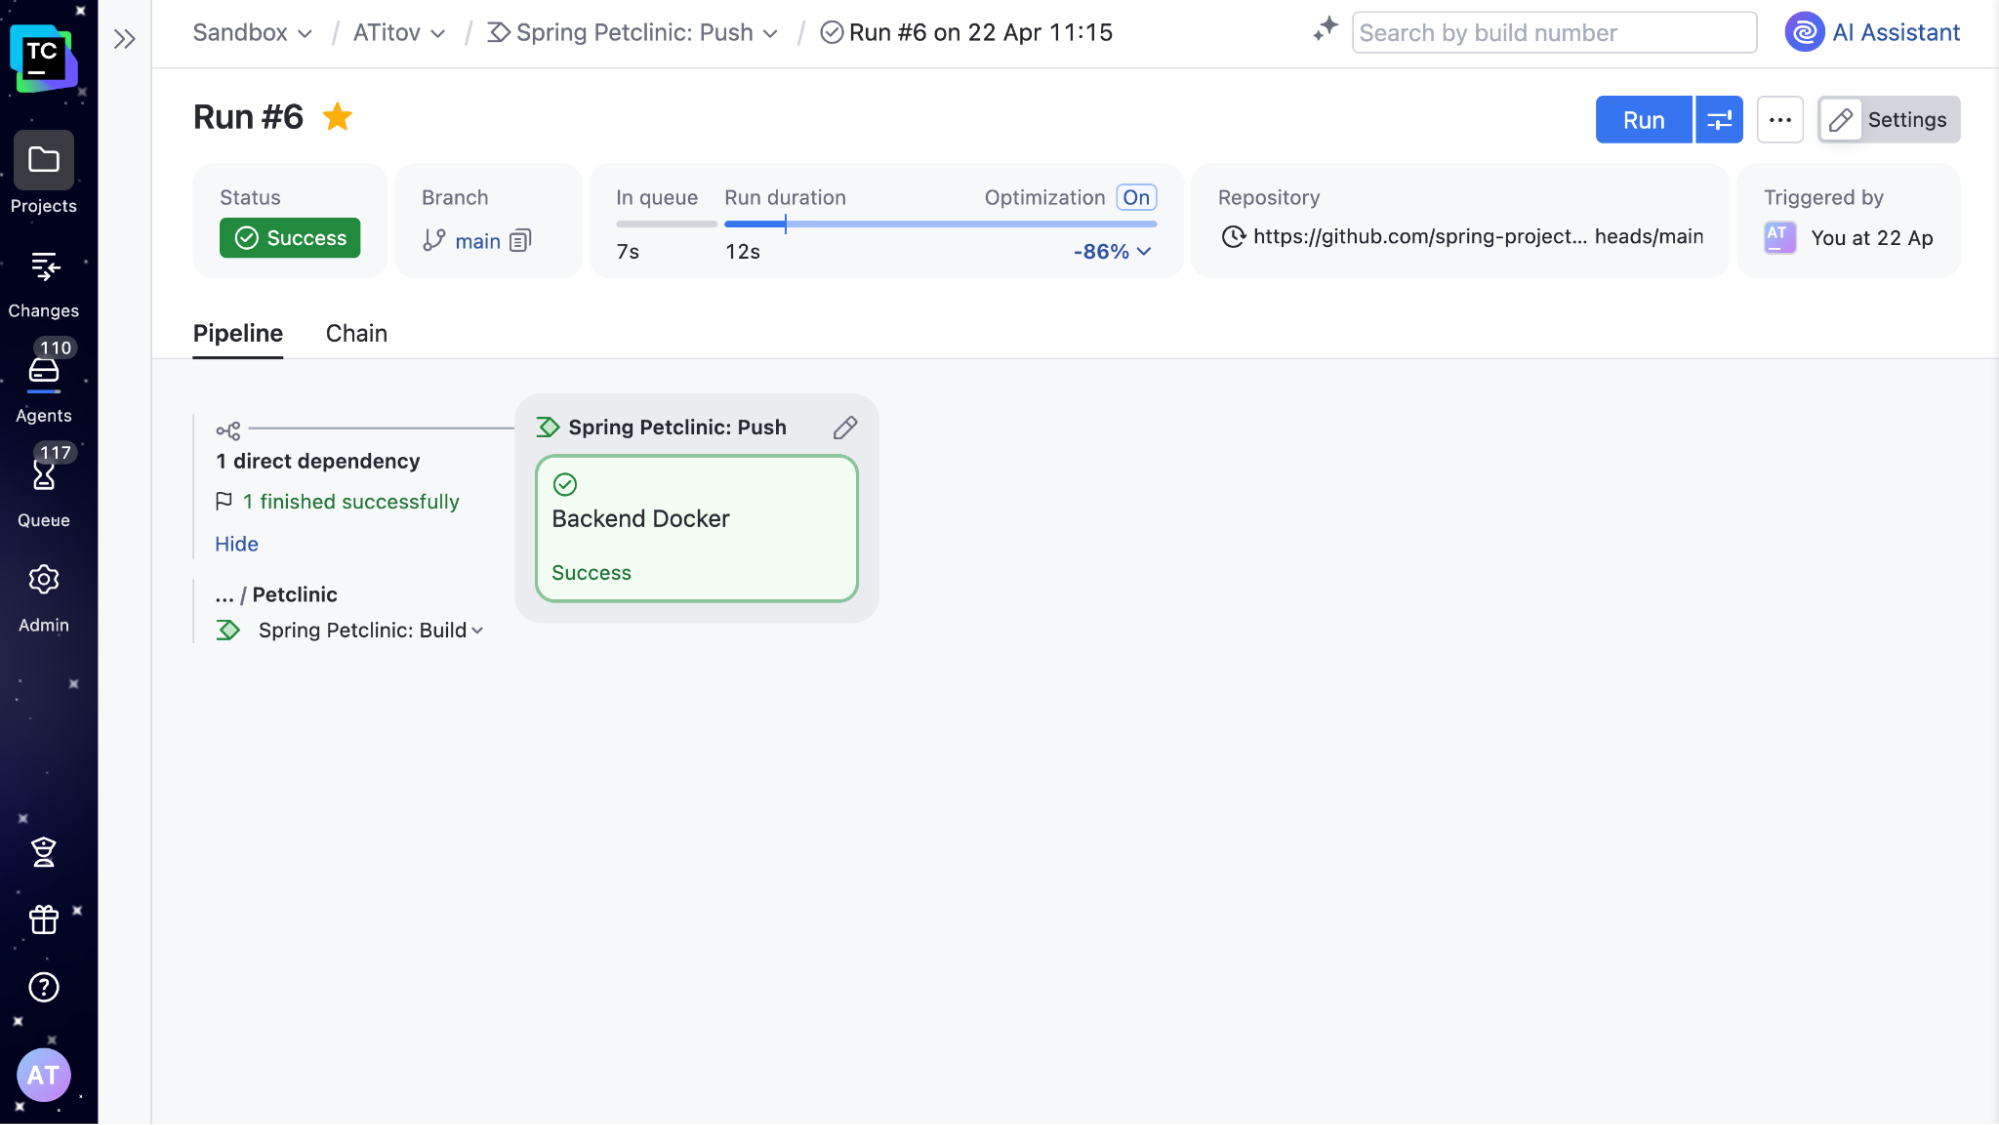
Improved Pipeline Run page
We improved the Pipeline Run page to include all familiar Build Results tabs (such as Overview, Build Log, Parameters, and more), giving you a complete overview of Pipeline execution results.
It now also includes a Pipeline/job switch, so you can quickly filter these tabs by job, making Pipelines easier to inspect, debug, and troubleshoot.
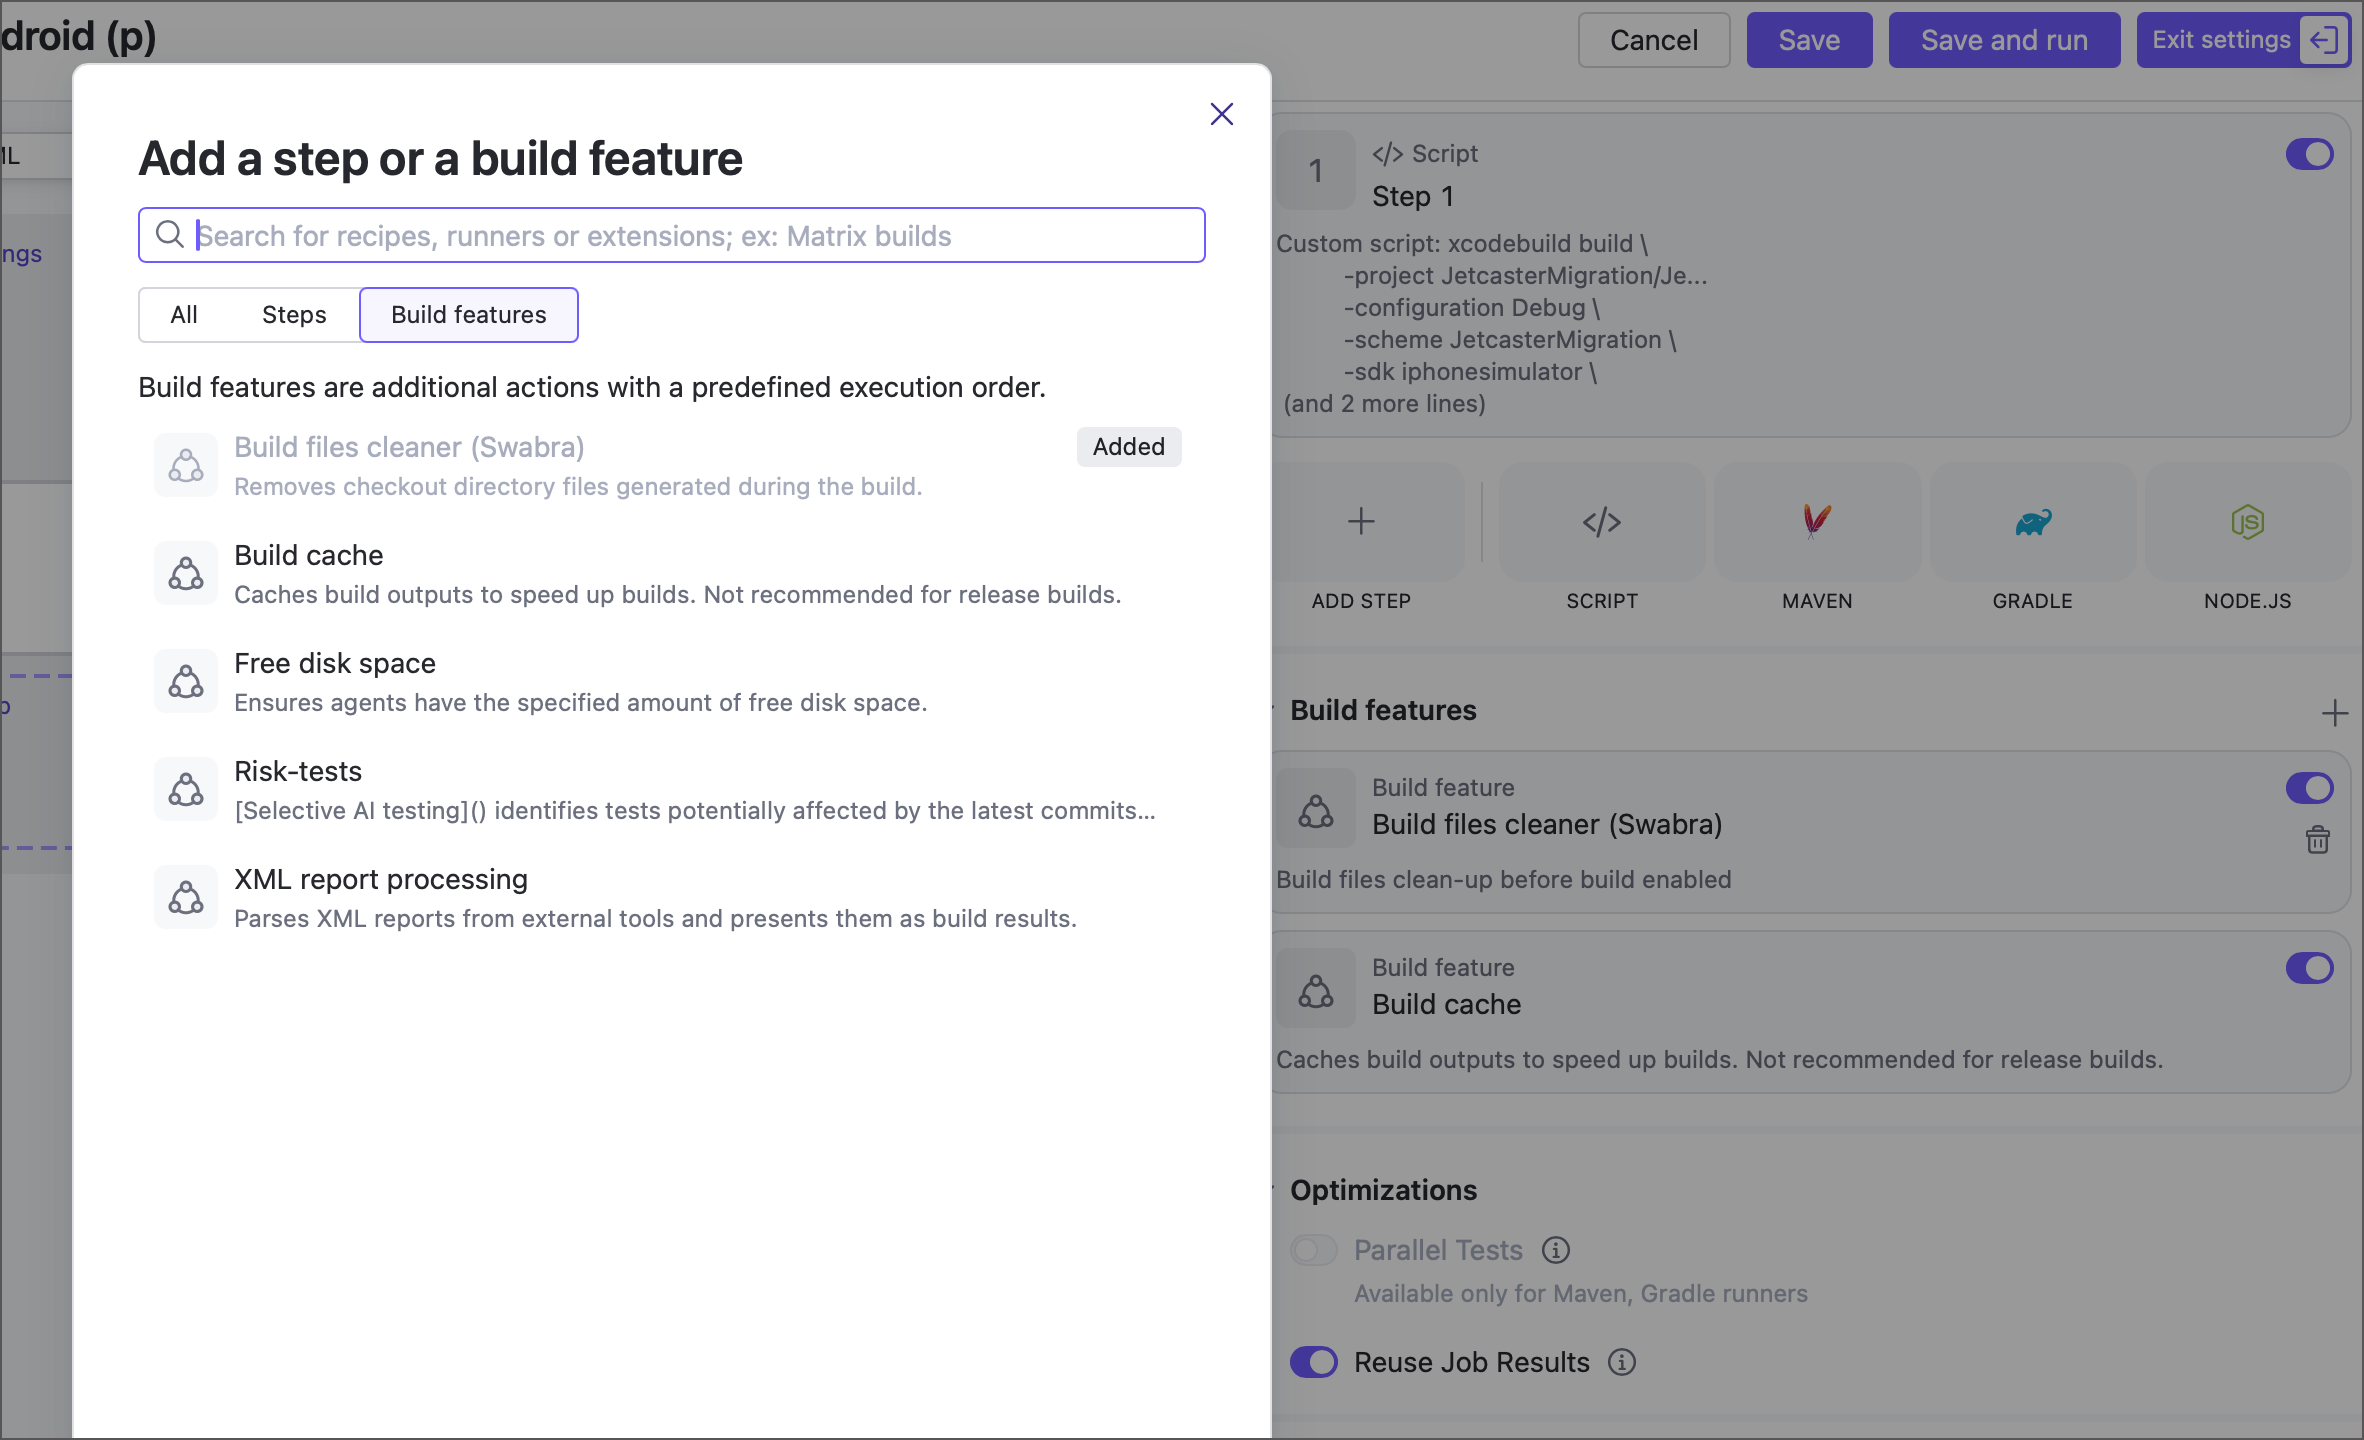
Build features are now available for jobs
Jobs can now use the following build features, previously available only for build configurations: Build files cleaner (Swabra), Build cache, Free disk space, and XML report processing.
More build features will be available soon. Contact us if you’re looking for something specific, and we’ll let you know if it’s already possible to enable it with a feature toggle.
Pipeline upstream dependencies and combining Pipelines with build chains
Since 2026.1, it is now possible to define upstream dependencies for a Pipeline. This allows you to decompose a single large Pipeline into smaller parts, simplifying maintenance, improving access management, and enabling you to combine several separate Pipelines into a unified workflow.
For instance, if you have separate Pipelines for microservices, upstream dependencies make it very convenient to set up a deployment Pipeline that deploys them all at the same time.
If you already have build configurations set up in your TeamCity, there is no need to rewrite them as Pipelines to take advantage of this functionality. A Pipeline can now define upstream dependencies on build configurations and vice versa. This means you can include new Pipelines in existing Build Chains whenever needed.
Kotlin DSL in Pipelines
In addition to YAML, it is now possible to define Pipelines in Kotlin DSL. It’s the same powerful Kotlin DSL, allowing you to leverage the full potential of a real, strongly typed programming language. Pipelines reuse most of the patterns used in build configurations, so you won’t need to learn them from scratch.
object MyPipeline : Pipeline({
    name = "A Pipeline"
    job {
        name = "Build"
        steps {
            script {
                content = "Hello Pipeline!"
            }
        }
    }
})
You can find the full list of Pipelines improvements in our documentation. Pipelines are currently offered via the Early Access Program. Sign up here to try them for your organization.
Sign up to Pipelines EAP
SAML authentication
The SAML authentication plugin is now bundled with TeamCity. SAML (Security Assertion Markup Language) is a widely used standard for single sign-on (SSO), allowing users to authenticate once via a central identity provider and access multiple services without re-entering credentials.
With SAML support, you can integrate TeamCity with your existing identity provider to simplify user management and improve security. It is confirmed to support Okta, OneLogin, AWS SSO, AD FS, and other SSO providers.
Learn more about the SAML authentication in our documentation.
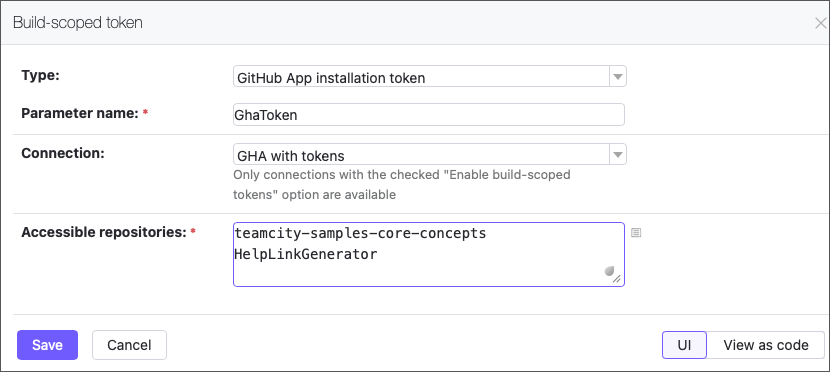
Dynamic build step credentials
The new Build-scoped token feature lets your builds securely generate short-lived GitHub access tokens (up to 60 minutes) on the fly. Pass them to build steps as parameters to enable seamless access to repositories.
Small niceties worth mentioning
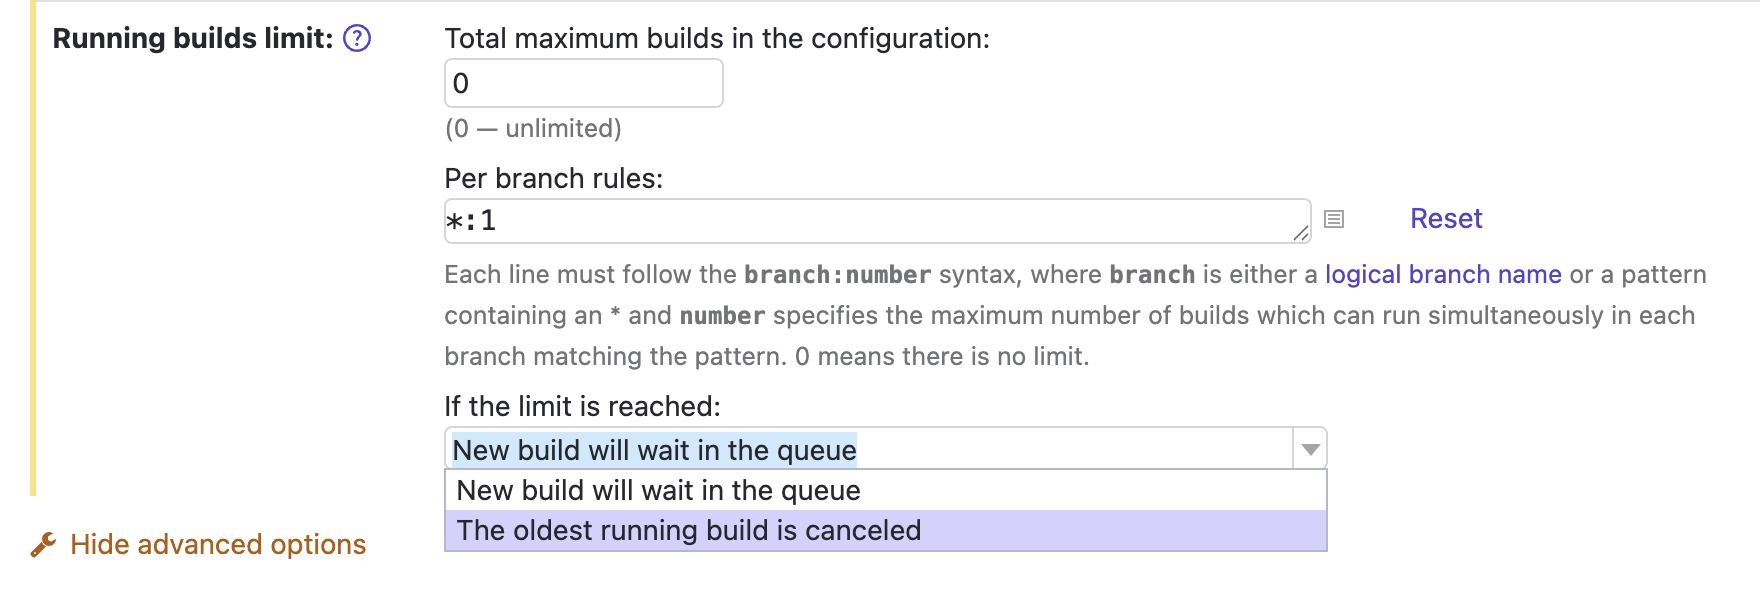
We’ve fixed quite a long-standing issue, and it is now possible to cancel the currently running build when new changes are made to the same VCS root and branch.
The corresponding setting is an extension of Running builds limit in the General build settings.
Another thing: If you know what reverse.dep.* parameters are, you may be glad that the problem detailed in this ticket has been fixed, too.
Release naming convention
We’re also changing the naming of TeamCity releases to align with other JetBrains tools. As before, we’ll have three major releases per year and several bug fixes after each release. The new naming format is YYYY.1, YYYY.2, YYYY.3.
Did you know? C# supports ref return and ref local, which let you return and work with references to variables instead of copies of their values.
Welcome to dotInsights by JetBrains! This newsletter is the home for recent .NET and software development related information.
🔗 Links
Here’s the latest from the developer community.
Stop Writing Specs. Let AI Interrogate You Instead 🎥 – Gui Ferreira
Speed Up Your AI Development Workflow by 2x 🎥 – Nick Chapsas
Testable Code Doesn’t Mean “Interfaces Everywhere” 🎥 – CodeOpinion by Derek Comartin
2code ^ !2code [S2026E06] Inspector Roslyn is a CLI tool 🎥 – FlashOWare by Stefan Pölz and Eva Ditzelmüller
Building an Instagram-Style Like Animation in .NET MAUI – Leomaris Reyes
Removing byte[] allocations in .NET Framework using ReadOnlySpan<T> – Andrew Lock
Source code generated string enums with exhaustion support – Steven Giesel
How to Delete and Update Millions of Rows in EF Core Without Loading a Single Entity – Chris Woodruff
The Cookie Apocalypse Already Happened – Khalid Abuhakmeh
Does Code Quality Still Matter in the Age of AI-Assisted Coding? – Mark Heath
URL Pattern Matching in .NET – Gérald Barré
Build QR Codes in .NET FAST with ElBruno.QRCodeGenerator – Bruno Capuano
Why your Entity Framework Core app needs query filters – David Grace
What Your .NET Exceptions Are Telling Attackers (And How to Stop It) – Adrian Bailador
Extracting Structured Table Data from DOCX Word Documents in C# .NET with Domain-Aware Table Detection – Bjoern Meyer
String Performance: Avoid Unnecessary Conversions with StringBuilder – David McCarter
“I started to lose my ability to code”: Developers grapple with the real cost of AI programming tools – David Cassel
Explore union types in C# 15 – Bill Wagner
The Toolkit Pattern – Andrew Stellman
Systems Thinking – Rocky Lhotka
Getting Started with the .NET MAUI Speech-to-Text Button Control – Héctor Pérez
Mastering ASP.NET Core Rate Limiting: From Basic Throttling to Distributed Token Buckets – Sudhir Mangla
Agent Skills in .NET: Three Ways to Author, One Provider to Run Them – Sergey Menshykh
LLM Chat in .NET with IChatClient: The Complete Guide – Patrick Smacchia
Microsoft Agent Framework–Building a multi-agent workflow with DevUI in .NET – Bart Wullems
EF Core query translation: Why does some LINQ never become SQL? – Ali Hamza Ansari
Comprehension Debt: The Hidden Cost of AI-Generated Code – Addy Osmani
How to Implement Command Pattern in C#: Step-by-Step Guide – Nick Cosentino
☕ Coffee Break
Take a break to catch some fun social posts.
🗞️ JetBrains News
What’s going on at JetBrains? Check it out here:
⛓️💥 Breaking AI vendor lock-in in Visual Studio ⛓️💥
ReSharper 2026.2 EAP 1 introduces Junie, JetBrains’ LLM-agnostic AI coding agent, as the first step toward a more open AI ecosystem in Visual Studio. More about that here.
Webinar – OSS Power-Ups: XenoAtom.Terminal.UI
Profile .NET Apps Without Restarting: Monitoring Comes to ReSharper
Qodana 2026.1 release brings two important linter updates and a new set of inspections designed to help you catch more issues earlier in development. In this release, Qodana for C/C++ moves out of EAP, Qodana for Rust becomes available in EAP, and several new inspections add protection against subtle bugs in Kotlin, Python, and C#.
If you’re new to Qodana, you can learn more about Qodana in our previous posts.
Qodana for C/C++ is out of EAP
Qodana for C/C++ is now generally available, enhancing its readiness for production use in native code development. We introduced support for C/C++ projects back in 2025.1, and since then, the linter has been expanded and refined based on your feedback. It’s now ready for production use in native code development.
Thank you to everyone who tried qodana-cpp during its EAP! Here are some of the changes we’ve made based on your feedback:
Qodana now properly detects build system failures, including for CMake and others, and helps you diagnose issues.
For large projects, Qodana now features configurable timeouts via qd.cpp.startup.timeout.minutes:
Cached build configurations in the .idea folder are simply ignored. We still advise cleaning cached files before running an analysis and closing any local IDE instances to avoid access conflicts with the .idea folder.
For more details, check out the C/C++ documentation and our previous post on the linter.
Qodana For C++ Info
The Qodana for Rust EAP is now open
With Qodana 2026.1, we’re launching the Early Access Program for Qodana for Rust. Adoption of Rust has grown significantly, with over 2.5 million developers using it in the last year. According to Stack Overflow, Rust has been the #1 most admired language for the past 10 years straight. And, there is strong demand from Rust teams working on infrastructure and performance-sensitive systems for safeguards.
With this release, we aim to simplify the integration of static analysis into Rust workflows, supporting Rust’s growing use in infrastructure and performance-sensitive applications. We’re bringing you:
Over 150 inspections, including for dead code, lifetime issues, unsafe code, and more, as well as built-in cargo check and cargo clippy inspections.
Conditional compilation, feature gating, and proc macro handling.
Configurable Rust toolchain via rustup in the bootstrap block.
Native support for multiple workspaces.
Your team can begin exploring automated inspections for Rust projects in CI and provide feedback as the linter develops. The current list of Rust inspections is available on Inspectopedia.
Qodana For Rust Info
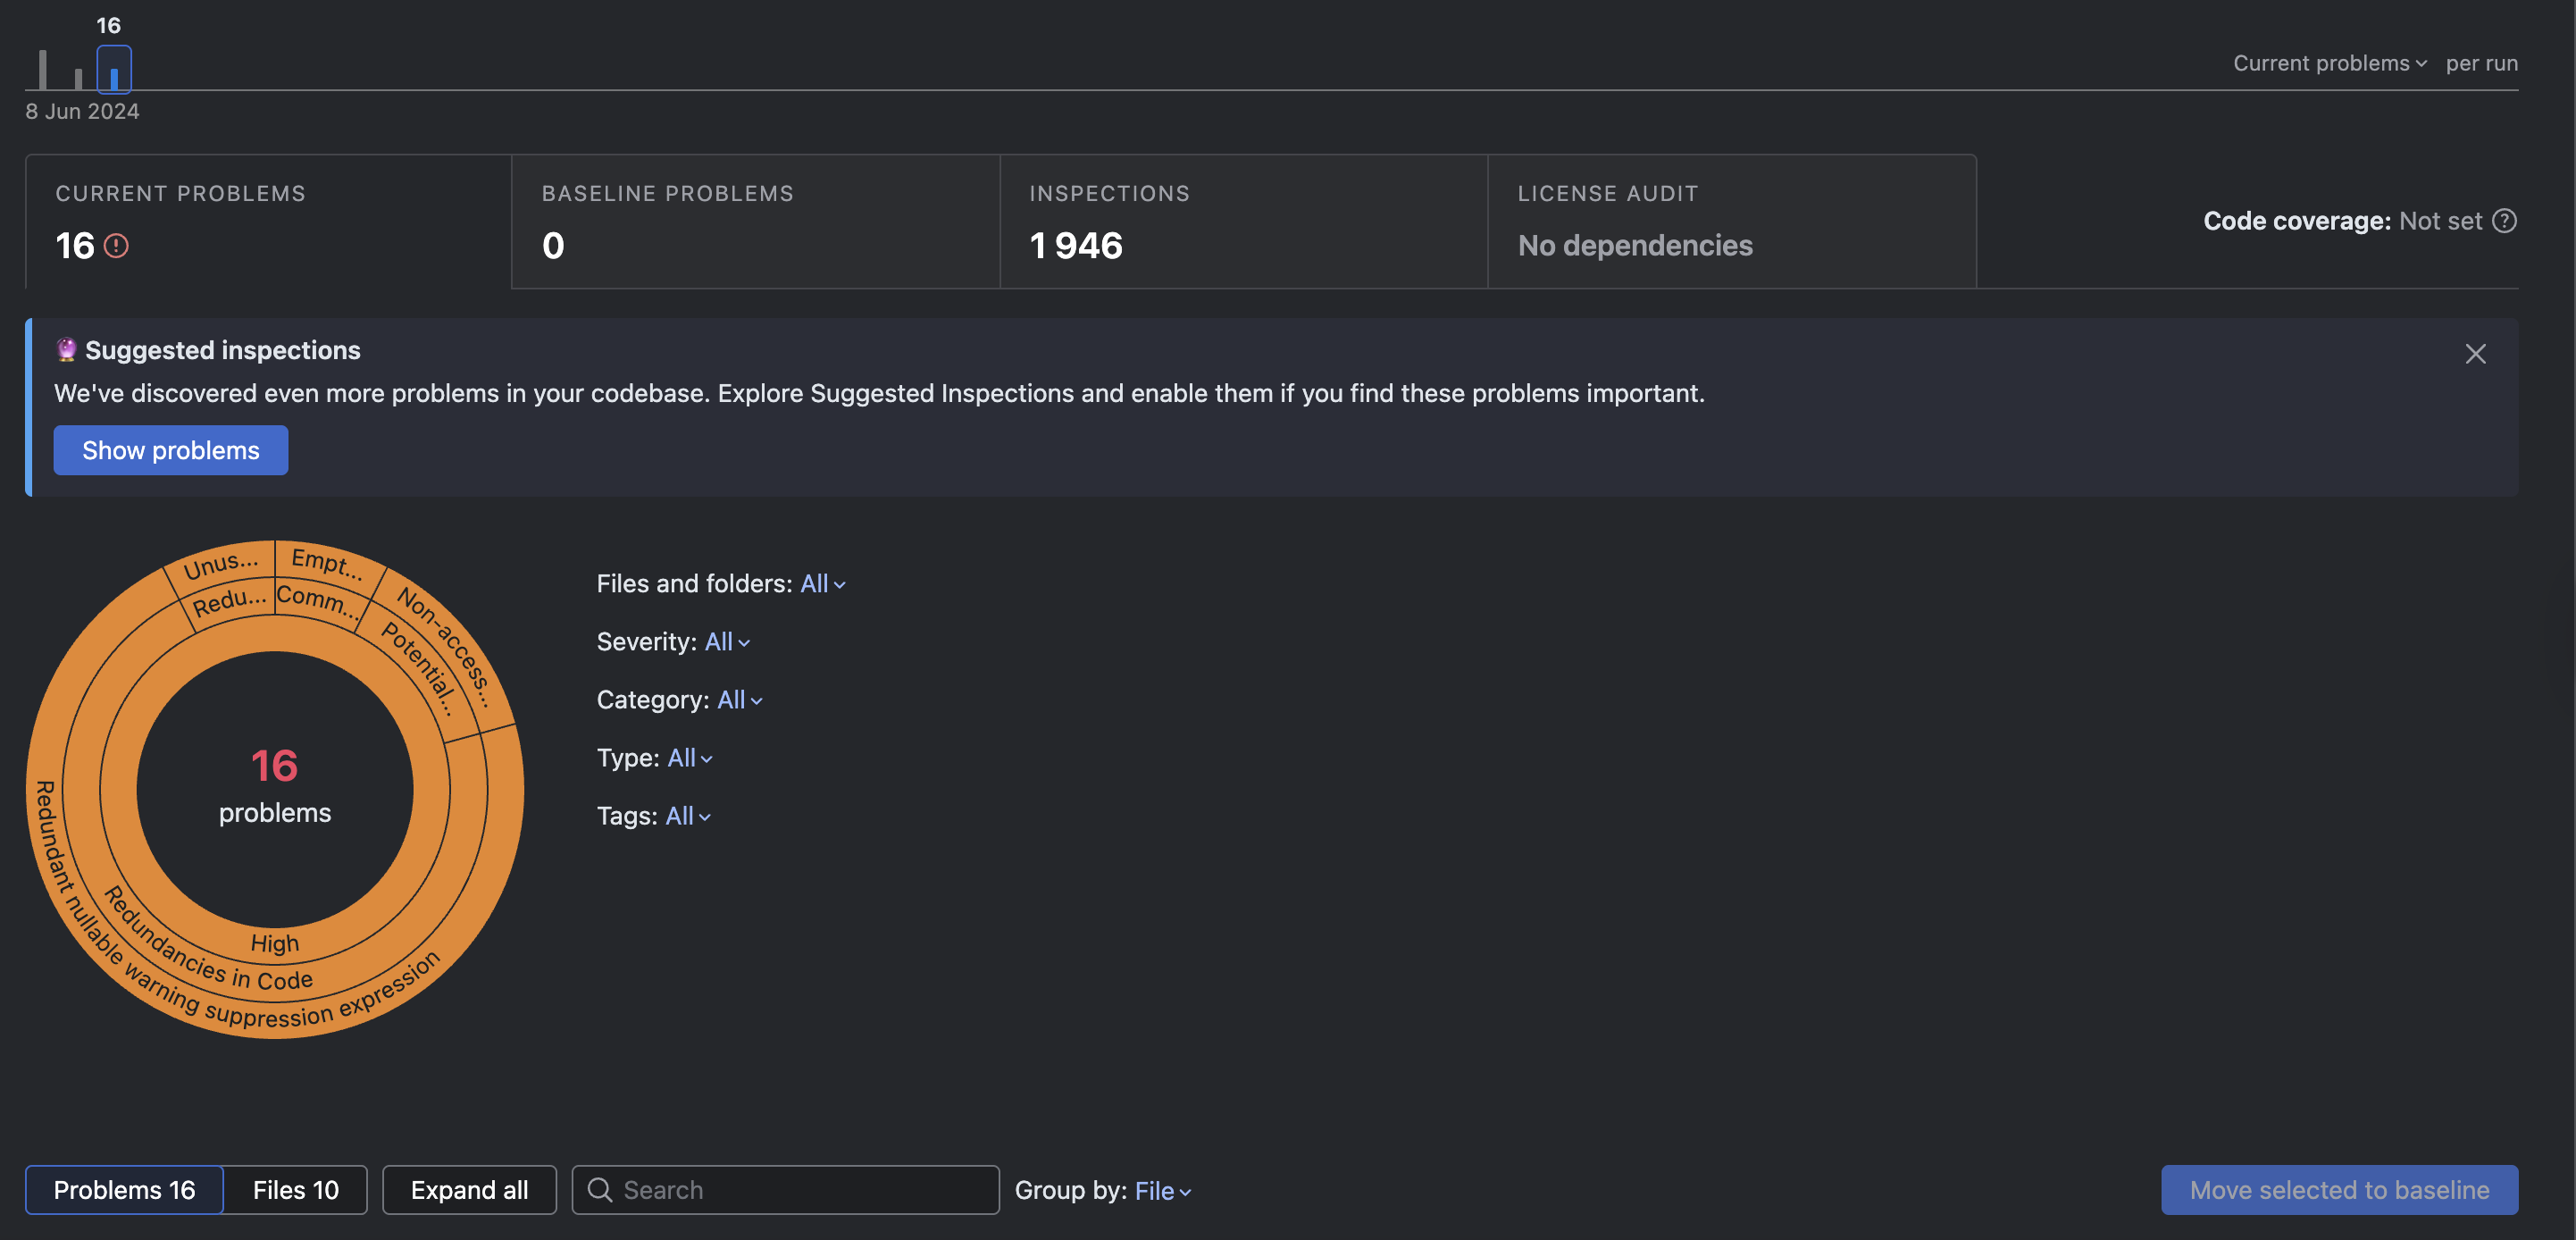
New inspections in 2026.1
This release also adds new inspections for multiple ecosystems to help catch issues that can cause confusing behavior in production but that are easy to miss in the code review phase.
Kotlin: Suspicious ::javaClass callable reference
This inspection reports suspicious uses of the kotlin.jvm.javaClass extension as a callable reference.
Using ::javaClass syntax does not result in a Class<T> instance, as may be expected. Instead, it creates a property reference of type KProperty0<Class<T>>, which is almost never the intended behavior and can lead to hard-to-detect bugs.
fun test(a: String) {
    val classRef = a::javaClass // KProperty0<Class<String>>
    println(classRef) // Prints "property javaClass", not "class java.lang.String"
}
Python: Suspicious boolean condition
This inspection reports coroutines used in boolean contexts such as if, while, or ternary expressions, even in the absence of the await keyword.
A coroutine object itself is always truthy, so using it directly in a condition will evaluate as True even when that is not the intended logic. The actual result only becomes available after await. In practice, this inspection helps prevent async code from silently behaving incorrectly because a coroutine was checked instead of executed.
async def main():
    if await check():  # Correctly awaits the coroutine
        print("hi")
C#: Short-lived HttpClient
This inspection reports short-lived uses of HttpClient. Frequently creating new HttpClient instances can lead to socket exhaustion and unnecessary resource pressure. In most cases, it is better to use IHttpClientFactory or a long-lived shared HttpClient instance.
This is the kind of issue that may not show up immediately during development, but can become a reliability problem under real traffic.
public class C
{
    static async Task<string> GetDataAsync(string url)
    {
        var client = new HttpClient() { Timeout = TimeSpan.FromMinutes(10) }; // Better to move in property
        var response = await client.GetAsync(url);
        response.EnsureSuccessStatusCode();
        return await response.Content.ReadAsStringAsync();
    }
}
Coming soon…
Code quality and security support for Laravel
Project-specific code quality rules
Additions to Insights like code provenance tracking
What’s next for you?
If you’re already using the latest release, you’re ready to start using the improvements in Qodana 2026.1 right away. If not, update to 2026.1 to try the stable C/C++ linter, participate in the Rust EAP, and start benefiting from the new inspections for Kotlin, Python, and C#.
For setup details and feature-specific guidance, head over to the documentation. If you’d like to see what Qodana can do in your own environment, try it on your project and explore the latest updates on the Qodana blog.