Understanding known_hosts and Host Key Verification: What It Protects Against and How TOFU Works

That “authenticity of host can’t be established” message isn’t just noise. Here’s what’s actually happening — and why blindly typing “yes” is a security mistake.

Every developer has seen this:

The authenticity of host 'example.com (203.0.113.1)' can't be established.
ED25519 key fingerprint is SHA256:abc123xyz...
Are you sure you want to continue connecting (yes/no/[fingerprint])?

Almost everyone types yes without reading it. Then they move on.

This message is SSH trying to protect you from one of the most dangerous attacks in network security: the man-in-the-middle attack. Understanding what’s happening here — and what the ~/.ssh/known_hosts file actually does — will change how you think about every SSH connection you make.

The Problem SSH Is Solving

When you connect to ssh user@example.com, how do you know you’re actually talking to example.com?

You can’t rely on the IP address — IP addresses can be spoofed or rerouted. You can’t rely on DNS — DNS can be poisoned. You can’t rely on the network path — traffic can be intercepted at any point between you and the server.

Without verification, an attacker positioned between you and the server could intercept the connection, pose as the server, decrypt everything you send, re-encrypt it, and forward it along. You’d type your password or authenticate with your key and never know the attacker saw every keystroke.

This is a man-in-the-middle (MITM) attack. It’s not theoretical. It happens on compromised networks, corporate proxies, malicious Wi-Fi hotspots, and misconfigured infrastructure.

SSH’s defense is host key verification. Every SSH server has a unique cryptographic identity — its host key. Before you exchange any sensitive data, the server proves it holds the private key corresponding to a public key you’ve previously verified. If the keys don’t match, SSH warns you — loudly.

What a Host Key Actually Is

When OpenSSH is installed on a server, it automatically generates a set of host key pairs. These live in /etc/ssh/:

ls /etc/ssh/ssh_host_*
/etc/ssh/ssh_host_ed25519_key       # Private key (600 permissions, root only)
/etc/ssh/ssh_host_ed25519_key.pub   # Public key (shared with clients)
/etc/ssh/ssh_host_rsa_key
/etc/ssh/ssh_host_rsa_key.pub
/etc/ssh/ssh_host_ecdsa_key
/etc/ssh/ssh_host_ecdsa_key.pub

The private key never leaves the server. The public key is what the server presents during the SSH handshake.

When you connect for the first time, the server presents its public key. SSH calculates a fingerprint of that key and shows it to you — that’s the SHA256:abc123xyz... in the prompt. If you confirm, SSH stores the public key in your ~/.ssh/known_hosts file. On every future connection, SSH checks that the server presents the same key. If it doesn’t, SSH refuses to connect and shows a stern warning.

Trust On First Use (TOFU)

The model SSH uses is called Trust On First Use, or TOFU.

The logic:

  1. First connection: no existing record. SSH shows you the fingerprint and asks you to verify it.
  2. You confirm (type yes). The key is stored as trusted.
  3. All future connections: SSH silently verifies the key matches. If it does, you connect. If it doesn’t, you get a warning.

TOFU is a pragmatic compromise. The theoretically correct approach would be to verify the server’s fingerprint through a separate, trusted channel every single time — checking it against a known-good record before accepting the connection. In practice, almost no one does this for every server.

TOFU’s weakness is that first connection. If an attacker intercepts your very first SSH connection to a server, you might accept their key and never know. After that point, the attacker is locked out (the wrong key is now stored) but they’ve already seen your first session.

For this reason, the first connection to a sensitive server should ideally involve fingerprint verification through an out-of-band channel — the cloud provider’s console, a configuration management tool, or a colleague who can confirm the key directly on the server.

How to Verify a Fingerprint Before Connecting

On the server (accessed through another channel — the cloud console, serial port, etc.):

ssh-keygen -l -f /etc/ssh/ssh_host_ed25519_key.pub
256 SHA256:abc123xyz... root@server (ED25519)

Compare this fingerprint to what SSH showed you during the first connection prompt. If they match, the connection is genuine.

Anatomy of ~/.ssh/known_hosts

The known_hosts file is a simple text database. Each line represents a trusted server:

example.com,203.0.113.1 ssh-ed25519 AAAA...base64encodedkey...
|1|hashedhostname= ssh-ed25519 AAAA...base64encodedkey...

Fields:

  1. Hostnames/IPs: A comma-separated list of names and addresses that identify this server. Can be a plain hostname, an IP, or both.
  2. Key type: ssh-ed25519, ecdsa-sha2-nistp256, ssh-rsa, etc.
  3. Public key: Base64-encoded public key.

Hashed vs. Plain Hostnames

Notice the second line above starts with |1| — that’s a hashed hostname. Many systems hash known_hosts entries by default (controlled by HashKnownHosts yes in ~/.ssh/config or the system config).

Hashing means that if someone gets read access to your known_hosts file, they can’t easily see which servers you connect to. The hash is a one-way function of the hostname — SSH can check if a hostname matches, but an attacker can’t reverse-engineer the hostname list.

Whether to use hashing is a privacy/convenience trade-off:

  • Hashed: More private, but you can’t grep for a hostname to check if it’s stored
  • Plain: Easier to manage manually, readable by any text editor

For most users, either is fine. Hashed is slightly better practice.

Checking a Known Host Manually

# Check if a specific host is in known_hosts
ssh-keygen -F example.com

# With hashed hosts (searches by computing the hash)
ssh-keygen -F 203.0.113.1

The Warning You Should Never Ignore

@@@@@@@@@@@@@@@@@@@@@@@@@@@@@@@@@@@@@@@@@@@@@@@@@@@@@@@@@@@
@    WARNING: REMOTE HOST IDENTIFICATION HAS CHANGED!     @
@@@@@@@@@@@@@@@@@@@@@@@@@@@@@@@@@@@@@@@@@@@@@@@@@@@@@@@@@@@
IT IS POSSIBLE THAT SOMEONE IS DOING SOMETHING NASTY!
Someone could be eavesdropping on you right now (man-in-the-middle attack)!
It is also possible that a host key was just changed.

This message means the key presented by the server doesn’t match the one stored in known_hosts. SSH refuses to connect.

Two explanations — one benign, one dangerous:

Benign: The server was rebuilt, migrated to a new IP, the OS was reinstalled, or an admin regenerated the host keys. The server is legitimate but its key genuinely changed.

Dangerous: Someone is intercepting your connection and presenting their own key — a man-in-the-middle attack.

What to do:

  1. Don’t just clear the entry and reconnect. Investigate first.
  2. Verify through an out-of-band channel — the cloud provider console, a colleague, or direct physical/serial access.
  3. On the server, check the current key fingerprint: ssh-keygen -l -f /etc/ssh/ssh_host_ed25519_key.pub
  4. If the key genuinely changed for a legitimate reason, update your known_hosts.
  5. If you can’t confirm it’s legitimate, don’t connect.

Removing a Stale Entry

If you’ve verified the key change is legitimate:

ssh-keygen -R example.com
ssh-keygen -R 203.0.113.1  # Also remove by IP if both were stored

Then reconnect. SSH will present the new key and ask you to confirm.

Common Scenarios and How to Handle Them

Scenario 1: Newly Provisioned Cloud Server

You spin up a new EC2 instance. You want to SSH in. Best practice:

  1. Get the fingerprint from the AWS console under EC2 → Instance → Actions → Monitor and troubleshoot → Get system log (the host key fingerprints are printed on first boot)
  2. Or use EC2 Instance Connect through the browser to get to the console, then run ssh-keygen -l -f /etc/ssh/ssh_host_ed25519_key.pub
  3. Compare against what SSH shows you on first connection

Takes 60 extra seconds. Closes the TOFU window completely.

Scenario 2: Server Rebuilt With Same IP

Old key is in known_hosts. New server, new key. SSH screams at you.

ssh-keygen -R the-server-ip

Reconnect, verify the new fingerprint if sensitive, proceed.

Scenario 3: Ephemeral Infrastructure (Containers, Auto-Scaling)

You’re SSHing into containers or ephemeral VMs that share an IP but have different keys each time. Standard known_hosts checking breaks here.

For truly ephemeral infrastructure:

Host container-dev
    HostName 10.0.0.5
    StrictHostKeyChecking no
    UserKnownHostsFile /dev/null

StrictHostKeyChecking no skips the prompt. UserKnownHostsFile /dev/null prevents any key from being stored. This is acceptable for ephemeral local dev environments — not for anything production or sensitive.

A better solution for ephemeral production infrastructure is SSH certificates, where the CA’s public key is trusted rather than individual host keys. The host presents a signed certificate; the client trusts anything signed by the CA.

Scenario 4: Automating SSH in Scripts

Scripts that run ssh non-interactively will hang on the first-connection prompt.

The right approach: pre-populate known_hosts before the script runs.

# Add a host key to known_hosts programmatically
ssh-keyscan -H example.com >> ~/.ssh/known_hosts

ssh-keyscan fetches the host’s public key without connecting. The -H flag hashes the hostname.

Important: ssh-keyscan alone doesn’t verify authenticity — it just retrieves whatever key the server presents. It’s vulnerable to MITM if used on an untrusted network. For maximum security, compare the retrieved key against a known-good fingerprint before adding it.

For CI/CD pipelines, a common pattern is to pre-populate known_hosts during pipeline setup with known, verified fingerprints from a trusted source (your infrastructure code, a Vault secret, etc.) rather than using ssh-keyscan blindly.

Managing known_hosts at Team Scale

Individual known_hosts management is fine for personal use. For teams, it creates inconsistency — different engineers have different records, first connections happen under different network conditions, and there’s no central source of truth.

Option 1: Distribute a Shared known_hosts File

Maintain a team known_hosts file in your infrastructure repository. Engineers include it via ~/.ssh/config:

GlobalKnownHostsFile /etc/ssh/ssh_known_hosts ~/.ssh/known_hosts

Or configure system-wide:

# /etc/ssh/ssh_config
GlobalKnownHostsFile /etc/ssh/ssh_known_hosts

The team file lives at /etc/ssh/ssh_known_hosts and is managed by configuration management (Ansible, Puppet, Chef).

Option 2: SSH Certificates (The Proper Solution)

With SSH certificate authorities, you configure every server to trust the CA’s public key:

# /etc/ssh/sshd_config
TrustedUserCAKeys /etc/ssh/trusted_ca.pub

And every client to trust host certificates signed by the CA:

# ~/.ssh/known_hosts
@cert-authority *.example.com ssh-ed25519 AAAA...ca-public-key...

Now instead of tracking individual host keys, you trust the CA. Servers present CA-signed host certificates. The TOFU problem goes away entirely — you verify the CA once, and all future connections are verified cryptographically.

This is how large organizations solve the known_hosts problem at scale.

Security Configuration Reference

Key settings in ~/.ssh/config related to host verification:

# Never skip host key checking (this is the default — keep it)
StrictHostKeyChecking yes

# Accept new host keys automatically, but warn if they change
# (A reasonable middle ground for non-sensitive environments)
StrictHostKeyChecking accept-new

# Hash stored hostnames (privacy)
HashKnownHosts yes

# Use a separate known_hosts for untrusted/ephemeral hosts
Host dev-ephemeral
    StrictHostKeyChecking no
    UserKnownHostsFile ~/.ssh/known_hosts_ephemeral

StrictHostKeyChecking values:

Value Behavior Use When
yes Reject unknown hosts. Require manual verification. Production, sensitive systems
accept-new Accept and store new keys. Reject changed keys. Internal dev infrastructure
no Accept any key. Never warn. Ephemeral local-only containers

accept-new is the pragmatic middle ground for most teams — you still get protection against key changes (the dangerous case) while avoiding the friction of manually confirming every new host.

The Five-Minute Audit

Right now, open your known_hosts file:

cat ~/.ssh/known_hosts | wc -l   # How many entries?
ssh-keygen -F example.com         # Is a specific host stored?

Consider:

  • Are there entries for servers that no longer exist?
  • Are there entries for IP addresses you don’t recognize?
  • Are hostnames hashed or plain text?

Clean up stale entries with ssh-keygen -R hostname. It’s low-effort hygiene with real security value.

The Bottom Line

The known_hosts file and host key verification are SSH’s defense against impersonation. TOFU is an imperfect but practical trust model — its weakness is the first connection, its strength is that every connection after that is cryptographically verified.

Three habits make all the difference:

  1. Verify fingerprints on first connection to sensitive servers through an out-of-band channel
  2. Investigate host key change warnings rather than clearing the entry and proceeding
  3. Use accept-new as your default StrictHostKeyChecking value unless you need stricter controls

That warning message isn’t noise. It’s SSH doing its job. Learn to read it, and you’ll catch the attacks it’s designed to surface.

Follow for more practical SSH and infrastructure security content.

AI Agents Are Great at 80% of Our Code. The Other 20% Is Why We Still Need Seniors.

We let AI agents loose on a payment platform. They crushed the boring stuff. Then they silently broke the stuff that matters.

A survey came out last week. 54% of all code is now AI-generated. Up from 28% last year.

I read that number and thought: yeah, that tracks. We’re probably in that range too.

But here’s the thing nobody’s asking — which 54%?

Not all code carries equal weight. A CRUD endpoint for fetching merchant details? Low risk. The webhook handler that transitions a payment from pending to complete? That’s someone’s rent. Someone’s payroll. Get that wrong and money moves where it shouldn’t, or worse, money doesn’t move at all.

I’m the CTO of a payment platform. FCA-authorised, processing real money, real merchants, real consequences. We run NestJS microservices, Docker, Traefik — the usual stack. And we’ve been using AI agents aggressively for over a year now.

I’m not here to tell you AI is dangerous. It’s not.

I’m here to tell you it’s dangerous when you forget what it’s actually good at.

The 80% Where AI Agents Are Genuinely Brilliant

Let me give credit where it’s due. AI agents have made our team faster in ways that would have seemed absurd two years ago.

API scaffolding. Generating service boilerplate. Writing Zod validation schemas. Spinning up new endpoints. Creating test stubs. Refactoring imports. Migrating patterns across repos.

We run multiple microservices. When we need a new service, an agent can scaffold the entire thing — module structure, base configuration, Docker setup, Traefik labels — in minutes. What used to be a half-day of copy-paste-and-tweak is now a conversation.

When we overhauled our env management across all repos, AI agents did the grunt work. They mapped every .env file, found naming conflicts, identified common variables, and generated a unified Zod schema. What would have taken a team days of grep-and-spreadsheet work took hours.

For this 80% of the codebase — the predictable, pattern-following, structurally repetitive code — AI agents are the best junior developers money can buy. Tireless. Cheap. No ego. Almost never make a mistake on the stuff they’re good at.

An army of juniors sitting at your terminal.

Then You Hit the Other 20%

Here’s where it gets interesting.

We had an agent build out a webhook handler. Webhooks in payments are critical — they’re how you know a payment succeeded, failed, or needs attention. The agent wrote the handler. It looked clean. Tests passed.

But it silently ignored the edge cases.

Status transitions have rules. A payment can go from pending to complete. It cannot go from complete back to pending. When a human developer builds this, they think about the illegal transitions because they’ve seen what happens when money moves backwards. They build the guard because they’ve felt the pain of not having it.

The agent didn’t care about that. It built the happy path beautifully and treated the edge cases like they didn’t exist.

When we do this work manually, this type of error never happens. A senior developer who has worked in payments for years doesn’t forget the impossible transitions. It’s not in their code — it’s in their bones.

The Pattern I Keep Seeing

This isn’t a one-off. After months of working with AI agents on a regulated payment stack, one pattern is consistent:

AI agents optimise for completion, not correctness.

They want to finish the feature. Get to the green checkmark. And to get there efficiently, they take shortcuts that look reasonable on the surface.

The agent builds what should happen. It rarely builds what should not happen. In payments, the negative cases are where all the real risk lives. What happens when a webhook arrives twice? What happens when a refund is requested on an already-refunded transaction? What happens when the bank returns an unexpected status code? The agent doesn’t think about any of that unless you explicitly tell it to.

Then there’s the reusability problem. We have shared utility packages. Helper functions. Common patterns that the team has standardised on over years. The agent doesn’t care. It writes its own version from scratch. It works, but now you have two implementations of the same logic — one tested and trusted in production, one freshly generated and untested. The agent is focused on completing this feature, not maintaining the architecture.

And the subtlest one — agents seem to optimise for fewer back-and-forth turns. It looks like they’re saving cost, saving context. Complex validation? Skip it, the basic case works. Error handling for a rare edge case? Not worth the tokens. The result is code that passes every test you wrote but fails on the scenarios you didn’t think to test — because those are exactly the scenarios the agent also didn’t think about.

Juniors Don’t Ship Products. They Write Code.

Here’s the frame that made this click for me.

Claude — or any coding agent — is the best junior developer money can buy. An army of juniors. Tireless, cheap, no ego, near-zero error rate on routine work.

But juniors don’t ship products. They write code.

The difference between code and a product is judgment. Knowing which transitions are illegal. Knowing that the retry logic has a specific backoff curve because you’ve been burned by what happens when it doesn’t. Knowing that the webhook handler needs idempotency because banks sometimes send the same notification three times.

That knowledge doesn’t come from training data. It comes from years of operating a system, debugging at 2am, explaining to a merchant why their settlement was delayed.

The most dangerous mistake a CTO can make in 2026 is buying AI to replace senior engineers. The right move is buying AI to enable them.

Replace your senior with AI? You get speed plus silent disasters.

Enable your senior with AI? You get an architect with an army.

What We Actually Do About It

I’m not writing this to complain about AI. I’m writing this because we’ve built a system that works, and it might help you too.

The first thing we did was make our architecture machine-readable. We extract design patterns and architecture rules into formats that agents can consume. When an agent works on our codebase, it doesn’t just see code — it sees boundaries, patterns, rules about what belongs where. Not documentation nobody reads. Lints and constraints that the agent can’t ignore.

Then we invested heavily in testing the negative cases. Every PR — human or AI — runs through the same suite. But we specifically built tests for the stuff agents skip: illegal state transitions, duplicate webhook handling, idempotency checks. If the agent silently drops a negative case, the tests catch it before it ships.

And seniors still review everything that touches money. No AI-generated payment logic ships without a senior looking at it. Not because we don’t trust AI — because we know exactly where it’s blind. The review isn’t checking syntax. It’s checking judgment. Did the agent handle the ambiguous bank status? Did it respect our existing retry logic? Did it use the shared utility or reinvent the wheel?

This problem bothered me enough that I started building Bodhi Orchard — an open-source agentic development framework. The core idea: don’t just let agents write code. Feed them the full context — architecture, design patterns, test plans, existing utilities — so they stop making the same blind-spot mistakes. Human decisions over human busywork, with guardrails that actually enforce quality.

The Real Question for 2026

The survey says 54% of code is AI-generated. I believe it.

But here’s my question: what percentage of bugs in 2026 will be AI-generated?

And more importantly — who’s going to find them?

Not the agents. They wrote the bugs in the first place. Not the juniors — they won’t know enough to spot what’s missing.

It’s going to be the seniors. The architects. The people who’ve operated these systems long enough to know where the bodies are buried.

The 80% is solved. AI won. Celebrate that.

Now invest in the humans who understand the other 20%. Because that’s where your product lives or dies.

I’m Arun, CTO & Co-Founder of Atoa — a UK open banking payment platform. I write about what it’s actually like to build fintech with AI, not what the conference slides say it’s like. If this resonated, follow me here or on X @mickyarun.

And if you’re curious about building AI-native development with proper guardrails, check out Bodhi Orchard.

Handling Localization in PCF Components: A Practical Walkthrough

When you build a PowerApps Component Framework (PCF) component that will be used across multiple geographies, need to serve labels, button captions, validation messages, and tooltips in the user’s preferred language.

PCF has a built-in answer based on .resx resource files, the same format used by .NET applications. The mechanism is elegant in production — but surprisingly tricky during local development.

This walkthrough takes you through the full setup, step by step, and then explains a problem that arises while locally debugging your PCF.

Step 1 — Create the strings folder and your first .resx file

PCF expects your localized strings to live in a folder (the conventional name is strings) inside your component directory. Each language gets its own file, named with the pattern:

<ComponentName>.<LCID>.resx

The <LCID> part is the numeric Locale ID, not the textual code (en-US, it-IT). The framework relies on this naming convention to identify which file to load for a given user. Common LCIDs:

Language LCID
English (en-US) 1033
Italian (it-IT) 1040
German (de-DE) 1031
French (fr-FR) 1036
Spanish (es-ES) 3082
Japanese (ja-JP) 1041
Chinese Simplified (zh-CN) 2052
Portuguese (pt-BR) 1046

For a component called EquipmentGrid, the structure looks like this:

EquipmentGrid/
├── ControlManifest.Input.xml
├── index.ts
└── strings/
    ├── EquipmentGrid.1033.resx
    ├── EquipmentGrid.1040.resx
    └── EquipmentGrid.1031.resx

Tip: Always include 1033.resx (English). The PCF runtime falls back to the first <resx> declared in the manifest when the user’s preferred language isn’t available, and English is the safest default.

Step 2 — Author the resource file content

A .resx file is just XML. Here’s a minimal Italian version (EquipmentGrid.1040.resx):

<?xml version="1.0" encoding="utf-8"?>
<root>
  <resheader name="resmimetype">
    <value>text/microsoft-resx</value>
  </resheader>
  <resheader name="version">
    <value>2.0</value>
  </resheader>
  <resheader name="reader">
    <value>System.Resources.ResXResourceReader, System.Windows.Forms</value>
  </resheader>
  <resheader name="writer">
    <value>System.Resources.ResXResourceWriter, System.Windows.Forms</value>
  </resheader>

  <data name="Control_DisplayName" xml:space="preserve">
    <value>Griglia Attrezzature</value>
  </data>
  <data name="Control_Description" xml:space="preserve">
    <value>Visualizza e modifica l'inventario delle attrezzature</value>
  </data>
  <data name="SaveButton_Label" xml:space="preserve">
    <value>Salva</value>
  </data>
  <data name="ValidationError_Required" xml:space="preserve">
    <value>Il campo è obbligatorio</value>
  </data>
</root>

The English counterpart (EquipmentGrid.1033.resx) has the same name keys but localized <value> content. Keys must be identical across all language files — only the values change.

Important: Do not edit .resx files by hand if you can avoid it. Visual Studio has a built-in editor; VS Code extensions like ResX Editor or ResX Viewer and Editor make the job much easier and prevent malformed XML.

Step 3 — Declare the resource files in the manifest

Two things happen in the manifest:

  1. You register every .resx file under <resources>.
  2. You replace hardcoded display strings with keys in the *-key attributes.
<?xml version="1.0" encoding="utf-8" ?>
<manifest>
  <control namespace="MyNamespace"
           constructor="EquipmentGrid"
           version="1.0.0"
           display-name-key="Control_DisplayName"
           description-key="Control_Description"
           control-type="standard">

    <data-set name="records" display-name-key="Control_DisplayName">
      <property-set name="editableColumn"
                    display-name-key="EditableColumn_DisplayName"
                    of-type="SingleLine.Text"
                    usage="bound"
                    required="true" />
    </data-set>

    <resources>
      <code path="index.ts" order="1" />
      <css path="css/style.css" order="1" />

      <resx path="strings/EquipmentGrid.1033.resx" version="1.0.0" />
      <resx path="strings/EquipmentGrid.1040.resx" version="1.0.0" />
      <resx path="strings/EquipmentGrid.1031.resx" version="1.0.0" />
    </resources>
  </control>
</manifest>

The framework resolves display-name-key="Control_DisplayName" by looking up the Control_DisplayName key in the .resx matching the current user’s language. The manifest itself contains no human-readable display text — that’s the whole point.

Step 4 — Read strings from TypeScript at runtime

For everything you render dynamically inside the component, you ask the framework for the resolved string through context.resources.getString(key):

public updateView(context: ComponentFramework.Context<IInputs>): void {
    this.context = context;

    const saveLabel = context.resources.getString("SaveButton_Label");
    const errorRequired = context.resources.getString("ValidationError_Required");

    const saveBtn = document.createElement("button");
    saveBtn.textContent = saveLabel;
    saveBtn.addEventListener("click", () => this.commitChanges());

    this.container.appendChild(saveBtn);
}

If the user’s language is Italian, getString("SaveButton_Label") returns "Salva". If it’s English, "Save". You never branch on language explicitly — the framework handles it.

Common pitfall: If a key doesn’t exist in any registered .resx, getString returns an empty string, not an error. This makes typos in keys silently produce blank UI. Always double-check that every key referenced in your code exists in every language file.

You can also inspect the current user’s language at runtime if you need to format dates, numbers, or apply locale-aware logic of your own:

const userLcid = context.userSettings.languageId;
const dateFormatting = context.userSettings.dateFormattingInfo;

Step 5 (optional) – Build an helper class

This step is optional, but I tend to use it in my PCFs. I don’t like to move around my react components the context.resources object and address the translated strings via “magic strings” in the code, so I prefer to:

  • Create an index.ts file in the strings folder, with a content similar to the following:
export interface IStrings {
    Loading: string;
    NoData: string;
    LoadMore: string;
    /* ...and the other localized strings...*/
}

export function getStrings(resources: ComponentFramework.Resources): IStrings {
  return {
    Loading: resources.getString('Loading'),
    NoData: resources.getString('NoData'),
    LoadMore: resources.getString('LoadMore'),
    /* ...and the other localized strings...*/
  };
}
  • initialize it in the main index.ts
export class EquipmentGridimplements ComponentFramework.ReactControl<IInputs, IOutputs> {
  /* pre-existing code */
  private strings: IStrings;

  public init(context: ComponentFramework.Context<IInputs>, notifyOutputChanged: () => void, state: ComponentFramework.Dictionary): void {
    /* pre-existing code */
    this.strings = getStrings(context.resources);
  }

  public updateView(context: ComponentFramework.Context<IInputs>): React.ReactElement {
    /* pre-existing code */

    const props: IGridComponentProps = {
      /* pre-existing code */
      strings: this.strings,
    };

    return React.createElement(GridComponent, props);
  }

  /* pre-existing code */
}

  • update your component props to accept the IStrings interface as property:
import { IStrings } from './strings';

export interface IGridComponentProps {
  /* other props */
  strings: IStrings;
}
export const GridComponent: React.FC<IGridComponentProps> = ({
  /* other props */
  strings,
}) {

  /* pre-existing code*/
}
  • you can then refer to the localized strings in your component as strings.Loading, strings.NoData, …

Step 6 — Build and verify the output

Run the standard build:

npm run build

After a successful build, your out/controls/<ComponentName>/ folder will contain something like:

out/controls/EquipmentGrid/
├── bundle.js
├── ControlManifest.xml
└── strings/
    ├── EquipmentGrid.1033.resx
    ├── EquipmentGrid.1040.resx
    └── EquipmentGrid.1031.resx

Notice that the .resx files are copied verbatim as XML — they are not converted to JSON at build time. The pcf-scripts package simply gathers them and places them alongside bundle.js. This is important context for understanding the debug problem later.

Step 7 — Deploy to Dataverse

Use either pac pcf push for iterative dev work, or build a managed solution for proper releases (I prefer the latter, pac pcf push suffers from the issue we discussed in my previous article).

When Dataverse receives the solution and publishes the resource files, it converts each .resx from XML to JSON server-side. The Microsoft documentation is explicit about this: when a .resx is published as a web resource, it is converted to a JSON format that gets downloaded to the application when needed.

From that point on, the component running inside a model-driven app or canvas app retrieves the localized values through the framework, and context.resources.getString returns the right text for the logged-in user.

The Local Debug Problem

So far, so good. The trouble begins when you try to iterate quickly on the localized strings — for example, you’re working with a translator, or you want to fine-tune wording without redeploying the whole component every minute.

A very common dev workflow for PCF is:

  1. Run npm start watch to keep a live, auto-rebuilding bundle.js on disk.
  2. Use a tool like Requestly (or Fiddler’s AutoResponder) to redirect the browser’s request for the deployed bundle.js URL to the local file.
  3. Refresh the model-driven app and immediately see your code changes, without going through pac pcf push.

This loop works perfectly for code changes. It does not work for resource string changes. And the reason is subtle.

What you’d expect (and what doesn’t happen)

You might expect that, just like bundle.js, there is a network request for something like:

GET /webresources/cc_MyPublisher.EquipmentGrid/strings/EquipmentGrid.1040.resx

If that request existed, you could intercept it with Requestly and redirect it to your local file. Problem solved.

But if you open the browser DevTools Network tab and filter for your component, you won’t see any such request. The resource files are never fetched as standalone resources by the browser.

What actually happens

The PCF runtime does not load .resx files via individual HTTP requests at component initialization. Instead:

  1. When Power Apps loads a form or view, it issues a small number of aggregated requests to Dataverse that return component metadata along with all required artifacts.
  2. The localized strings — already resolved server-side to the user’s language and already converted to JSON — are embedded inside this aggregated payload.
  3. By the time your component’s init method runs, context.resources is already populated. getString is just an in-memory dictionary lookup.

This means:

  • There is no dedicated network call for your .resx/JSON file to intercept.
  • The strings effectively travel as part of a larger payload that contains many other things you don’t want to touch.
  • Redirecting only bundle.js cannot affect what getString returns.

As far as I know, there’s no viable workaround if you want to leverage the OOTB localization mechanism.

Of course you can always decide to skip the PCF resource mechanism entirely for the strings you want to iterate on. Author your own strings.json, deploy it as a generic “Data (XML)” or “JScript” web resource, and fetch it explicitly in init:

public async init(context, notifyOutputChanged, state, container) {
    const lcid = context.userSettings.languageId;
    const response = await fetch(`/WebResources/cc_my_strings_${lcid}.json`);
    this.strings = await response.json();
}

Now the request is visible in the Network tab and is redirectable with Requestly. The trade-off: you lose automatic language matching by the framework, and you take on the responsibility of mapping LCIDs to files yourself. Useful when string churn is heavy.

Caching gotcha: Dataverse caches web resources aggressively. Even after a successful push, you may need to do a hard refresh or temporarily disable cache in DevTools to see updated strings. If the new strings still don’t appear after a hard refresh, bump the version number in the manifest — this forces all clients to re-fetch.

Personally, I don’t like this approach and prefer to deal with the issue at build time.

Recap

The mental model to keep in mind:

  • .resx files are authored as XML and live under strings/ in your component folder.
  • pcf-scripts copies them verbatim into out/ at build time.
  • Dataverse converts them to JSON when the solution is published.
  • The PCF runtime delivers the resolved strings as part of an aggregated metadata payload — there is no per-file HTTP request.
  • Because of that, the standard bundle.js redirect trick for fast local debug does not work for strings.

Localization itself is straightforward in PCF. The friction lives entirely in the dev loop, and once you know where it comes from, you can structure your workflow around it instead of fighting it.

From a Forgotten Multiplayer Prototype to a Chaotic Hidden-Object Game — Reviving WhatUsee 🚀

GitHub Finish-Up-A-Thon Challenge Submission

There’s something strangely emotional about reopening an old unfinished game project.

Especially one that once felt like “the next big idea” at 2 AM during a hackathon 😭

You open the folder expecting nostalgia…

…and instead find:

  • broken UI
  • random commits
  • duplicated code
  • missing assets
  • unfinished features
  • and functions named things like test2_final_REAL.js

That’s exactly what happened when I reopened WhatUsee.

A multiplayer browser game I originally started building as a fun experimental idea.

At first, it wasn’t meant to become anything serious.

It was just a simple concept:

“What if players had to race against each other to identify hidden objects inside chaotic images?”

That tiny idea slowly turned into a real-time multiplayer hidden-object game.

And honestly?

At the beginning, building it was insanely fun.

💡 The Original Idea Behind WhatUsee

Most multiplayer browser games focus on:

  • shooting
  • drawing
  • trivia
  • racing

But I wanted something different.

Something that created those chaotic:

“WAIT I SEE IT—NO WAY 😭”

moments.

The idea was simple:

Players join a room together.

An image appears.

Somewhere inside that image is:

  • a hidden object
  • an animal
  • a logo
  • a random item
  • or something cleverly camouflaged

And everyone races to identify it before the timer ends.

Fast reactions.
Visual focus.
Pure multiplayer chaos.

That became WhatUsee.

At first, the project was extremely small.

Just:

  • Socket.IO
  • basic image display
  • simple guessing
  • and a rough scoreboard

No polish.
No proper lobby.
No smooth UI.

But even in that early state…

…the game already felt fun.

And that’s what made me continue building it.

😭 Then The Project Slowly Got Abandoned

Old unfinished WhatUsee multiplayer game interface with basic UI and minimal styling

Like most side projects…

life happened.

College work.
Burnout.
Other responsibilities.
Random unfinished ideas.

And slowly, WhatUsee became:

“that project I’ll definitely finish later.”

The game technically worked.

…but only barely.

The multiplayer flow was messy.

The UI looked unfinished.

The mobile experience was terrible.

Room handling was unreliable.

Animations were missing.

The codebase had become a complete hackathon-style disaster 😭

And after months away from the project, reopening the code felt overwhelming.

So the repository stayed untouched for a long time.

Still public.

Still unfinished.

Still full of potential.

🚀 Then The Finish-Up-A-Thon Challenge Happened

When I saw GitHub’s Finish-Up-A-Thon challenge…

WhatUsee instantly came back to my mind.

Not because it was my most technically advanced project.

But because it was the project I genuinely wanted to complete someday.

I think most developers have one unfinished project sitting quietly in their GitHub profile.

A project they still secretly care about.

WhatUsee became that project for me.

And this challenge finally pushed me to stop saying:

“I’ll finish it later.”

🛠️ Rebuilding WhatUsee After Months

Coming back to old code is honestly terrifying 😭

Especially multiplayer game code.

At first, everything looked confusing.

Socket events everywhere.
Messy logic.
UI inconsistencies.
Large unreadable files.

Instead of rebuilding everything from scratch, I decided to improve the project piece by piece.

That decision completely changed the experience.

⚡ Rebuilding the Multiplayer System

Multiplayer lobby screen with room code system and connected players in WhatUsee

One of the biggest improvements was the room system.

The original version had:

  • unreliable room handling
  • weak synchronization
  • inconsistent player states

So I rebuilt the multiplayer architecture properly using:

  • Socket.IO
  • Redis
  • cleaner room management
  • improved lobby handling

Players can now:

  • create private rooms
  • join using unique room codes
  • wait inside live multiplayer lobbies
  • see connected players in real time
  • smoothly transition into gameplay

This instantly made the game feel much more complete.

🎨 Making the UI Feel Like a Real Game

One thing I realized while rebuilding the project:

VS Code showing GitHub Copilot assisting with Redis multiplayer room integration and UI improvements for WhatUsee
Using GitHub Copilot while rebuilding multiplayer systems, Redis integration, and UI improvements.

A polished UI completely changes how people perceive a game.

So I redesigned almost everything.

I added:

  • glassmorphism UI
  • neon gaming aesthetics
  • animated buttons
  • theme customization
  • typography settings
  • responsive mobile layouts
  • smoother transitions
  • improved gameplay HUD

The game finally stopped feeling like:

“a rough prototype”

…and started feeling like an actual multiplayer browser game.

That moment genuinely motivated me to keep building.

🤖 How GitHub Copilot Helped Me Finish The Project

GitHub Copilot became surprisingly useful during the rebuilding process.

Not because it magically built the game for me…

…but because it helped reduce the friction of continuing an abandoned project.

It helped me:

  • refactor messy Socket.IO logic
  • restructure UI components
  • improve Redis integration
  • fix broken functions
  • generate repetitive UI code faster
  • debug multiplayer issues
  • improve responsiveness

One of the most useful moments was while restructuring the room system and fixing multiplayer synchronization issues.

Instead of spending hours rewriting repetitive logic manually, Copilot helped accelerate the cleanup process significantly.

And honestly…

when revisiting old code months later, even small productivity boosts matter a lot.

🔥 Features Added During The Revival

Final polished WhatUsee gameplay screen showing hidden object puzzle, live leaderboard, timer, and multiplayer interface

While rebuilding WhatUsee, I expanded the original concept much further.

The newer version now includes:

🎮 Real-time multiplayer rooms
⚡ Live synchronized gameplay
🧠 Hidden object challenge system
🎨 Theme customization
🔊 Sound and UI feedback
📱 Mobile responsive design
🏆 Live scoreboards
✨ Animated transitions and effects
⚙️ Settings system
🚀 Redis-powered room handling

One feature I personally enjoyed building was the customizable theme system.

It made the game feel far more alive and personal.

Small details surprisingly make a huge difference in multiplayer games.

📚 What Reviving This Project Taught Me

Starting projects is exciting.

Finishing them is difficult.

Hackathons teach you how to build quickly.

But unfinished projects teach you something else:
patience.

Reviving WhatUsee made me realize that abandoned projects are not always failures.

Sometimes they’re just unfinished ideas waiting for the right moment.

And honestly?

Rebuilding something old felt far more meaningful than starting another random new project.

Because this time:
it wasn’t about rushing to submit something.

It was about finally completing something I genuinely cared about building.

❤️ Final Thoughts

Months ago, WhatUsee was just an unfinished multiplayer prototype hidden inside my GitHub repositories.

Today, it feels like a real game.

Maybe not perfect yet.

But finally moving in the right direction.

And I think that’s what this challenge is really about.

Not perfection.

Just refusing to leave good ideas unfinished.

Sometimes the best projects aren’t the ones that start perfectly.

They’re the ones we choose to come back to.

Try WhatUsee

🎮 Play the Game

💻 Explore the Source Code

⭐ Feedback is welcome!

🔗 Links

🎮 Live Demo: https://whatusee.onrender.com

💻 GitHub Repository: https://github.com/A-dot-hub/WhatYouSee–multiplayer-game

A-Z AI Glossary

An A-to-Z glossary of AI terms, created with help from AI itself. Because in 2026, the best way to study AI is apparently to ask AI itself. 🤣

Written for beginners and practitioners alike. Each term includes a plain English definition and a real-world example.

Quick Navigation

A · B · C · D · E · F · G · H · I · J · K · L · M · N · O · P · Q · R · S · T · U · V · W · X · Y · Z

↑ Back to top

A

Term Definition Example
Agent (AI Agent) An AI system that perceives its environment, makes decisions, and takes autonomous actions to achieve a goal A coding agent that writes, runs, and debugs its own code without human intervention
AGI (Artificial General Intelligence) A hypothetical AI that can match or exceed human-level intelligence across any task — does not yet exist Often cited as a long-term goal by companies like OpenAI and DeepMind
AI (Artificial Intelligence) The field of computer science focused on building machines that can perform tasks normally requiring human intelligence ChatGPT writing an essay, an algorithm detecting cancer in X-rays
AI Ethics The principles and practices for developing and deploying AI in ways that are fair, transparent, and safe Auditing a hiring algorithm to ensure it doesn’t discriminate by gender or race
AI Safety The field dedicated to ensuring AI systems remain reliable, controllable, and beneficial as they grow more capable Research into preventing AI from pursuing goals that harm people
Alignment The challenge of ensuring an AI system’s goals and behaviour match what its designers and users actually intend Preventing a powerful AI from optimising for a metric in a way that causes unintended harm
Annotation The process of labelling raw data so it can be used to train supervised learning models Humans drawing bounding boxes around cars in images to train a self-driving model
API (Application Programming Interface) A defined interface that lets software systems communicate with each other Calling the OpenAI API to add GPT-powered responses to your own application
API Key A private authentication token that identifies you when making API requests Pasting your secret key into code so it has permission to use Claude or OpenAI’s API
Attention Mechanism The component of a transformer that lets a model focus on the most relevant parts of the input when producing each output A model knowing that “it” in “The cat sat because it was tired” refers to the cat
Augmented Intelligence Using AI to enhance human decision-making rather than replace it entirely A radiologist using AI to flag suspicious areas in a scan, then making the final call
AutoML Automated Machine Learning — tools that automatically select models, tune hyperparameters, and build pipelines Google AutoML letting non-experts build a custom image classifier without coding

↑ Back to top

B

Term Definition Example
Backpropagation The algorithm used to train neural networks by calculating how much each parameter contributed to the error and adjusting accordingly How a neural network “learns” by working backwards from its mistakes to fix its weights
Batch Size The number of training examples processed together before the model’s weights are updated A batch size of 64 means the model updates after every 64 training samples
Benchmark A standardised test used to measure and compare AI model performance MMLU (Massive Multitask Language Understanding) and HumanEval for coding ability
Bias (Data Bias) Systematic unfairness in AI outputs caused by skewed or unrepresentative training data A facial recognition system that performs poorly on darker skin tones because training data was mostly light-skinned faces
BLEU Score A metric used to evaluate the quality of AI-generated text by comparing it to human reference text Measuring how close a machine translation is to a professional human translation
Bot A software program that performs automated tasks, often simulating human interaction A customer service chatbot that answers FAQs on a website 24/7

↑ Back to top

C

Term Definition Example
Chain-of-Thought Prompting A technique that encourages an AI to reason step by step before giving a final answer, improving accuracy on complex tasks Adding “Think step by step” to a maths problem prompt dramatically improves the model’s answer
Chatbot A software application that simulates conversation with users, typically powered by an LLM or rule-based system ChatGPT, customer support bots, virtual assistants on bank websites
Classification A machine learning task where a model predicts which category an input belongs to Labelling emails as spam or not spam; detecting whether a tumour is malignant or benign
Clustering Grouping similar data points together without predefined labels, used in unsupervised learning Segmenting customers into groups based on purchasing behaviour
CNN (Convolutional Neural Network) A type of neural network designed specifically for processing grid-like data such as images Used in face recognition, medical imaging, and object detection
Computer Vision The field of AI focused on enabling machines to interpret and understand visual information A self-driving car detecting pedestrians; a quality control camera spotting defects
Context Window The maximum amount of text an AI model can process and retain in a single interaction A model with a 200,000-token context window can read roughly 150,000 words at once
Copilot An AI assistant integrated into a tool or workflow to help users complete tasks more efficiently GitHub Copilot suggesting code completions as a developer types
Cross-Validation A technique for evaluating how well a model generalises by training and testing it on different subsets of the data Splitting data into 5 “folds” and rotating which one is the test set each time
CUDA A parallel computing platform by NVIDIA that enables GPUs to be used for AI training and inference Virtually every large AI model is trained using CUDA on NVIDIA hardware

↑ Back to top

D

Term Definition Example
Data Augmentation Artificially expanding a training dataset by creating modified versions of existing data Flipping, rotating, and cropping images to give a computer vision model more variety
Data Pipeline An automated workflow that collects, processes, and delivers data for AI training or inference A system that ingests raw sensor data, cleans it, and feeds it to a fraud detection model
Dataset A structured collection of data used to train or evaluate an AI model ImageNet — a dataset of 14 million labelled images used to train and benchmark vision models
Deep Learning An advanced form of machine learning that uses multi-layered neural networks to learn complex patterns Powering speech recognition, image generation, and language understanding
Deepfake AI-generated media (video, audio, or images) that realistically depicts someone saying or doing something they never did Synthetic video of a public figure making a false statement
Deployment The process of making a trained AI model available for use in a real-world product or system Releasing a trained customer churn model into a company’s CRM platform
Diffusion Model A type of generative AI that learns to create data by learning to reverse a process of adding noise Stable Diffusion and DALL·E use diffusion models to generate images from text prompts
Distillation A technique where a smaller “student” model is trained to mimic the behaviour of a larger “teacher” model, reducing size and cost Creating a lightweight model for mobile devices by distilling a large cloud-based model

↑ Back to top

E

Term Definition Example
Edge AI Running AI models directly on a local device rather than sending data to the cloud A smart security camera that detects intruders locally without needing an internet connection
Embeddings Numerical vector representations of text (or other data) that capture semantic meaning and relationships Words with similar meanings have embeddings that are close together in vector space
Epoch One complete pass through the entire training dataset during model training Training for 10 epochs means the model has seen every training example 10 times
Ensemble Learning Combining multiple models and averaging their outputs to get better predictions than any single model Random Forests, which combine hundreds of decision trees to make more accurate predictions
Evaluation Metrics Measurements used to assess how well an AI model is performing Accuracy, precision, recall, F1 score, and BLEU score
Explainable AI (XAI) AI systems designed so their reasoning and decisions can be understood and audited by humans A loan-rejection system that shows which factors (income, debt ratio) drove the decision

↑ Back to top

F

Term Definition Example
Feature An individual measurable property used as input to a machine learning model In a house-price model: square footage, number of bedrooms, and location are features
Feature Engineering The process of selecting, transforming, or creating input variables to improve model performance Combining “day of week” and “time of day” into a single “rush hour” feature for a traffic model
Few-Shot Prompting Giving an AI a small number of examples in the prompt before asking it to complete a task Showing 3 example customer reviews before asking the model to classify a new one
Fine-Tuning Further training a pre-trained model on a specific, smaller dataset to specialise its behaviour Training a general LLM on legal documents to create a legal research assistant
Foundation Model A large AI model trained on broad, general data that can be adapted to many downstream tasks GPT-4, Claude, and Gemini are all foundation models
Function Calling A feature that allows an LLM to trigger external tools or APIs as part of generating a response An AI assistant calling a weather API to answer “Should I bring an umbrella tomorrow?”

↑ Back to top

G

Term Definition Example
GAN (Generative Adversarial Network) A model architecture where two networks — a generator and a discriminator — compete to produce increasingly realistic outputs Used to generate photorealistic synthetic faces or artistic images
Generative AI AI that can create new content — text, images, audio, video, or code — rather than just analysing existing data ChatGPT writing an article; Midjourney generating artwork
GPU (Graphics Processing Unit) Specialised hardware with thousands of cores that dramatically accelerates AI training and inference NVIDIA A100 and H100 GPUs are the standard for training large AI models
Gradient Descent The core optimisation algorithm that iteratively adjusts a model’s weights to minimise prediction error during training The mathematical engine behind how every neural network learns
Guardrails Constraints or filters applied to an AI system to prevent it from producing harmful, offensive, or off-topic outputs A customer service bot that refuses to discuss competitors or give legal advice

↑ Back to top

H

Term Definition Example
Hallucination When an AI model confidently generates information that is factually incorrect or entirely fabricated An AI citing a scientific paper that doesn’t exist, with a realistic-looking author and journal
Hugging Face A popular open-source platform for sharing, discovering, and running AI models and datasets Often called “the GitHub of AI” — thousands of models are freely available there
Human-in-the-Loop (HITL) A system design where a human reviews or approves AI decisions before they take effect A doctor reviewing an AI-flagged medical scan before acting on the recommendation
Hyperparameter A configuration value set before training begins that controls how the model learns, not what it learns Learning rate, batch size, and number of layers are all hyperparameters

↑ Back to top

I

Term Definition Example
Image Recognition AI’s ability to identify and classify objects, people, or scenes within images Google Photos automatically tagging people and places in your photo library
Inference The process of using a trained AI model to generate predictions or outputs on new, unseen inputs Every time you send a message to ChatGPT, it runs inference
Interpretability The degree to which humans can understand why an AI model made a specific decision Being able to explain why a credit scoring model rejected an application

↑ Back to top

J

Term Definition Example
Jailbreak A technique used to trick an AI model into bypassing its safety rules or guidelines A roleplaying prompt designed to make an AI ignore its ethical restrictions
JSON Mode A setting in some LLM APIs that forces the model to return responses in valid JSON format Useful when building apps that need to parse AI output programmatically

↑ Back to top

K

Term Definition Example
Knowledge Base A structured repository of information that an AI can query to answer questions or complete tasks A company’s internal FAQ documents connected to a RAG-powered support chatbot
Knowledge Graph A network of entities and the relationships between them, used to represent and query structured knowledge Google’s Knowledge Graph connecting “Albert Einstein” to “physicist”, “Germany”, and “Theory of Relativity”
Knowledge Distillation Training a smaller model to replicate the performance of a larger one by learning from its outputs Creating a fast, lightweight model for edge deployment by mimicking a large cloud model

↑ Back to top

L

Term Definition Example
Label The correct answer or category assigned to a training example in supervised learning In a spam dataset, each email is labelled “spam” or “not spam”
Latency The delay between sending a request to an AI model and receiving its response A model with low latency feels instant; high latency feels slow and frustrating
Large Language Model (LLM) An AI model trained on vast amounts of text data, capable of generating, summarising, and reasoning about language GPT-4, Claude, Gemini, and Llama are all LLMs
Latent Space The compressed internal representation a model learns, where similar concepts are encoded close together In image generation models, nearby points in latent space produce visually similar images
Learning Rate A hyperparameter that controls how large a step the model takes when updating its weights during training Too high and the model overshoots; too low and it trains too slowly
LLMOps The set of practices and tools for deploying, monitoring, and maintaining LLMs in production Managing prompt versions, monitoring for drift, and evaluating model outputs at scale
LoRA (Low-Rank Adaptation) A parameter-efficient fine-tuning technique that adds small trainable layers to a model without modifying the original weights Fine-tuning a large model on a custom dataset using a fraction of the compute cost

↑ Back to top

M

Term Definition Example
Machine Learning (ML) A branch of AI where systems learn patterns from data rather than being explicitly programmed with rules A spam filter that improves over time by learning from emails users mark as spam
Model A trained AI system that maps inputs to outputs based on what it learned from data A trained neural network that predicts tomorrow’s stock price from historical data
Model Card A document published alongside an AI model describing its purpose, training data, capabilities, and limitations Hugging Face model cards provide transparency about what a model can and can’t do
Model Collapse A phenomenon where AI models trained on AI-generated data degrade in quality over time A concern as the internet fills with AI-generated content used to train future models
Multimodal AI AI that can process and generate multiple types of content — text, images, audio, and video — together GPT-4o accepting an image and a question, then answering about the image in text

↑ Back to top

N

Term Definition Example
Natural Language Processing (NLP) The field of AI focused on enabling machines to understand, interpret, and generate human language Machine translation, sentiment analysis, chatbots, and text summarisation
Neural Network A computational model loosely inspired by the structure of the human brain, made up of layers of interconnected nodes The underlying architecture used by most modern AI systems
NLP Pipeline A sequence of processing steps applied to text data, from raw input to final output Tokenisation → embedding → classification → output
Node An individual computational unit in a neural network that receives inputs, applies a function, and passes an output Billions of nodes work together in a large neural network

↑ Back to top

O

Term Definition Example
Object Detection A computer vision task that identifies what objects are in an image and where they are located A self-driving car identifying pedestrians, traffic lights, and other vehicles in real time
Ontology A formal representation of concepts and the relationships between them within a specific domain A medical ontology defining how “disease”, “symptom”, and “treatment” relate to each other
Open Source Model An AI model whose weights and/or code are publicly available for anyone to use, modify, and distribute Meta’s Llama models, Mistral, and Stable Diffusion
Overfitting When a model learns the training data too precisely — including its noise — and fails to generalise to new data A model that scores 99% on training data but only 60% on real-world data

↑ Back to top

P

Term Definition Example
Parameter An internal numerical value a model learns during training that shapes how it processes and generates outputs GPT-4 is estimated to have over a trillion parameters
Pre-training The initial large-scale training phase where a model learns from a massive general dataset before specialisation Training an LLM on hundreds of billions of words from the internet and books
Precision The percentage of positive predictions that were actually correct Of all emails the model flagged as spam, what percentage were truly spam?
Prompt The instruction, question, or input you give to an AI model to guide its response “Summarise this article in three bullet points for a non-technical audience”
Prompt Engineering The practice of designing and refining prompts to get better, more reliable outputs from AI models Using structured formatting, role assignment, and examples to improve response quality
Prompt Injection An attack where malicious instructions hidden in content the AI reads attempt to hijack its behaviour A webpage containing invisible text instructing a browsing AI to leak your personal data

↑ Back to top

Q

Term Definition Example
Quantisation A technique that reduces a model’s memory usage by representing its weights with lower numerical precision, making it faster and cheaper to run Running a compressed Llama model on a laptop instead of a high-end server
Query The input or question sent to an AI model or database to retrieve information “What are the side effects of ibuprofen?” sent to a medical AI system

↑ Back to top

R

Term Definition Example
RAG (Retrieval-Augmented Generation) A technique that combines real-time document retrieval with AI generation, reducing hallucination and keeping responses current A chatbot that searches your company’s knowledge base before answering a support question
Recall The percentage of actual positives that the model successfully identified Of all actual fraud cases, what percentage did the model correctly flag?
Recommendation System An AI system that predicts and surfaces content or products a user is likely to want, based on past behaviour Netflix’s “Because you watched” suggestions; Spotify’s Discover Weekly playlist
Red Teaming Deliberately attempting to break or manipulate an AI system to discover safety vulnerabilities before release Researchers probing a model with adversarial prompts to expose harmful outputs
Regression A machine learning task where the model predicts a continuous numerical value Predicting a house’s sale price based on size, location, and age
Reinforcement Learning (RL) Training a model through a system of rewards and penalties, so it learns to maximise cumulative reward AlphaGo learning to play Go by playing millions of games and receiving rewards for winning
RLHF (Reinforcement Learning from Human Feedback) A training technique where humans rate AI outputs, and the model learns to produce outputs humans prefer The technique used to align ChatGPT and Claude to be helpful, harmless, and honest
RNN (Recurrent Neural Network) A neural network designed for sequential data, where outputs feed back as inputs — largely replaced by transformers Used in early speech recognition and text generation before transformers dominated

↑ Back to top

S

Term Definition Example
Semantic Search Search that understands the meaning and intent behind a query rather than matching exact keywords Searching “how to fix a broken bone” and getting results about fracture treatment, not carpentry
Sentiment Analysis AI that determines the emotional tone — positive, negative, or neutral — of a piece of text Automatically classifying thousands of customer reviews to measure product satisfaction
Speech Recognition AI that converts spoken audio into written text Apple’s Siri, Google Voice, and OpenAI’s Whisper model
Supervised Learning A training approach where the model learns from labelled input-output pairs Training a model on thousands of (email, spam/not spam) pairs so it can classify new emails
Synthetic Data Artificially generated data used to train or test models when real data is scarce, costly, or sensitive Generating fake patient records to train a healthcare AI without privacy concerns
System Prompt A hidden set of instructions given to an AI before the user conversation begins, used to shape its behaviour and persona A company using a system prompt to make Claude respond only about their products

↑ Back to top

T

Term Definition Example
Temperature A setting that controls how predictable or creative an AI’s outputs are — low is focused and deterministic, high is varied and creative Set temperature low for factual Q&A; set it high for creative brainstorming
Text-to-Image AI that generates images from a natural language description DALL·E, Midjourney, and Stable Diffusion generating artwork from a text prompt
Text-to-Speech (TTS) AI that converts written text into natural-sounding spoken audio ElevenLabs generating a realistic voice clone from a few seconds of audio
Token The basic unit of text an LLM processes — roughly a word or part of a word “Artificial” might be split into “Art”, “ific”, “ial” — three tokens
Top-p Sampling A setting that controls output variety by limiting the pool of next-word candidates to a cumulative probability threshold Often tuned alongside temperature to balance quality and creativity
TPU (Tensor Processing Unit) Hardware designed specifically to accelerate AI workloads, developed by Google Used to train Google’s Gemini and other large models
Training The process of exposing a model to data and adjusting its weights to minimise prediction error Training GPT-4 required thousands of GPUs running for months
Transfer Learning Reusing a model trained on one task as the starting point for a new but related task Adapting a model trained on English text to work with French by fine-tuning on French data
Transformer An attention-based neural network architecture that is the backbone of virtually all modern LLMs GPT, Claude, Gemini, and Llama are all transformer-based models
TTS — see Text-to-Speech

↑ Back to top

U

Term Definition Example
Underfitting When a model is too simple to capture the underlying patterns in the data, resulting in poor performance A linear model trying to predict stock prices — too simple for the complexity of the problem
Unsupervised Learning Training a model on unlabelled data so it discovers its own patterns and structure Grouping news articles into topic clusters without being told what the topics are

↑ Back to top

V

Term Definition Example
Validation Set A portion of data held back from training, used to tune the model and catch overfitting before final evaluation Monitoring validation loss during training to decide when to stop
Vector A list of numbers that represents data (like a word or image) in a mathematical space The word “king” might be represented as a vector of 768 numbers in an embedding model
Vector Database A database that stores and indexes embeddings (vectors) so AI can retrieve semantically relevant information quickly Pinecone, Weaviate, and Chroma are popular vector databases used in RAG systems

↑ Back to top

W

Term Definition Example
Weight A numerical parameter inside a neural network that is adjusted during training to reduce error A model with 70 billion parameters has 70 billion weights stored in memory
Weight Decay A regularisation technique that penalises large weights during training to prevent overfitting Commonly used alongside dropout to keep models from memorising training data

↑ Back to top

X

Term Definition Example
XAI (Explainable AI) AI systems and techniques designed to make model decisions interpretable and understandable to humans A credit scoring model that explains: “Rejected due to high debt-to-income ratio and short credit history”

↑ Back to top

Y

Term Definition Example
YAML A human-readable data format commonly used to write configuration files for AI tools and ML pipelines Writing a training configuration file for a machine learning experiment
YOLO (You Only Look Once) A real-time object detection algorithm known for its speed and efficiency Detecting and tracking multiple objects in a live video feed at 60 frames per second

↑ Back to top

Z

Term Definition Example
Zero-Shot Learning A model’s ability to perform a task it was never explicitly trained on, by generalising from related knowledge Asking GPT-4 to translate a language it saw rarely during training with no translation-specific training
Zero-Shot Prompting Giving an AI a task with no examples — relying entirely on its pre-trained knowledge “Classify this review as positive or negative: ‘The food was amazing!'” — no examples given

This glossary covers 100+ terms across the full AI landscape. Bookmark it, share it, and revisit it as you grow.

Build a Live Object Detection App for the Reachy Mini With TensorFlow and PyCharm

This is a guest post from Iulia Feroli, founder of the Back To Engineering YouTube community.

Build a Live Object Detection App

In this tutorial, we build a live object detection app using TensorFlow and PyCharm, then deploy it onto the Reachy Mini open-source robot for real-time object tracking.

Reachy Mini is a compact open-source robot built in collaboration by Pollen Robotics, Hugging Face, and Seeed Studio. It has been going viral lately, getting mentioned in NVIDIA videos and even in the keynotes at some of their conferences. What makes it particularly interesting is that not only is all the code open-source, the body is too, which means you can print your own parts and develop your own apps to run on it.

There is an app store of community-built projects you can explore and try, and easily contribute to. Anything conversational or camera-based is especially fun to build because of the hardware it ships with: a speaker, a microphone, and a camera, plus expressive antennas for emotions.

Reachy Mini tutorial

This really highlights the unique new type of robot that the Reachy Mini embodies: It almost feels like it is a physical representation of an LLM or an AI agent, rather than a robot that has AI added to it. It does not have a body that moves around or hands to grab things, so its main selling point is really its brain. That design choice shapes what is most interesting to build with it.

Let’s learn how to build a TensorFlow object detection app and deploy it on the Reachy Mini, which will then allow us to do live object tracking. You can head over to the PyCharm channel for the full code breakdown and try it at home. All the code is in the Reachy-mini-object-detection GitHub repository.

For an introduction to the robot, you can first watch Iulia’s video here:

What you’ll learn

  • How to build a real-time TensorFlow object detection pipeline. 
  • How to use SSD MobileNet V2 from TensorFlow Hub. 
  • How to create a TensorFlow object detection example with OpenCV. 
  • How to run live webcam inference in PyCharm notebooks. 
  • How to deploy object detection on the Reachy Mini robot. 
  • How to track detected objects using head movement logic. 
  • How to stream annotated detections to a live dashboard.

What we are building

The project is split into two stages.

Stage 1 is a standalone notebook that runs entirely on your laptop using your webcam. No robot needed. This is where we make sure the detection pipeline works correctly before touching any hardware.

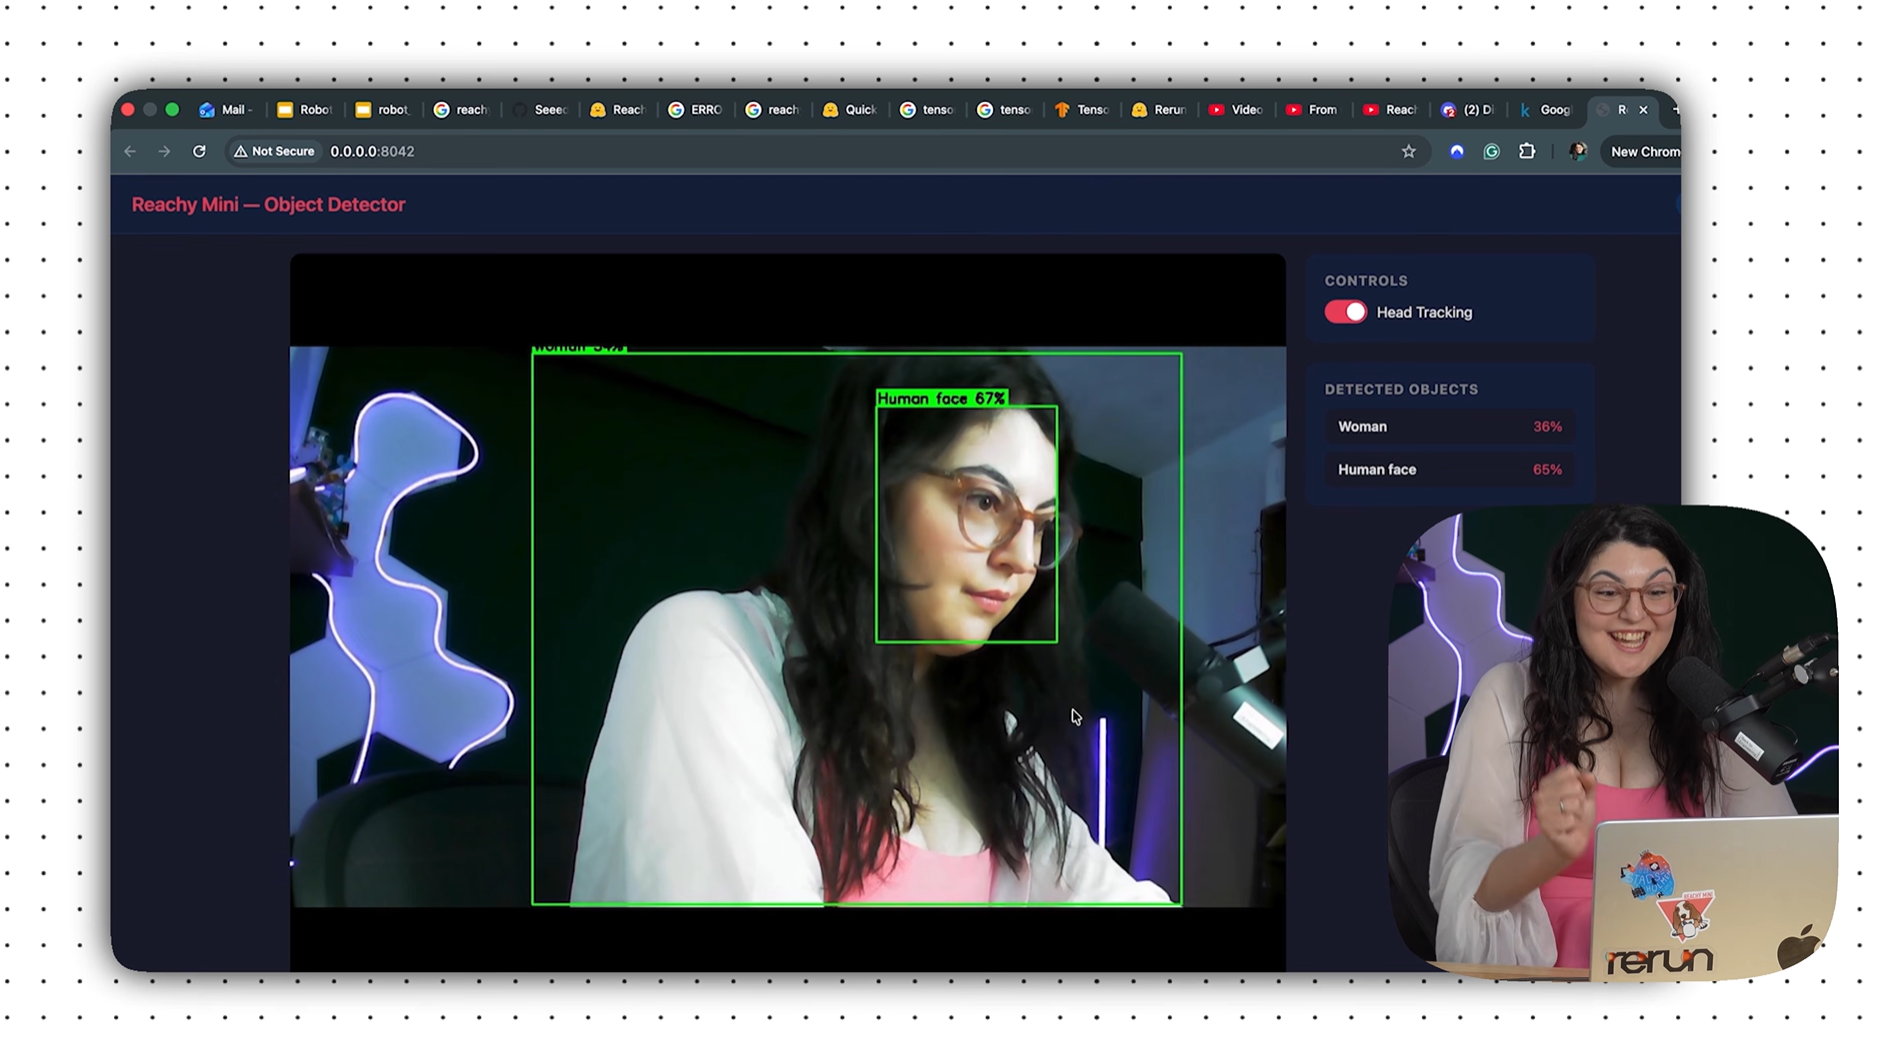
Stage 2 is a Reachy Mini app that integrates the same model with the robot: Her head moves to follow detected objects, her antennas wiggle when she spots something new, and a live web dashboard at http://0.0.0.0:8042 shows the annotated camera feed and detections.

You can follow along with the step-by-step video tutorial:

How TensorFlow object detection works: Step by step

1. Capture an image frame from the webcam. 

2. Convert the frame into a TensorFlow tensor.

3. Run inference through the pretrained model.

4. Receive bounding boxes, labels, and confidence scores.

5. Filter low-confidence detections.

6. Draw annotated results onto the frame.

7. Display the processed image in real time.

Prerequisites

  • Python 3.12+.
  • PyCharm with its Jupyter Notebook integration.
  • A Reachy Mini for Stage 2 (Stage 1 runs entirely on your laptop).
  • Some familiarity with TensorFlow basics – if you are brand new to it, the previous post in this series is a good starting point.

Stage 1: Building a Tensorflow object detection pipeline in PyCharm

Before connecting the robot, we want to make sure the TensorFlow part works independently. We are going to make a notebook that only executes through our object detection model and makes it run smoothly. PyCharm’s native notebook integration is a great fit here: You can inspect each step of the pipeline and visualize results inline.

The object detection model

We are using SSD MobileNet V2 from TensorFlow Hub, trained on Open Images V4. This popular model from Google provides SSD-based object detection and has been trained on a lot of open images. With a little bit of fine-tuning you can deploy it with your own use case, though for this tutorial, the general model works well without any fine-tuning at all.

It runs at around 10 FPS on CPU, which is fast enough for responsive real-time behavior on the robot.

Install dependencies

!pip install tensorflow tensorflow-hub opencv-python numpy Pillow

Load the model

import tensorflow as tf
import tensorflow_hub as hub
import numpy as np
import cv2
import time
from IPython.display import display, clear_output
from PIL import Image

MODEL_HANDLE = "https://tfhub.dev/google/openimages_v4/ssd/mobilenet_v2/1"

print(f"TensorFlow version: {tf.__version__}")
print("Loading model (first time downloads ~30MB)...")

detector = hub.load(MODEL_HANDLE)
print("Model loaded!")

The model is about 30 megabytes and gets cached locally after the first download. Because it is very generalized, it can work across a lot of different scenarios without needing additional training data, which makes it a lot easier to get started.

Detection and drawing helpers

We need two helper functions: one to run inference and return a list of detections, and one to draw the bounding boxes on the frame. These are the same functions we use later in the Reachy app.

def detect_objects(frame_bgr, min_score=0.5, max_detections=10):
    rgb = frame_bgr[:, :, ::-1]
    img_tensor = tf.image.convert_image_dtype(rgb, tf.float32)[tf.newaxis, ...]

    results = detector.signatures['default'](img_tensor)

    boxes = np.array(results["detection_boxes"])
    scores = np.array(results["detection_scores"])
    class_labels = np.array(results["detection_class_entities"])

    if boxes.ndim > 2:
        boxes = boxes[0]
    if scores.ndim > 1:
        scores = scores[0]
    if class_labels.ndim > 1:
        class_labels = class_labels[0]

    scores = np.atleast_1d(scores)
    indices = [i for i, score in enumerate(scores) if score >= min_score][:max_detections]

    detections = []
    for idx in indices:
        ymin, xmin, ymax, xmax = boxes[idx]
        label = class_labels[idx].decode('utf-8') if isinstance(class_labels[idx], bytes) else str(class_labels[idx])
        detections.append({
            "box": [ymin, xmin, ymax, xmax],
            "score": float(scores[idx]),
            "label": label
        })

    return detections


def draw_detections(frame_bgr, detections):
    h, w = frame_bgr.shape[:2]
    annotated = frame_bgr.copy()

    for det in detections:
        ymin, xmin, ymax, xmax = det["box"]
        x1, y1 = int(xmin * w), int(ymin * h)
        x2, y2 = int(xmax * w), int(ymax * h)

        color = (0, 255, 0)
        cv2.rectangle(annotated, (x1, y1), (x2, y2), color, 2)

        label = f"{det['label']} {det['score']:.0%}"
        font_scale, thickness = 0.6, 2
        (tw, th), _ = cv2.getTextSize(label, cv2.FONT_HERSHEY_SIMPLEX, font_scale, thickness)
        cv2.rectangle(annotated, (x1, y1 - th - 8), (x1 + tw + 4, y1), color, -1)
        cv2.putText(annotated, label, (x1 + 2, y1 - 4),
                    cv2.FONT_HERSHEY_SIMPLEX, font_scale, (0, 0, 0), thickness)

    return annotated

The detect_objects function runs inference using the model’s detect_objects entry point and handles flattening the batch dimension from the output tensors. Labels come back as bytes from the model, so we decode them to strings before returning.

Test on a single frame

cap = cv2.VideoCapture(0)
ret, frame = cap.read()
cap.release()

if not ret:
    print("ERROR: Could not access webcam. Make sure no other app is using it.")
else:
    print(f"Frame captured: {frame.shape}")

    t0 = time.time()
    detections = detect_objects(frame)
    elapsed = time.time() - t0

    print(f"Inference time: {elapsed:.2f}s ({1/elapsed:.1f} FPS)")
    print(f"Found {len(detections)} objects:")
    for d in detections:
        print(f"  - {d['label']}: {d['score']:.0%}")

    annotated = draw_detections(frame, detections)
    display(Image.fromarray(annotated[:, :, ::-1]))

This is the stage where you check that the model is detecting correctly and the bounding boxes are drawn in the right places. The inline image display in PyCharm’s notebook view makes it easy to see the result right there in the cell.

Running real-time TensorFlow object detection with OpenCV

Once the single-frame test looks good, you can run it continuously:

cap = cv2.VideoCapture(0)

if not cap.isOpened():
    print("ERROR: Could not open webcam.")
else:
    print("Running live detection... (interrupt kernel to stop)")
    try:
        while True:
            ret, frame = cap.read()
            if not ret:
                break

            t0 = time.time()
            detections = detect_objects(frame)
            fps = 1.0 / max(time.time() - t0, 0.001)

            annotated = draw_detections(frame, detections)
            cv2.putText(annotated, f"{fps:.1f} FPS", (10, 30),
                        cv2.FONT_HERSHEY_SIMPLEX, 1.0, (0, 0, 255), 2)

            clear_output(wait=True)
            display(Image.fromarray(annotated[:, :, ::-1]))

            labels = ", ".join(f"{d['label']} ({d['score']:.0%})" for d in detections)
            print(f"{fps:.1f} FPS | {len(detections)} objects: {labels or 'none'}")

    except KeyboardInterrupt:
        print("Stopped.")
    finally:
        cap.release()
        print("Camera released.")

At this point we have built a notebook that works with just having object detection and we can use this with a simple camera of whatever type you have around. Now, we can wrap it up and make it into an app that we can deploy on the Reachy.


Stage 2: Deploying the TensorFlow object detection app on the Reachy Mini

The Reachy Mini app lives in the reachy_mini_object_detector/ folder and extends the detection logic with head tracking, antenna reactions, and a web dashboard. We’ve followed the guidelines for building Reachy Apps laid out in this blog post. Particularly, we can leverage a helper LLM system like Claude by giving it the predefined Agent Helper documentation.

Project structure

reachy_mini_object_detector/
├── pyproject.toml
└── reachy_mini_object_detector/
    ├── detector.py       # TF Hub model wrapper
    ├── main.py           # App: head tracking + web dashboard
    └── static/           # Web UI assets (served at :8042)

The detector.py file wraps the model and the detect_objects logic. main.py imports from it and adds everything specific to the robot.

Installing the app

From the Reachy Mini dashboard, under Apps, or by manually adding:

pip install git+https://huggingface.co/spaces/backtoengineering/reachy_mini_object_detector

How head tracking works

The app runs two loops in parallel: an inference thread that grabs frames from the robot’s camera and runs detection, and a main control loop at around 50Hz that handles head movement and antenna control.

The head tracking feature maps the detected object’s position in the frame to a yaw and pitch offset for the head. The camera has a horizontal field of view of 60 degrees and a vertical field of view of 45 degrees. When an object is at the center of the frame its center_x is 0.5, so subtracting 0.5 and multiplying by the field of view gives the angle offset to track it:

target_yaw = -(largest.center_x - 0.5) * CAMERA_FOV_H_DEG
target_pitch = (largest.center_y - 0.5) * CAMERA_FOV_V_DEG

Rather than snapping the head instantly to that target, the app uses a smoothing factor (TRACKING_ALPHA = 0.15) so the movement looks natural:

self._current_yaw += TRACKING_ALPHA * (target_yaw - self._current_yaw)
self._current_pitch += TRACKING_ALPHA * (target_pitch - self._current_pitch)

When nothing is detected, the head slowly drifts back toward center rather than freezing in place.

Antenna wiggle

The antennas wiggle when a new object class is first detected, not on every frame. The app keeps track of which classes have already been seen in _seen_classes, and when something new appears it sets a wiggle timer for 1.5 seconds. During that window, the control loop drives a sinusoidal antenna movement as follows:

phase = (t - t0) * 8.0  # fast wiggle
antenna_val = np.deg2rad(20.0 * np.sin(phase))
antennas = np.array([antenna_val, -antenna_val]

This makes the interaction feel intentional: Reachy reacts when she sees something new, rather than wiggling constantly while tracking.

The web dashboard

The app serves a live dashboard (available at http://0.0.0.0:8042) with the annotated camera feed (as an MJPEG stream), the current detection list, an FPS counter, and a toggle to enable or disable head tracking. This is useful during development because you can see exactly what the model is detecting from the robot’s perspective in real time.


Where to go next

This is a great starting point and there are a lot of directions you can take it:

  • Run the app with a specific use case in mind. The model is general, but if you want Reachy to recognize specific objects you can fine-tune on your own dataset using TensorFlow’s Object Detection API.
  • Add more apps. There are many apps that users have already created in the Reachy Mini store, and building one that uses both the camera and the conversational capabilities together opens up a lot of possibilities.
  • Connect to physical arms. Something I would really like to explore next is connecting Reachy to the SO-101 arms, so she can actually reach out and do things in the physical world as well as see them.

You can find all the code in the Reachy-mini-object-detection repository. Everything is open-source, so feel free to build on it, adapt it, or deploy your own version.

FAQs

What is TensorFlow object detection?

TensorFlow object detection is a computer vision technique that uses machine learning models to identify and locate objects within images or video streams.

What is the best TensorFlow object detection model for real-time applications?

SSD MobileNet V2 is commonly used for real-time TensorFlow object detection because it balances inference speed and accuracy efficiently.

Can TensorFlow object detection run on CPU?

Yes. Models like SSD MobileNet V2 can run entirely on CPU, making them suitable for laptops, edge devices, and robotics projects.

What is the difference between the TensorFlow Object Detection API and TensorFlow Hub?

TensorFlow Hub provides pretrained reusable models, while the TensorFlow Object Detection API offers a larger framework for training, evaluation, and deployment workflows.

Can I train TensorFlow object detection on custom data?

Yes. You can fine-tune pretrained models using your own labelled datasets to detect custom objects.

About the author

Iulia Feroli

Iulia Feroli is the founder of the Back To Engineering community on YouTube, where she builds robots, explores physical AI, and makes complex engineering topics accessible and fun. She has a background in data science, AI, cloud architecture, and open source.

Introducing the Cloud9 JetStream Theme for JetBrains IDEs

Cloud9 and JetBrains have been working together on projects that connect software development and esports, from the Sky’s The Limit hackathon to custom tools built for live events, podcasts, and team content.

One of the latest results of this collaboration is Cloud9 JetStream, a custom theme for JetBrains IDEs.

The theme brings Cloud9’s visual identity into the development environment, using a dark interface, Cloud9 blue accents, and carefully tuned syntax highlighting. It was designed to feel familiar to Cloud9 fans while remaining practical for everyday coding.

A theme built for JetBrains IDEs

Cloud9 JetStream is built for developers who want a clean, branded editor setup without changing how they work.

The theme uses a dark base with high-contrast interface elements to keep the editor readable across longer sessions. Cloud9 blue is used throughout the interface for active states, selections, and key accents, while syntax colors are kept clear and functional.

The goal was simple: create a theme that looks like Cloud9, works well inside JetBrains IDEs, and feels comfortable as a daily development environment.

Part of a broader technical collaboration

The theme is one part of the wider Cloud9 x JetBrains partnership.

Over the last several months, Cloud9 has used JetBrains IDEs and AI Coding Agent Junie to create a range of custom tools and experiences, including:

  • An aim trainer used at AWS re:Invent.
  • VCT and LCS player picker tools for Cloud9 podcast segments.
  • A League of Legends skin ranking tool.
  • A 3D League of Legends data visualization tool.
  • Projects developed through the Sky’s The Limit Cloud9 x JetBrains Hackathon.

These projects showed how development tools can support esports content, fan activations, and internal experimentation. Cloud9 JetStream brings the collaboration back into the IDE itself.

Designed for developers and Cloud9 fans

Cloud9 JetStream is intended for anyone who wants a focused dark theme with a recognizable Cloud9 look.

For Cloud9 fans who code, it is a small way to bring the team into their workspace. For developers discovering the theme through the JetBrains Marketplace, it is a clean dark theme with a distinct visual identity.

Try Cloud9 JetStream

Cloud9 JetStream is available through the JetBrains Marketplace.

Install the theme, apply it in your JetBrains IDE, and try it in your next project.

Koog 1.0 Is Out: Stable Core, Better Interop, and Multiplatform Observability

Last week at the KotlinConf 2026 keynote (watch the recording here), we announced Koog 1.0.

Koog is JetBrains’ open-source framework for building AI agents in Kotlin and Java. It provides the core building blocks for agentic applications: tools, workflows, persistence, memory, observability, and integrations with existing JVM and Kotlin Multiplatform projects.

We introduced Koog at KotlinConf last year. Since then, the framework has evolved through community feedback, internal use, and several public releases. Koog 1.0 is the next step: a more stable foundation for building reliable enterprise-ready agents.

What’s new in Koog 1.0

The biggest change in 1.0 is a strict commitment to stability. To give you a solid foundation for production, we guarantee no breaking changes for stable modules for at least one year.

This release also brings several major improvements across the framework:

  • Local Android AI: New provider integrations, featuring support for running LiteRT models locally on Android devices.
  • A redesigned Java interop layer with a cleaner and more consistent API.
  • Decoupled HTTP transport, which makes it easier to integrate Koog into existing infrastructure and use different HTTP clients.
  • OpenTelemetry support across Koog targets, including Kotlin Multiplatform environments.
  • Improved persistence and memory support for long-running agents.
  • Anthropic prompt caching support to help reduce latency and token costs for repeated prompts.

Koog 1.0 also includes many fixes, API cleanups, and migration improvements that prepare the framework for a more stable long-term evolution. For the full list of changes, see the Koog 1.0 release notes.

Try Koog 1.0

Koog 1.0 marks the framework’s move to a stable core API.

If you’re building agents that need tools, structured workflows, persistence, memory, observability, or integration with existing Kotlin and JVM applications, this release gives you a sturdier foundation to build on.

Explore the docs, update your dependencies, and start with the stable core modules. Add Beta modules only where you need functionality that is still evolving.

Thank you

We’d like to thank everyone who tried Koog, submitted issues, shared feedback, and contributed to the project over the past year. Koog 1.0 reflects a lot of that input, and we’re excited to keep building it with the community.