Welcome to PhpStorm 2025.3! This release brings native Claude Agent integration, out-of-the-box Laravel support, support for PHP 8.5, improvements in generics, a new Islands theme, and more.
PhpStorm 2025.3 supports all of the changes introduced in the recently released PHP 8.5.
As usual, you can try new features by setting the project language level to PHP 8.5. You can do so in the settings (by going to PHP | PHP language level), by specifying the requirement in composer.json, or by simply using PhpStorm’s Switch to PHP 8.5 language level quick-fix.
Cloning objects with properties
PHP 8.5 changes clone from a standalone keyword to a language construct that optionally accepts a second array parameter. Now, clone can clone an object and modify its properties in one expression, and PhpStorm helps you detect the syntax that can be updated in your code and replace it.
In addition, PhpStorm 2025.3 ensures the proper usage of clone when it is promoted to a function and used as a callable.
Closures in constant expressions
PHP 8.5 allows you to use closures in the constructs that previously accepted only constant expressions. PhpStorm supports this with code checks and quick-fixes that ensure the proper usage of closures as attribute parameters, constants and class constants, or default values of properties and parameters.
Pipe operator
PHP 8.5’s pipe operator (|>) takes the return value of the left-side callable and passes it to the right-side callable, thus chaining multiple callables together.
PhpStorm ensures that the pipe operator is used correctly in your code, highlighting invalid callables in a pipe chain, improper syntax, incompatible types, or type mismatches.
PHP 8.5 introduces a new #[NoDiscard] attribute, which indicates that a function’s or method’s return value cannot be ignored. PhpStorm adds support for this attribute as well.
Other PHP 8.5 features
Here are a few more PHP 8.5 features now supported in PhpStorm:
Final property promotion, where a __constructor parameter marked with final is considered promoted and treated like other promoted properties.
Attributes for constants that are allowed to target the constants declared in their own statements.
Generics improvements: support for nested generic types
PhpStorm 2025.3 further advances support for type annotations in PHPDoc comments. Now it can infer the variable type in nested generic type declarations such as Inner<Inner<DateTime>>.
To display the type, place the caret at the required variable or expression and press Ctrl+Shift+P or select View | Type info in the main menu.
Laravel
Out-of-the-box Laravel support
A while ago, we announced that the Laravel Idea plugin had been made free for PhpStorm users. In PhpStorm 2025.3, we’ve bundled the Laravel Idea plugin into the IDE. Now PhpStorm offers full-featured support for every aspect of Laravel development out of the box, with no need to install additional plugins.
The developer of Laravel Idea, Adel Faizrakhmanov, will keep working on new Laravel support features, which will now be delivered as part of the PhpStorm IDE.
When debugging browser tests with the ->debug() method in PhpStorm, use the Continue Test Run button on the test results toolbar to resume a paused test.
JetBrains AI
JetBrains AI is evolving to give you more choice, transparency, and flexibility in how you use AI inside your IDE. You can work with Claude Agent and Junie from a single chat interface, track your AI credits directly in the IDE, and soon you’ll be able to connect your own AI provider keys with BYOK.
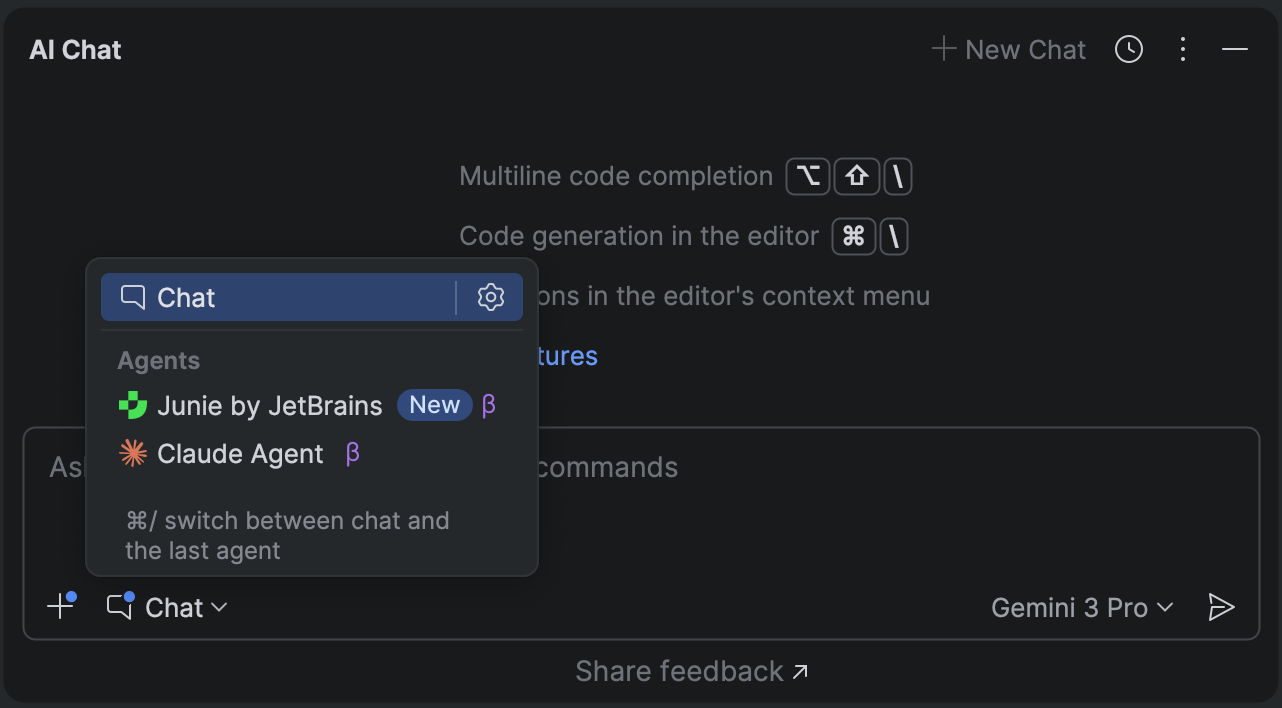
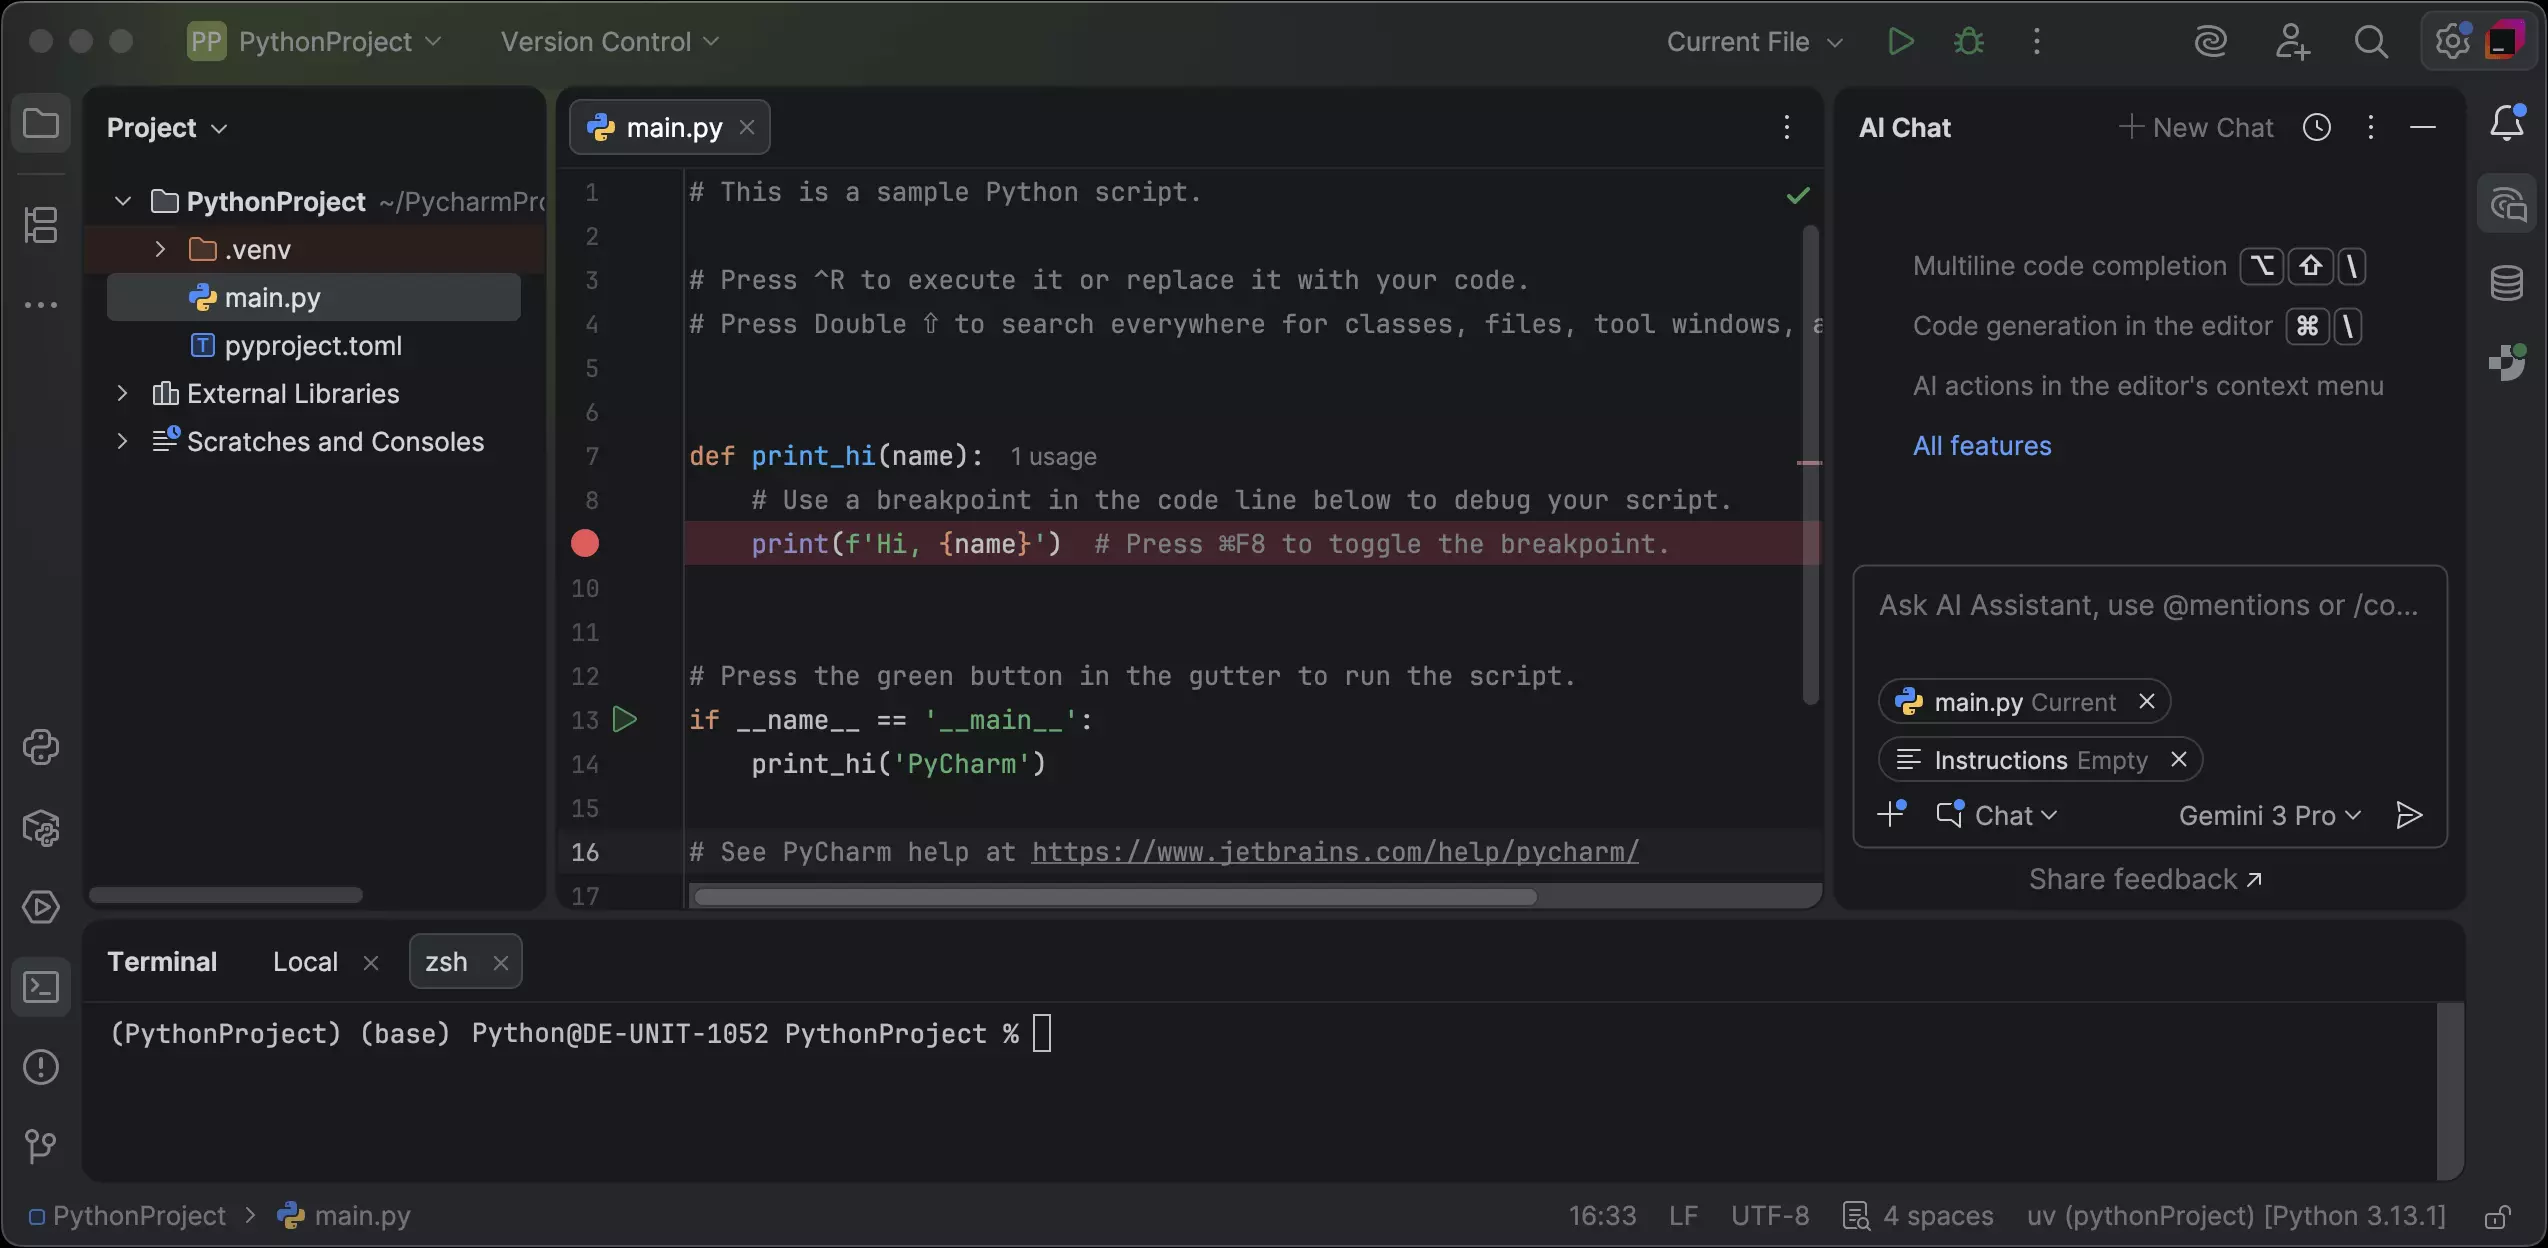
Claude Agent has become the first third-party AI agent natively integrated into JetBrains IDEs. With its addition, JetBrains introduces a multi-agent experience that brings even more flexibility and power to your development workflow. Now that Claude Agent and Junie are available in the same chat interface, you can switch between agents seamlessly and get the right kind of assistance for every task.
The easiest way to start working with any agent now is to launch it directly from the AI chat. However, the Junie plugin will still be available for you if you prefer it this way.
Bring Your Own Key: More freedom and control Coming soon
BYOK will let you connect your own API keys from OpenAI, Anthropic, or any OpenAI API-compatible local model, giving you more flexibility and control over how you use AI in JetBrains IDEs. You’ll be able to use your favorite AI chat and agents without logging into JetBrains AI, which is perfect for developers who already have API keys and want to work with their preferred provider. Learn more in this blog post.
The feature is expected to roll out in the upcoming 2025.3.x releases.
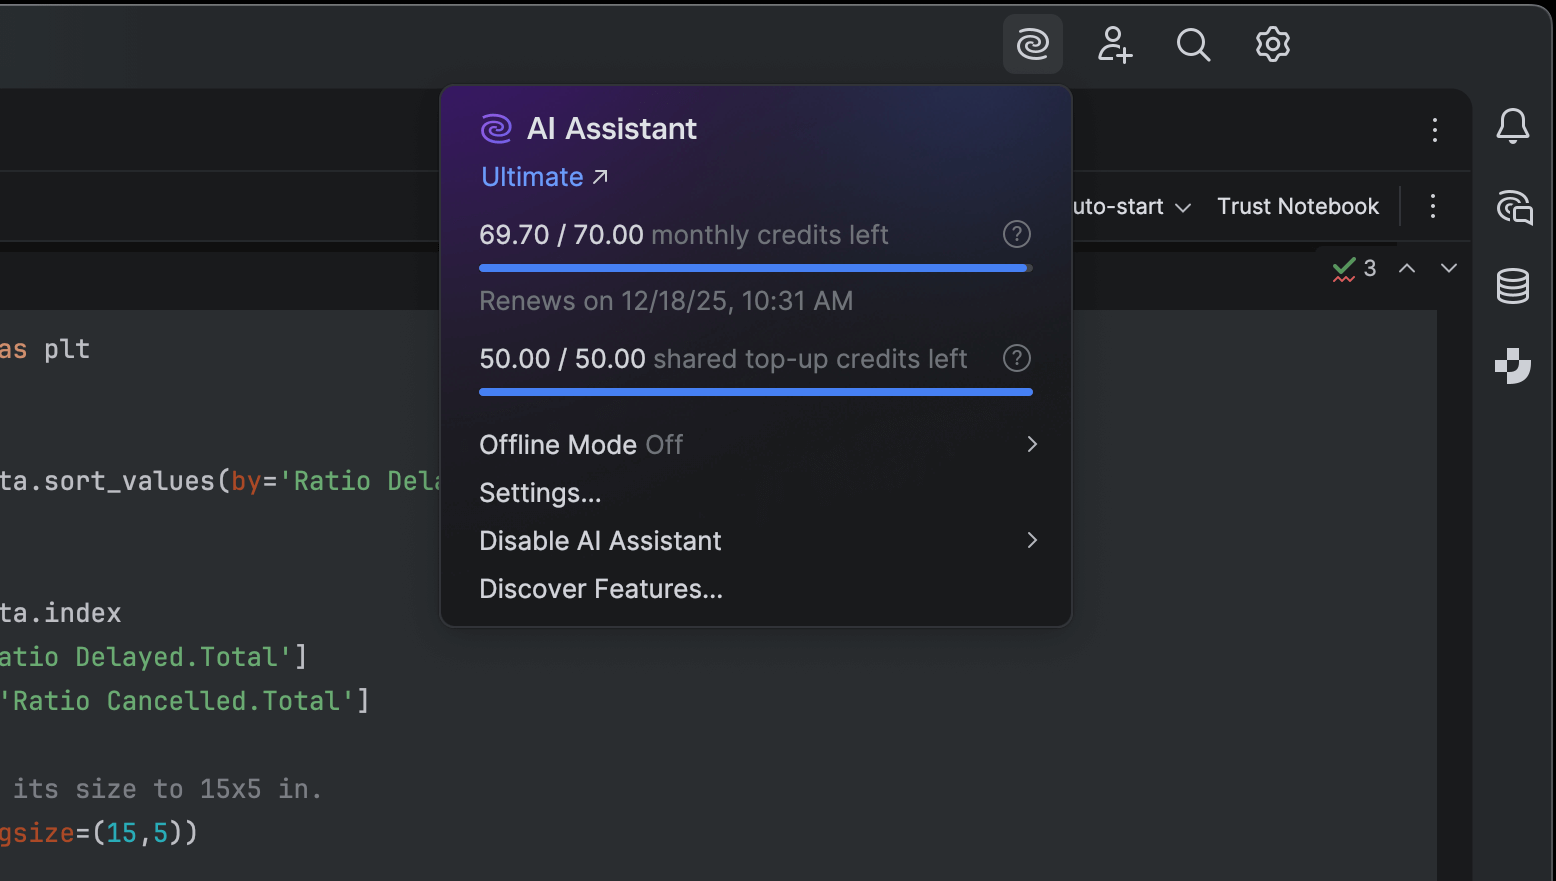
Transparent AI quota tracking in IDE
You can now view your remaining AI credits, renewal date, and top-up balance directly inside your IDE, and if you run out of credits, you can initiate a top-up from there as well.
This update makes it easier to monitor and manage your AI resources – bringing more clarity and convenience to your AI usage.
In PhpStorm 2025.3, we’ve improved the way MCP server configurations are imported from other tools. When you first open a project with an mcp.json file in it, PhpStorm will automatically fetch the configured MCP servers and prompt you to view or enable them in the IDE settings.
We’ve improved Laravel Boost setup as well. Now PhpStorm does more than just pick the server configuration automatically – it also suggests enabling the server when it is disabled.
Disclaimer: some AI features may work differently or be unavailable in your region. Learn more here.
Databases
A farewell to consoles
Starting from the 2025.3 release, PhpStorm and other JetBrains IDEs with database support will stop using the term query console. From now on, we’ll use query file – because consoles were essentially files all along, and it’s time the UI reflected that. We’ve also made the workflow simpler, more discoverable, and more consistent.
PhpStorm now works with cloud database providers! In the new version, you can connect your AWS, Azure, and Google Cloud accounts to the IDE, browse the list of databases you have in those accounts, and choose the ones you’d like to connect to. PhpStorm will create new data sources and fill in all the connection details.
To connect to your cloud account, click New | Data Source from Cloud Provider and select the cloud provider.
The Islands theme is now the default look in PhpStorm. More than just a visual refresh, it reflects our commitment to providing the ultimate comfort throughout your development experience.
Instantly recognizable tabs, improved in-editor contrast, clear separation between working areas, and rounded corners create a soft and balanced environment that was designed around one goal: helping you stay focused and code with ease. Learn more in this blog post.
Completion in the terminal
The terminal is a tool developers use every day. Now, you can be even more productive in it, thanks to completion that suggests commands, option names, and path parameters. Don’t remember the exact name of a Git branch? Need a long file path? Forgot a specific switch?
Just start typing and PhpStorm will suggest parameters for the given command.
Fleet started as our attempt to explore a new generation of JetBrains IDEs, developed in parallel with those based on the IntelliJ Platform. Over time, we learned that having two general-purpose IDE families created confusion and diluted our focus. Rebuilding the full capabilities of IntelliJ-based IDEs inside Fleet did not create enough value, and positioning Fleet as yet another editor did not justify maintaining two overlapping product lines.
Starting December 22, 2025, Fleet will no longer be available for download. We are now building a new product focused on agentic development.
Fleet vs. IntelliJ-based IDEs
For many years, JetBrains focused on IntelliJ-based IDEs, which served as the primary environment for most developers. When we started Fleet, our goal was to explore a lighter architecture, a modern UI model, and a more flexible environment free from decades of legacy architectural decisions. It was a worthwhile experiment, and from both a technical and design perspective, it was a success. Many Fleet components now power JetBrains IDEs, and several UX and UI concepts have been adopted throughout our product lineup.
However, Fleet did not succeed as a standalone product. We could neither replace IntelliJ IDEA with Fleet nor narrow it into a clear, differentiated niche. We suddenly had two IDE families aimed at largely the same audience, with overlapping purposes. Users kept asking which one to choose, and the answer was never short or satisfying. Two similar products created friction and raised questions about ownership and long-term investment.
What we tried with Fleet
We initially positioned Fleet as a lightweight multi-language IDE and then as an editor with smart coding assistance. For some time, we seriously considered whether Fleet could become a second flagship IDE family alongside IntelliJ-based tools. User feedback was consistent: If you already work with IntelliJ IDEA, Rider, WebStorm, PyCharm, or any other JetBrains IDE, switching to Fleet required a strong reason – and Fleet did not offer enough value to justify the transition from IDEs you already know and love.
When AI matured, we explored Fleet as an AI-first editor. We built new workflows and conducted large-scale user research to understand potential differentiation and long-term value. We confirmed that another AI editor would not stand out, especially in a market filled with AI-first VS Code forks. It became increasingly clear that the best path forward was to strengthen AI workflows in our existing IDEs. However, rapid progress in AI revealed a different niche where Fleet fits much more naturally.
What this new niche looks like
While we worked on AI within the editor, a new development workflow began to take shape. Developers started delegating meaningful tasks to agents – updating tests, cleaning code, refactoring modules, exploring unfamiliar code paths, and even building new features. These tasks run asynchronously and return full patches. The developer doesn’t write the code themselves. They guide the agent and review its output. This is fundamentally different from the classic IDE workflow, which is based on immediate feedback, synchronous control, and a single stable local state.
The agentic loop relies on structured task definition, context assembly, multiple asynchronous runs, isolated execution, and review-first workflows. Combining them in a single tool results in a disjointed experience, so the Fleet team chose to stop competing with IDEs and code editors and instead build a product focused on agentic workflows. This led to a pivot to a new product: an agentic development environment. Based on the Fleet platform, this new environment will ship as a new product with a new name. The technology, team, and long-term direction continue – but the product identity and the target market evolve.
What changes for current Fleet users
We will stop releasing any further updates for Fleet. Distribution will also end, so you will no longer be able to download Fleet from the Toolbox App or other channels starting December 22, 2025.
If you have already downloaded Fleet, you can continue using it. However, some features that rely on our server-side services, including AI Assistant, may stop working over time.
We will continue to share updates about the new product as the work progresses. Stay tuned!
We’re excited to announce that PyCharm 2025.3 is here! This release continues our mission to make PyCharm the most powerful Python IDE for web, data, and AI/ML development.
It marks the migration of Community users to the unified PyCharm and brings full support for Jupyter notebooks in remote development, uv as the default environment manager, proactive data exploration, new LSP tools support, the introduction of Claude Agent, and over 300 bug fixes.
As announced earlier, PyCharm 2025.2 was the last major release of the Community Edition. With PyCharm 2025.3, we’re introducing a smooth migration path for Community users to the unified PyCharm.
The unified version brings everything together in a single product – Community users can continue using PyCharm for free and now also benefit from built-in Jupyter support.
With a one-click option to start a free Pro trial, it’s easier than ever to explore PyCharm’s advanced features for data science, AI/ML, and web development.
Jupyter notebooks are now fully supported in remote development. You can open, edit, and run notebooks directly on a remote machine without copying them to your local environment.
The Variables tool window also received sorting options, letting you organize notebook variables by name or type for easier data exploration.
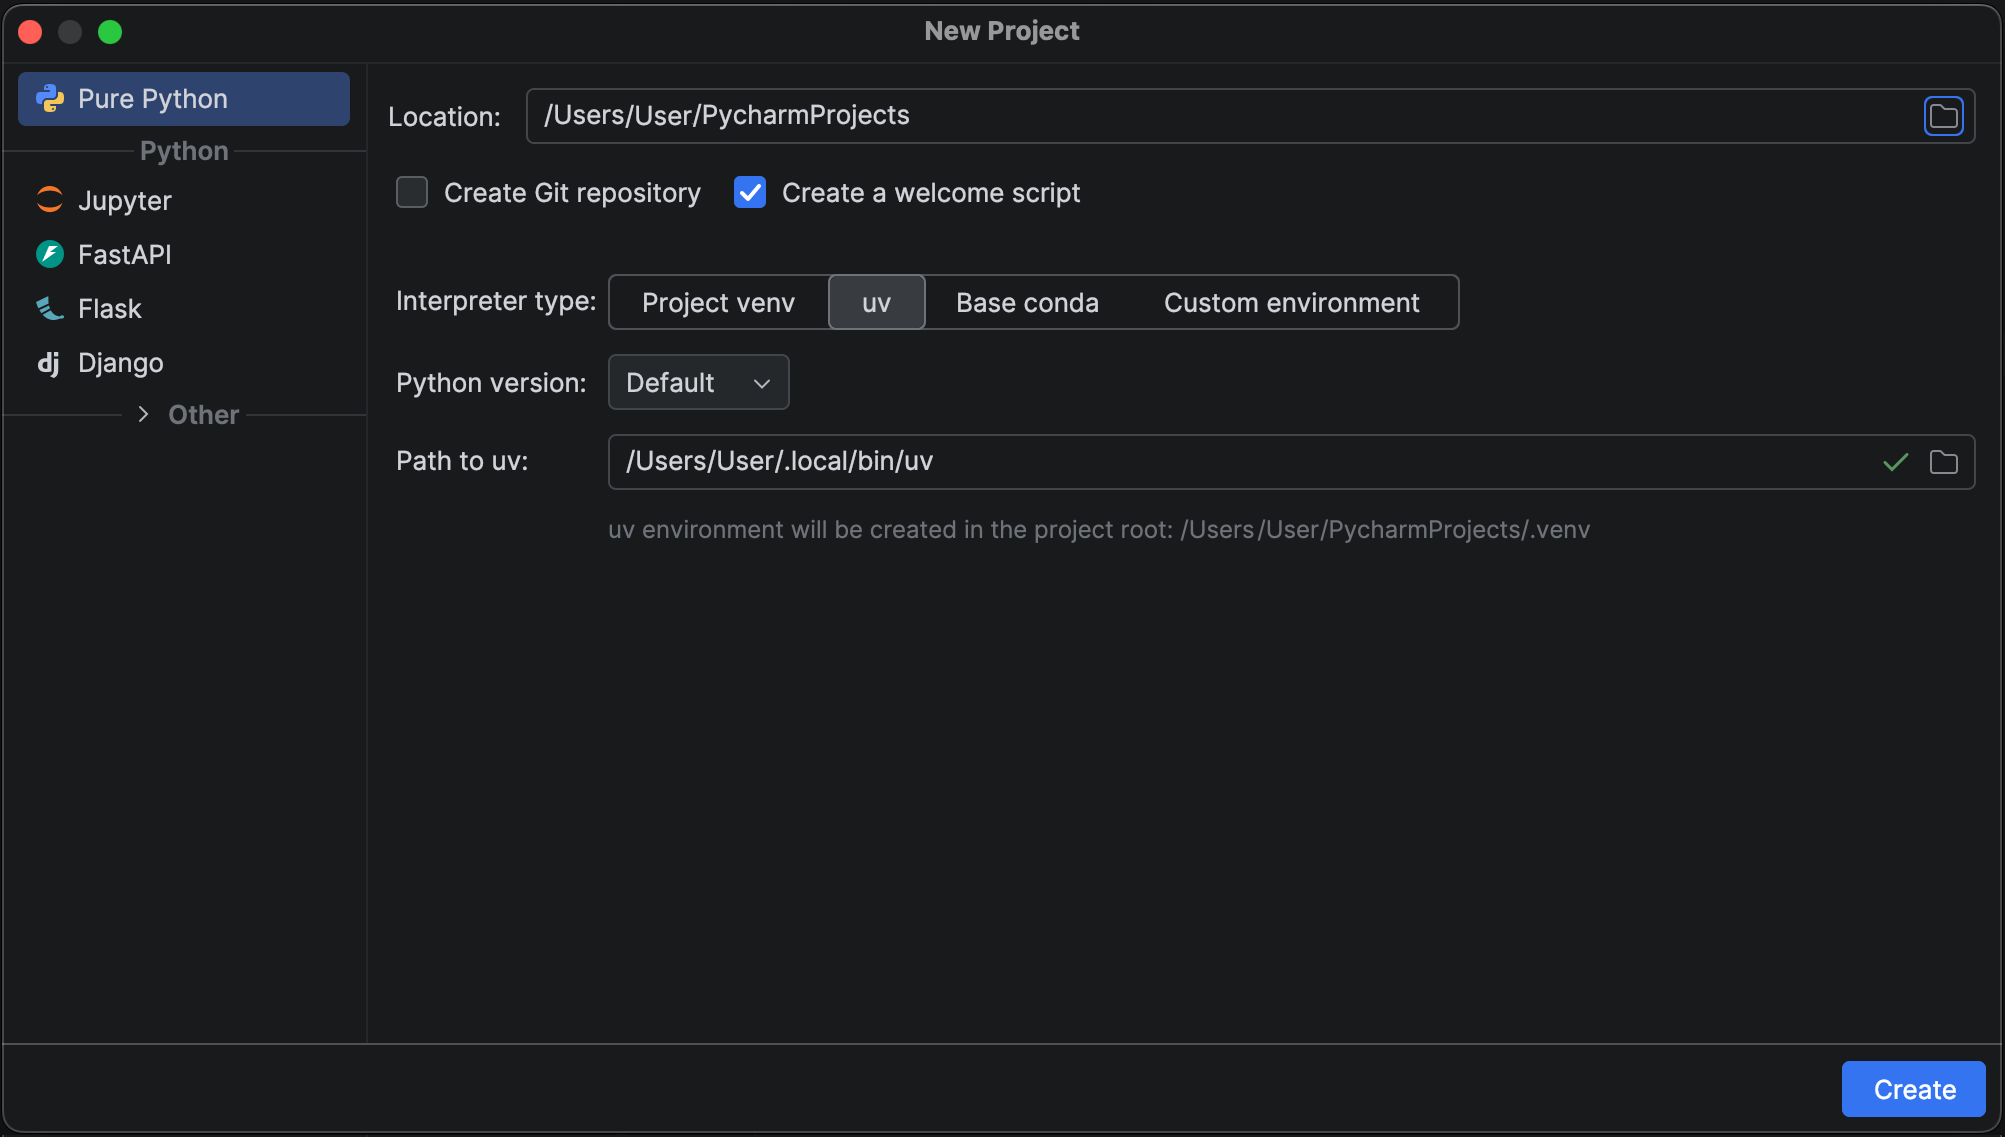
When uv is detected on your system, PyCharm now automatically suggests it as the default environment manager in the New Project wizard.
For projects managed by uv, uv run is also used as the default command for your run configurations.
Proactive data exploration Pro
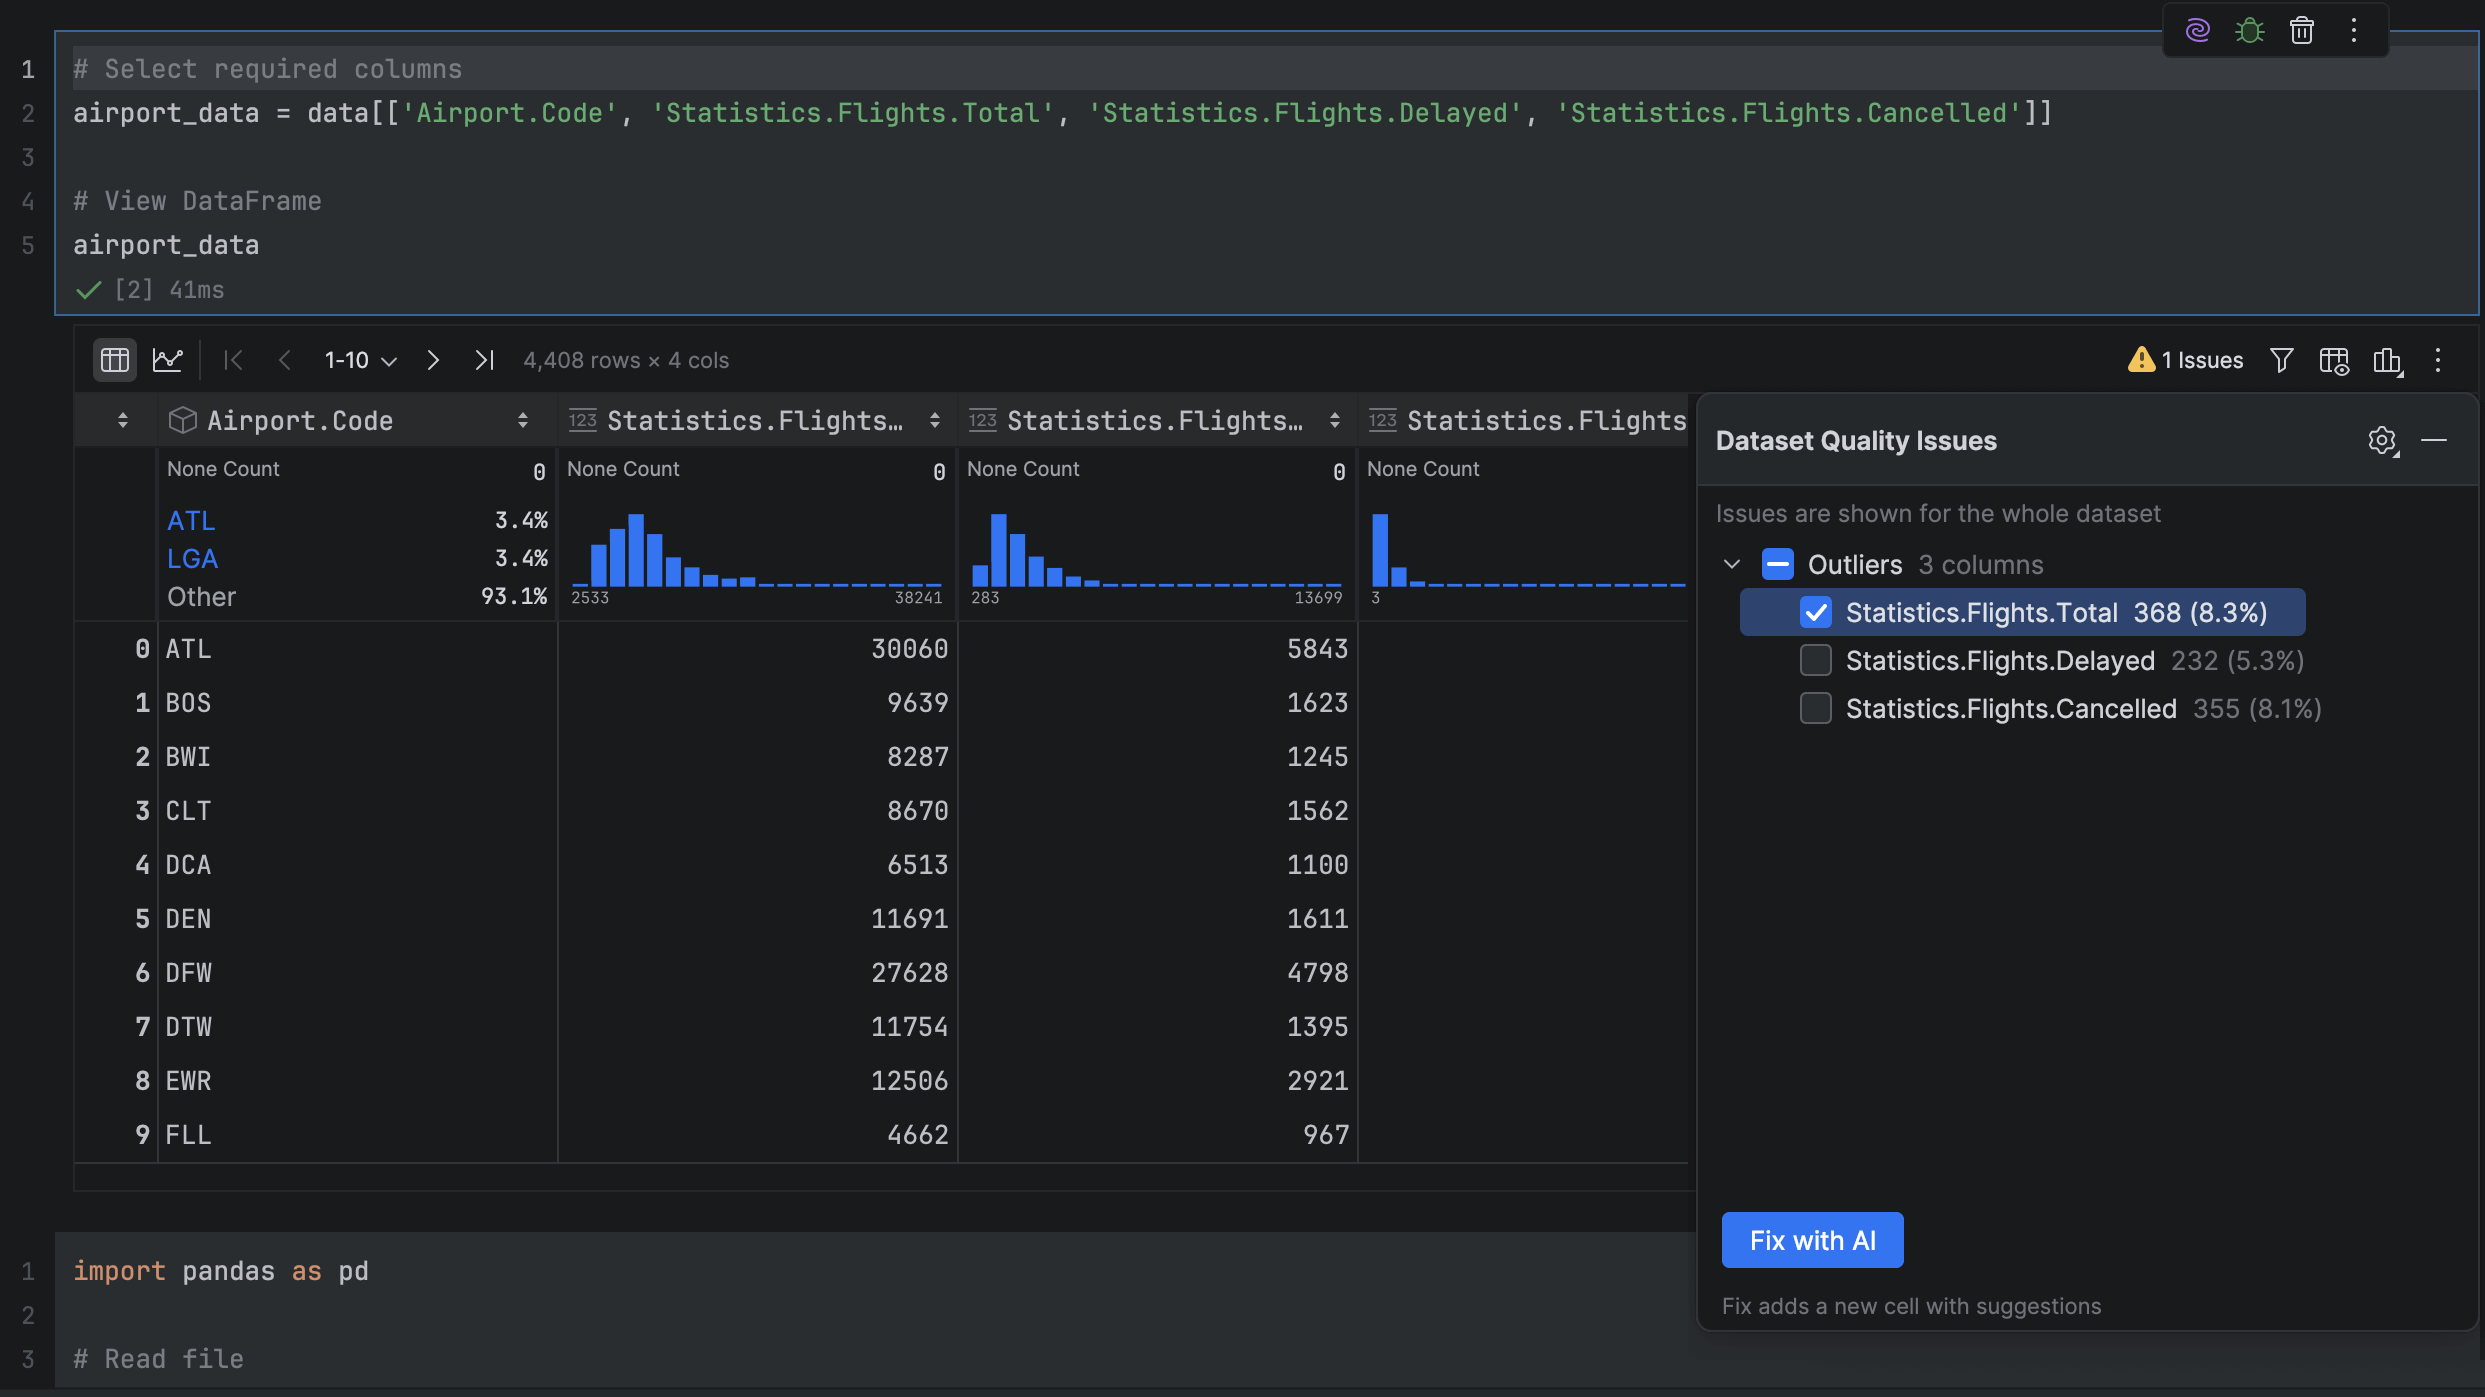
PyCharm now automatically analyzes your pandas DataFrames to detect the most common data quality issues. If any are found, you can review them and use Fix with AI to generate cleanup code automatically.
The analysis runs quietly in the background to keep your workflow smooth and uninterrupted.
Support for new LSP tools
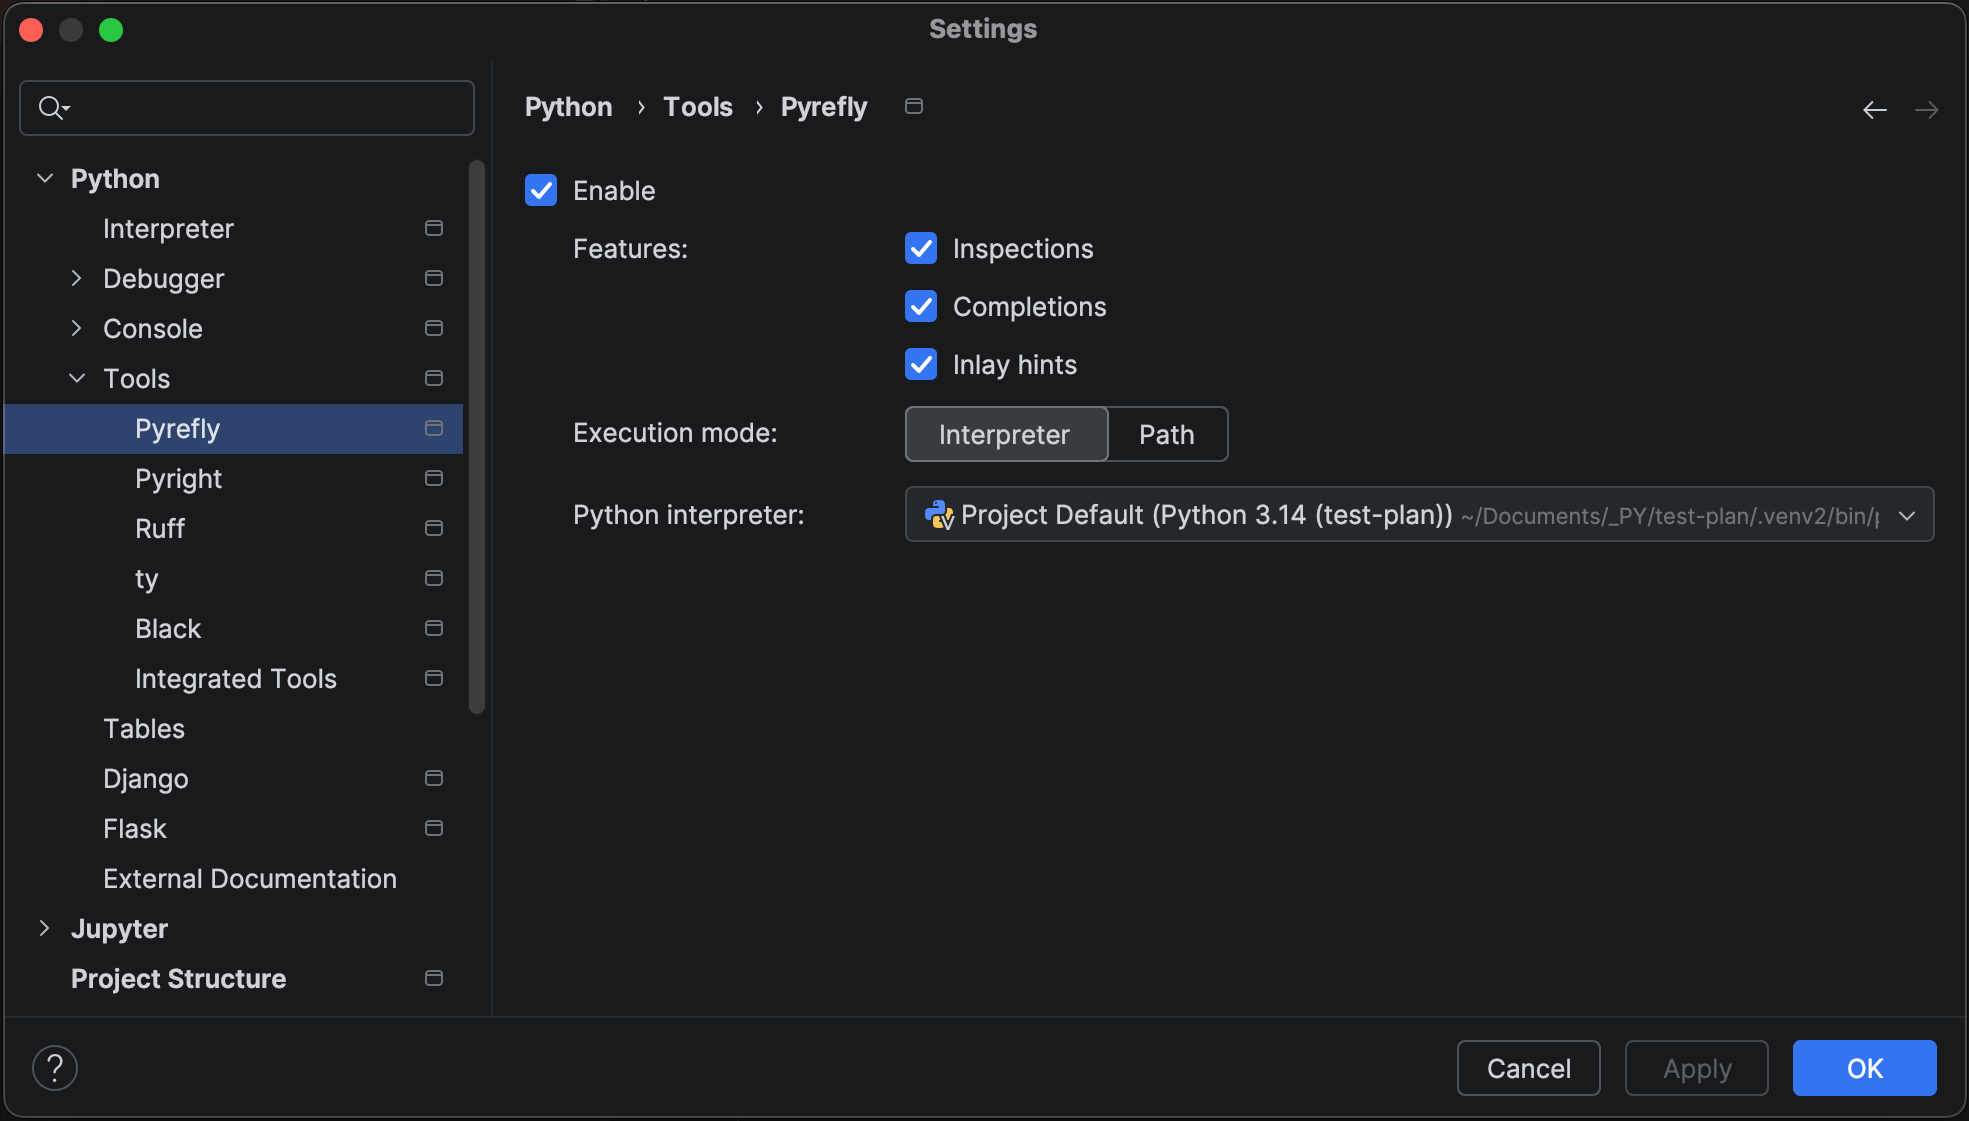
PyCharm 2025.3 expands its LSP integration with support for Ruff, ty, Pyright, and Pyrefly.
These bring advanced formatting, type checking, and inline type hints directly into your workflow.
Bring Your Own Key (BYOK) is coming soon to JetBrains AI
BYOK will let you connect your own API keys from OpenAI, Anthropic, or any OpenAI API-compatible local model, giving you more flexibility and control over how you use AI in JetBrains IDEs.
Monitoring and managing your AI resources just got a lot easier, as you can now view your remaining AI Credits, renewal date, and top-up balance directly inside PyCharm.
UIX changes
Islands theme
The new Islands theme is now the default for all users, offering improved contrast, balanced layouts, and a softer look in both dark and light modes.
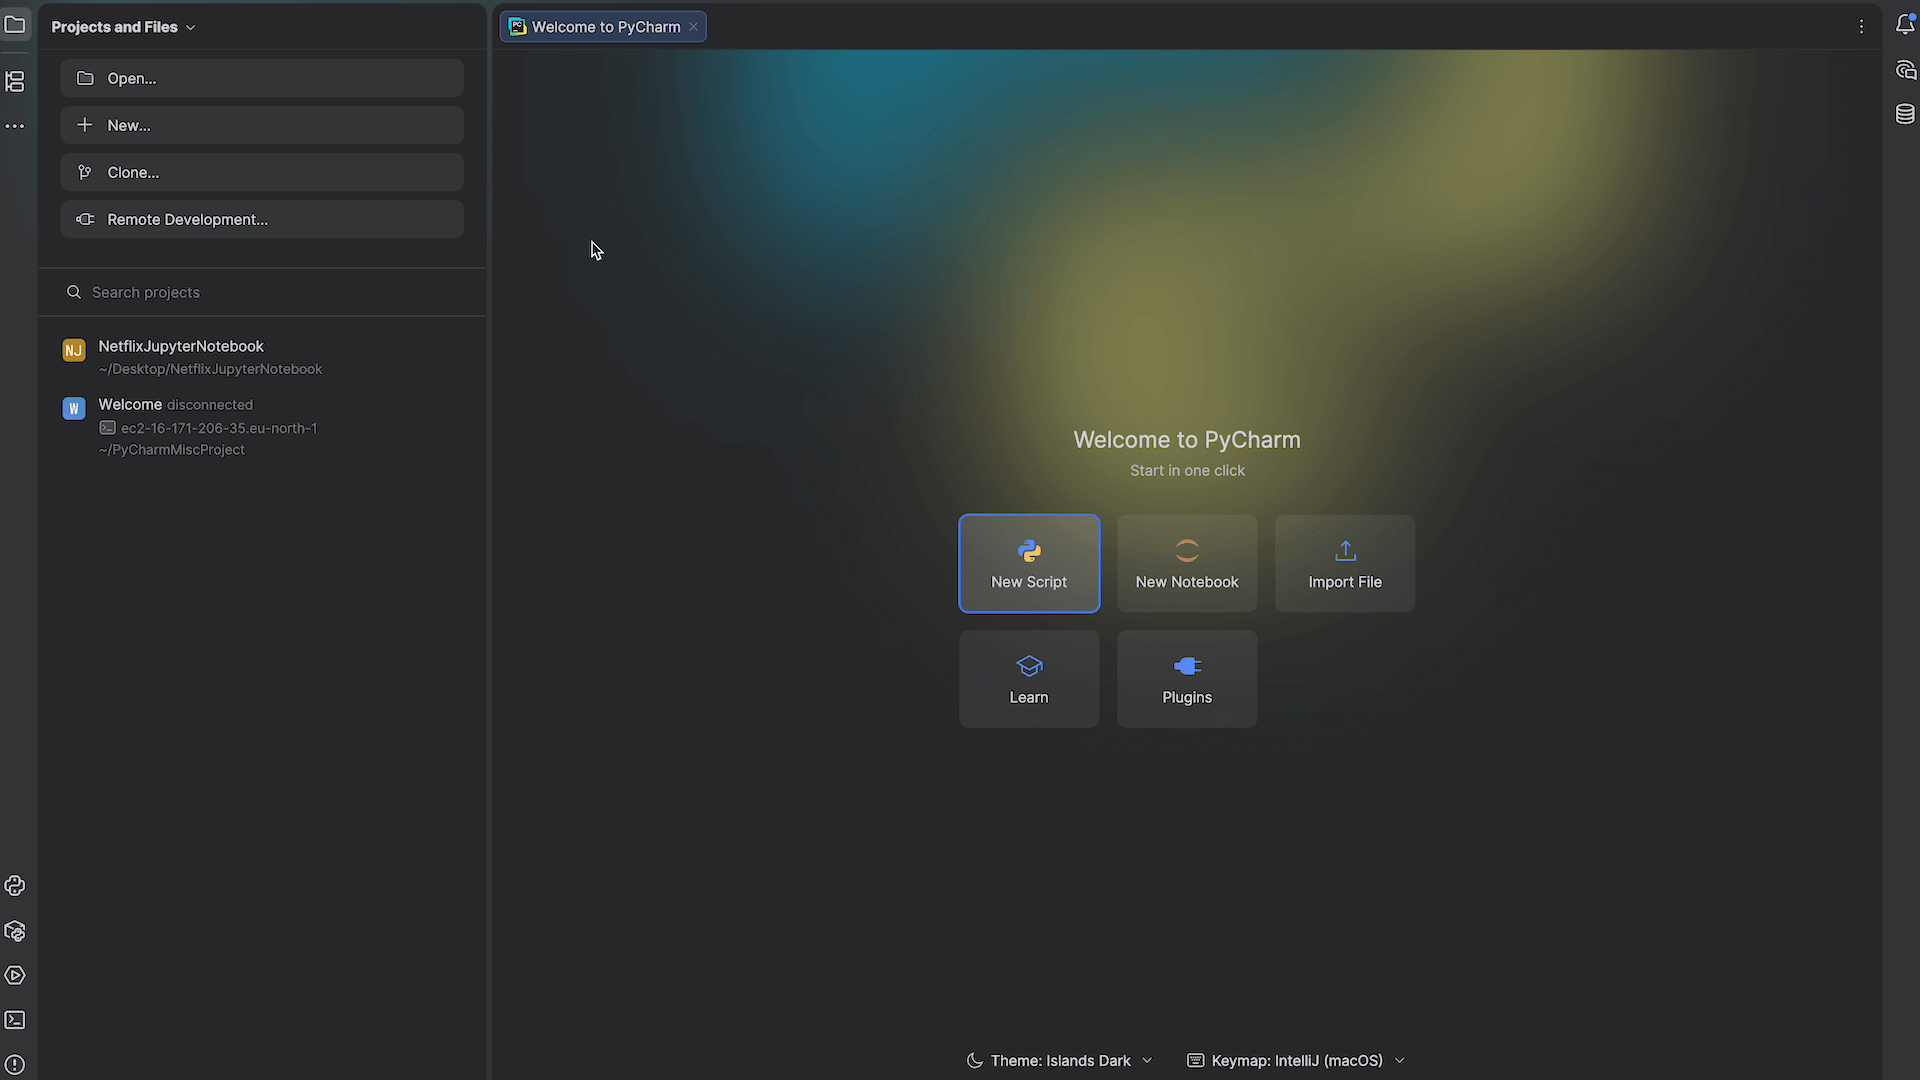
New Welcome screen
We’ve introduced a new non-modal Welcome screen that keeps your most common actions within reach and provides a smoother start to your workflow.
Looking for more?
Visit our What’s New page to learn about all 2025.3 features and bug fixes.
Read the release notes for the full breakdown of the changes.
If you encounter any problems, please report them via our issue tracker so we can address them promptly.
We’d love to hear your feedback on PyCharm 2025.3 – leave your comments below or connect with us on X and BlueSky.
At JetBrains, we’re always listening closely to our users, ensuring that the products we ship provide a consistent and intuitive user experience. One area for improvement that we both noticed is the presence of two separate UIs – one for Junie, the coding agent by JetBrains, and one for the JetBrains AI chat.
We’ve now taken the first step toward uniting the two interfaces, making Junie a first-class JetBrains AI citizen. Starting today, this functionality is available in Beta, meaning you can select Junie right from the AI chat and start using it there.
Our intention is to eventually deprecate and fully merge the separate Junie interface into the AI chat, leaving a single space for you to use Junie and other AI functionality. Your feedback during this stage is especially important! Try the new unified experience and let us know what you think – your input will help us make sure it best serves your needs.
We expect the user experience provided by the current Beta version of Junie inside the AI chat to be on par with that of the plugin version. However, you can expect more improvements in the future.
Why did we have two separate UIs in the first place?
When coding agents first appeared, we explored multiple R&D directions in parallel to identify the most effective IDE experience. That exploration led us to develop two chat interfaces, each testing a different approach.
With the industry now converging on clearer UX standards for coding agents, we’re unifying these two interfaces into a single, consistent one. It’s a natural evolution that allows us to streamline the Junie experience without compromising on innovation.
Transition period
The standalone Junie plugin will remain available to help you adjust to the change at your own pace. Your existing settings – active models, Action Allowlist, MCP server, and more – will be retained and gradually merged into the unified interface. In the first iteration, Junie and the AI chat will use separate settings – changes in the AI chat won’t affect Junie, while updates in Junie will apply to both the standalone plugin and the chat version. We’ll notify you in advance of any further changes to come and do our best to make the transition as smooth as possible.
How to try it
Open the AI chat in your IDE.
Choose Junie from the agent selector.
Run a prompt – the agent will then download and be installed automatically.
If you haven’t installed the AI chat yet, do so by following the steps in this installation guide.
What’s next?
We’ll continue to integrate Junie’s features into the unified interface and refine the UX to ensure that AI tools in JetBrains IDEs work seamlessly together.
Your feedback matters! Tell us which AI use cases are most important for you and what you’d like to see next by submitting a feature request. This helps us ensure our priorities are aligned with those of our users.
For hardcore Junie fans, our Discord is still open. Join it to get all the latest updates, discuss your experiences, and share your feedback with the Junie team and community.
This article was written by an external contributor.
Michael Nyamande
A digital product manager by day, Michael is a tech enthusiast who is always tinkering with different technologies. His interests include web and mobile frameworks, NoCode development, and blockchain development.
Kubernetes is a container orchestration system for deploying, scaling, and managing containerized applications. If you build services on the Java virtual machine (JVM), you likely know that most microservices run on Kubernetes. Kubernetes has become the de facto standard for running containerized microservices at scale. However, Kubernetes is famously complex, with many new concepts (Pods, Deployments, Services, etc.) to master, and thus, has a steep learning curve.
This tutorial helps ease that complexity for JVM developers. It focuses on what you need to ship a Kotlin or Java Spring Boot app to a cluster, step-by-step, with simple explanations and runnable examples.
You’ll learn the basics of Kubernetes by deploying a Kotlin Spring Boot application onto a Kubernetes cluster. You’ll also cover what deployment and services are, how to manage configurations using ConfigMaps and Secrets, and what the best practices are for running JVM applications on Kubernetes.
Prerequisites Before diving in, make sure you have the following:
Docker: Install and run this locally. Docker builds a container image of your app.
Set Up the Sample Kotlin Spring Boot App (Optional)
While you can use an existing Kotlin Spring Boot application for this tutorial, if you want to follow along with the code used here, you can create a new project with Spring Initializr. If you’re using an existing Spring Boot application, you can jump directly to the next section.
Select Kotlin as your language and Java 21 as our runtime. Make sure to add Spring Web, Spring Data JPA, and H2 as dependencies. You’ll use Spring Web to create REST endpoints, Spring Data JPA to connect to a PostgreSQL database, and H2 (an in-memory database) to test the database logic locally:
After creating and downloading the project, locate your main application file. If you used Spring Initializr, the file will be named after your application with Application.kt appended— for example, a project named Demo will have a file called DemoApplication.kt. Add the following code to create a @RestController that returns Hello World, which will let you verify the deployment is working:
import org.springframework.boot.autoconfigure.SpringBootApplication
import org.springframework.boot.runApplication
import org.springframework.web.bind.annotation.GetMapping
import org.springframework.web.bind.annotation.RestController

@SpringBootApplication
class DemoApplication

fun main(args: Array<String>) {
    runApplication<DemoApplication>(*args)
}

@RestController
class HelloController {
    @GetMapping("/hello")
    fun hello(): String = "Hello World"
}
The entire Spring Boot app and REST controller fit in just a few lines, thanks to Kotlin features like type inference and single-expression functions.
Containerize a JVM App Using Docker
To deploy your application to Kubernetes, you need to initially package it into a container image using Docker. Create a Dockerfile in the project root:
FROM openjdk:21-jdk-slim

WORKDIR /app

# Copy the JAR file from builder stage
COPY build/libs/*-SNAPSHOT.jar app.jar

# Expose port 8080
EXPOSE 8080

# Run the application
ENTRYPOINT ["java", "-jar", "app.jar"]
This Dockerfile uses a lightweight Java 21 base image, copies in the built JAR file, and runs it. Kotlin and Java interoperability means the Spring Boot JAR runs just like any Java app in the container.
To build the image, you initially need to create a JAR file with gradle build or mvn clean package, depending on which build manager you’re using. If using Maven, update the Dockerfile to use target/*.jar instead of build/libs/*-SNAPSHOT.jar.
After that, build the image:
docker build -t kotlin-app:latest .
Before you can push the image to Docker Hub, you need to execute this command to log in:
docker login
Note that you may be prompted to enter your Docker Hub credentials to complete the login step.
Next, push the image to Docker Hub or another registry so your Kubernetes cluster can access it:
docker tag kotlin-app:latest YOUR_DOCKERHUB_USER/kotlin-app:latest
docker push YOUR_DOCKERHUB_USER/kotlin-app:latest
Deploy the Application to a Kubernetes Cluster
To run your application on Kubernetes, you need to tell Kubernetes how to configure and run it. You do this using manifest files, which are typically written in YAML. These files declaratively define the desired state of your application in the cluster. For a basic deployment, you need two key Kubernetes objects: a Deployment manifest and a Service manifest.
Add the Deployment Manifest
A Deployment manages replicated Pods and handles rolling updates. A Pod is Kubernetes’s smallest unit that runs your container. Deployments ensure your specified number of Pods stay running and update them safely without downtime.
Create a file named k8s/deployment.yaml that defines your Deployment so that Kubernetes can run the application:
spec.replicas: 1 tells Kubernetes how many instances of the application you want running.
spec.selector.matchLabels is how the Deployment knows which Pods to manage. It looks for Pods with the label app: kotlin-app.
spec.template is the blueprint for the Pods. It defines the container(s) to run inside the Pod.
spec.containers.image specifies the Docker image to pull.
spec.containers.ports.containerPort informs Kubernetes that your application inside the container listens on port 8080.
Include the Service Manifest
While a Deployment ensures your Pods are running, those Pods are ephemeral; each time they restart, they get a new internal IP address. A Service solves this by acting as a stable entry point with a fixed IP and DNS name, automatically routing traffic to the Pods identified by its label selector. This guarantees that even if Pods restart or change IPs, traffic still reaches the intended application.
Create a file named service.yaml in the k8s folder:
spec.selector must match the labels of the Pods (app: kotlin-app). This is how the Service knows where to send traffic.
spec.ports maps the Service’s port (port: 8080) to the container’s port (targetPort: 8080).
spec.type: NodePort exposes the application on a static port on each node in the cluster, making it accessible for local development with Minikube. In a cloud environment, you typically use a LoadBalancer.
Deploy to a Cluster Using Minikube
To deploy this to a cluster, run Minikube with minikube start and apply the manifests using the following commands:
After applying, you can verify that everything is running using kubectl get pods. You should then get a result like this:
NAME                                    READY   STATUS    RESTARTS      AGE
kotlin-app-deployment-744476956-bfwg4   1/1     Running   0             20s
To access your application, run minikube service kotlin-app-service. This command finds the service in Minikube and opens a URL in your host browser via port forwarding. The output shows an IP and port (eghttp://192.168.49.2:30000). Visiting http://<minikube-ip>:30000/hello should call your Spring app and return the Hello World message.
Extend the Kotlin App with ConfigMap
Hard-coding configuration in images forces rebuilds for simple changes and risks exposing sensitive data. Kubernetes provides ConfigMaps for non-sensitive configuration and Secrets for sensitive data, like passwords.
To demonstrate ConfigMaps, replace the hard-coded greeting with one that can be set through a configuration.
To do this, update the controller to read the message from an environment variable:
@RestController
class HelloController {
    @Value("${greeting.message:Hello}")
    lateinit var greetingMsg: String

    @GetMapping("/hello")
    fun hello(): String = greetingMsg
}
This code snippet declares a variable greetingMsg, which pulls a value from the environment or defaults to "Hello" if it doesn’t find the specific environment variable.
Now, create a configmap.yaml file in the k8s folder; this sets the greeting configuration so you can change it without rebuilding the image:
apiVersion: v1
kind: ConfigMap
metadata:
  name: kotlin-app-config
data:
  application.properties: |
    greeting.message=Hello from a ConfigMap!
To use this ConfigMap, you need to mount it as a volume into the Pod. This approach prevents configuration values from being accidentally logged in process lists and allows for configuration updates without restarting the Pod.
Additionally, ConfigMaps can store larger configuration files and support multiple configuration formats.
Update your k8s/deployment.yaml so that it uses the new ConfigMap that you defined earlier:
This manifest adds a volumes section that defines a volume named config-volume, which sources its data from the kotlin-app-config ConfigMap. It also adds a volumeMounts entry to the container specification, mounting this volume at /app/config. This setup allows Spring Boot to automatically detect and load the application.properties file from the /config directory, making it easy to manage configuration through Kubernetes.
The deployment also updates the image to an updated Docker image. Let’s create this image by rebuilding the application and creating a new Docker image with an updated tag (egv2). Then push it to your registry so Kubernetes can pull the latest version:
# 1) Rebuild the Kotlin app
./gradlew clean build            # Gradle
# or
mvn clean package                # Maven

# 2) Build a new Docker image with a new tag (v2)
docker build -t <your-username>/kotlin-app:v2 .

# 3) Push the image so the cluster can pull it (skip if using Minikube's Docker daemon)
docker push <your-username>/kotlin-app:v2
After pushing the new image, apply the new configmap.yaml and the updated deployment.yaml:
When your application needs to store and retrieve data, such as user accounts or business records, you need to manage persistent storage alongside your deployments. Kubernetes lets you run databases like PostgreSQL as managed Deployments, using persistent volumes for data durability and Secrets for credentials.
Let’s walk through deploying PostgreSQL and connecting it to your application.
To keep your credentials out of the container and enable safe injection into Pods, you need to define a Secret. A Kubernetes Secret is like a ConfigMap but intended for confidential info (passwords, tokens). Create postgres-secret.yaml to safely store the database credentials:
Creates a Service named postgres-service so your application can connect to the database using a stable DNS name.
Creates a Deployment that runs PostgreSQL, using the Secret for the password. It mounts /var/lib/postgresql/data to a volume (here, an emptyDir for simplicity). In production, you’d use a StatefulSet and a PersistentVolumeClaim to ensure data persists across Pod restarts and node failures.
Let’s also update the Kotlin app to connect to a PostgreSQL database. In this example, the app returns a custom greeting with the user’s details that it pulls from the database. You can use Spring Data JPA.
To connect to a PostgreSQL database and use JPA, you need to add the PostgreSQL Java Database Connectivity (JDBC) driver. The PostgreSQL driver is essential because it allows your application to communicate with the database running in Kubernetes. Add this to the dependencies block in your build.gradle.kts (or pom.xml if you’re using Maven) so it’s available at compile and runtime:
implementation("org.postgresql:postgresql")
For local development, the application uses H2 (which you added earlier as a dependency) as a lightweight option for testing without having to spin up a full PostgreSQL instance. The application interacts only with PostgreSQL when deployed to the Kubernetes cluster.
Create a file and name it User.kt. Use this to model the users table. Additionally, create a Spring Data JPA repository for database lookups:
import jakarta.persistence.*
import org.springframework.data.jpa.repository.JpaRepository
import org.springframework.stereotype.Repository

@Entity
@Table(name = "users")
class User(
    @Id
    @GeneratedValue(strategy = GenerationType.IDENTITY)
    val id: Long = 0,

    @Column(nullable = false)
    val name: String = "",

    @Column(nullable = false)
    val email: String = ""
)

@Repository
interface UserRepository : JpaRepository<User, Long> {
    fun findByName(name: String): User?
}
This snippet uses a Kotlin class to define a User entity. With Kotlin’s primary constructor syntax, you can declare mutable properties and initialize the object in a single definition, eliminating the need for boilerplate getters and setters required in Java entities. The snippet also defines a UserRepository that handles retrieving user details from the database.
Update the main controller with this GetMapping to return dynamic greetings based on username:
import org.springframework.web.bind.annotation.PathVariable

@RestController
class HelloController(private val userRepository: UserRepository) {

    @GetMapping("/hello")
    fun hello(): String = "Hello World"

    @GetMapping( "/hello/{name}")
    fun getGreeting( @PathVariable name: String = "world"): String =
        userRepository.findByName(name)
            ?.let { "Hello ${it.name}! Your email is ${it.email}."
            ?: "Hello $name! (User not found in database)"
}
This code injects the UserRepository into the Controller, allowing you to use it in the getGreeting method. This method returns the user’s name, along with their email, if the user exists in the database; otherwise, it outputs that the user wasn’t found. It uses Kotlin null safety features to produce a response without unsafe casts or a NullPointerException.
Next, update the src/main/resources/application.properties file with the PostgreSQL configuration:
The properties file configures Spring Data JPA settings. The hibernate.ddl-auto=update property enables automatic schema updates based on the @Entity definitions. This ensures that the User table is created at runtime if it doesn’t exist in the database. The spring.jpa.properties.hibernate.dialect=org.hibernate.dialect.PostgreSQLDialect tells hibernate to use PostgreSQL-specific queries.
To use the updated code, rebuild the application and Docker image with the changes, and update the Deployment to include the new environment variables as Secrets:
The configuration now contains a new env section that defines the database URL, username, and password from the Secrets definition. Spring uses these variables to connect to the database.
You can use minikube service kotlin-app-service to expose the application using an external IP address and navigate to <url>/hello/<username> to test. If the username doesn’t exist in the User table of the PostgreSQL database, you’ll get this output:
Hello <username>! (User not found in database)
Dynamic routing using Ingress
Sometimes you might want to roll out new features to a subset of users to test out how they work before a full production release, for example, during beta testing. To do this, you can have route traffic from your Kubernetes cluster to different services depending on certain rules. This is done via an Ingress. An Ingress sits at the edge of the cluster and routes HTTP traffic to Services based on rules like host, path, or headers.
In this example, you’ll route normal traffic to v2 of the application and route all traffic with a special header to the new v3 image. This allows you to test a new database feature on a subset of users or clients before a full, stable rollout.
To enable the NGINX Ingress controller in Minikube:
minikube addons enable ingress
Create a new v2-application file that contains the deployment and Service for the v2 version of the app, save it to k8s/v2-app.yaml:
The example above is similar to the Deployment and Service you set up earlier, except the Service type is now ClusterIP instead of NodePort. ClusterIP only exposes the Service within the cluster, making it accessible to other Pods but not directly from outside the cluster. In contrast, NodePort exposes the Service on a static port on each node’s IP, allowing external access. Since the Ingress handles external traffic routing, you use ClusterIP for internal communication between the Ingress and your Services.
With Services in place, you can add the Ingress resources. Create a new ingress file to receive traffic and direct it to the v2 version of your service, and save it as k8s/ingress.yaml:
To direct traffic to the v3 version of the application, you can utilize the canary annotations of the ingress controller. Create another ingress definition file and save it to k8s/ingress-canary.yaml:
The canary Ingress above uses NGINX’s canary annotations to implement header-based routing. When a request includes the header X-Client-Version: v3, the Ingress controller routes it to the kotlin-app-service (your v3 Pods). All other requests without this header go to kotlin-app-v2-service (your stable v2 Pods). This pattern lets you safely test new features in production with a subset of users, such as internal testers or beta users, while the majority of traffic continues to hit the stable version.
The canary: "true" annotation tells NGINX this Ingress is a canary rule, and the canary-by-header annotations define the matching logic.
Apply the new manifests using the following commands:
To test this out, run minikube tunnel to tunnel your minikube instance and make it available on localhost. To view our application you simply need to navigate to http://localhost/hello.
You can verify the routing behavior with curl. A request without the header goes to v2:
curl http://127.0.0.1/hello
This returns “Hello from a v2 stable app!”.
Running the same request with the X-Client-Version header, returns a response from v3 of the application:
$ curl -H "X-Client-Version:v3" http://127.0.0.1/hello
Hello World
You can also run the same on with /hello/{name} to verify it routes to v3 of the application:
curl -H "X-Client-Version:v3" http://127.0.0.1/hello/mike
Hello mike! (User not found in database)
You can find the tutorial’s full codebase on this GitHub repository. Switch between different branches to access different parts of the tutorial.
Follow These Best Practices
When deploying JVM-based microservices on Kubernetes, keep these practices in mind:
Configure Health Checks (Liveness and Readiness Probes)
Kubernetes needs to know if your application is healthy and ready to serve traffic. Health checks let Kubernetes direct traffic to healthy Pods and restart failing ones. Spring Boot Actuator provides /actuator/health/liveness and /actuator/health/readiness endpoints. Kubernetes sends HTTP requests to these endpoints, and non-2xx responses trigger container restarts.
Use ConfigMap and Secret Manifests
Do not hard-code environment-specific or sensitive data into your image. As you learned in this tutorial, it’s best to store non-sensitive configs (like feature flags, greeting messages) in ConfigMaps and more confidential data (passwords, tokens) in Secrets. This makes it easy to change settings without rebuilding containers.
Set CPU/Memory Resource Limits
Kubernetes allows you to set memory and cpu requests and limits. This prevents your app from consuming unlimited resources and impacting other pods. Without limits, a runaway JVM can crash your entire node or be killed unexpectedly, so proper limits ensure cluster stability and cost control.
Conclusion
This tutorial showed you how to containerize and deploy a Kotlin Spring Boot application on Kubernetes. Along the way, you learned important Kubernetes fundamentals, like Pods, Deployments, Services, ConfigMaps, and Secrets.